Duke's CEA Army BDU - Jungle Marine

Status
Not open for further replies.

PerniciousDuke

Sr Member
Member DIN
S128
I'm planning to create my first clone! The last one was ONI, so I guess that will make this the good clone?

I made a Military Counter Intelligence cosplay for ArcSol and now I will use the same process to create a Jungle Marine for me! :D

Some may recall this was part of a Bucket to Boot's series with TurboCharizard, original project found here:


I'd like something I can travel with, so I will be doing something similar to the character on the far left:
HR_UNSCLineup_Concept_1.jpg


I'm picturing the marines in Halo CE:A after first landing on the Halo. Maybe one of the guys with the camping pack, you remember the dead guys.


5l9Bb5y.pngPUjHwxR.png


Here's a great catalog of Reach/CEA Marines screenshots:


Items to purchase:
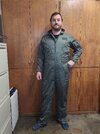
BDU Flight Suit (Sage L Regular) $90
Gloves (Coyote L) $16
Backpack Top Pouch (Army Green) $15
Backpack Side Pouch (Olive) 2 for $24
Backpack (green) $40
Belt and Pistol Hostlers (Black) $33
Patch (H3 Skull) (UNSC) 2 for $24
Knee pads (Black Tactical) Already Owned
Shows (black) Already Owned
Thigh Pouch (Coffee) Already Owned


Items to make:
Helmet (3d Print File - stock scale)
Chest (Foam File - scaled 704mm)
Shoulder Base (Foam File - scaled 239mm)
Shoulder (ZIP below - scaled 288mm)
Thighs (Andrew DFT - stock scale)
Flak Jacket (custom)
Boot Tops (Andrew DFT - stock scale)
Backpack/Bed Roll (Foam File)


<Will update above with links as I find things and files>
 

Attachments

  • gungnir-variant-PDO-FOAM.zip
    27.3 KB · Views: 176
Last edited:
First comes my favorite part...Shopping!

A lot of Halo Marine gear is very similar to gear already being made. Sometimes, just an extra strap or modification here and there can make it fit that futuristic look. I'm not going to buy everything right away, but I will probably spend a good several hours on Amazon and Google trying to find clothes, pouches and straps as close to what I need as possible. Plus professionally made items have less of a chance of falling apart compared too me making them all from scratch.

Here is pretty much everything I am going for:
Jungle Marine.png


Green BDU
I've been debating is the undersuit here green or some sort of camo??? After pouring through tons of references images I have settled on, who cares. What matters is will the final result look good and how obtainable is it? Most of the references images to me look like a flat green with occasional blackwash in spots. I'm thinking something like this sage flight suit would look good.
41p8uE3367L._AC_.jpg


Tan armor

There are not really many armor pieces: helmet, chest, two thighs and one shoulder. I think I will 3d print the bucket and foamsmith the rest. We'll get into the details later.


Camping Backpack

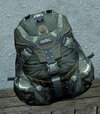
This one is tricky. I could fabricate the whole thing to look exactly like the game, but it likely wouldn't be able to hold up to much weight and there for would not function like a backpack should. I'm leaning towards buying a backpack base as close to this one as I can
HR_Army_Rucksack.jpg
Then buying a small molle pouch to put on top with a UNSC patch.

For the bed roll, I'm really struggling to find a bag the right size, shape and color, so I think I will fabricate that. Likely fill it with cotton so I can use it as a pillow for those long con weekends. I've also noticed the bottom of the backpack where the roll attaches looks like a thick rubber shell. I think I will make that out of foam and connect it to the roll so both things can connect to the backpack like a façade.

Finally the giant pouches on the side, I might just make out of foam too.

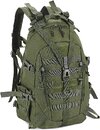
I'm thinking something like this will be a good base to build up from:
813Ta240iTL._AC_UX679_.jpg
Add on a nice UNSC bag on top, put some foam wings on the side, add a foam bottom with pillow roll and I think we'll have it pretty close!


Camp pack.png
 
Now..... my least favorite part! Seeing how fat I've become. :(
I'm not super happy with Armorsmith's proportions, but I'll be sure to double check every piece before I fabricate anything. This just gives me a chance to see if I like my creation.

1673660570543.png

1673661145234.png
 
Last edited:
What do you all like to see in build threads?

Do you just scroll through to the pictures?

Do you like the explanation of the steps?

Or an explanation of the thought process behind choices?

Sometimes I throw personal events in to share a little bit about myself, do you like that?
 
What do you all like to see in build threads?

Do you just scroll through to the pictures?

Do you like the explanation of the steps?

Or an explanation of the thought process behind choices?

Sometimes I throw personal events in to share a little bit about myself, do you like that?
1) Sometimes, it depends on how invested I am in the build. Often times I'll start by going straight to pics, but if something catches my eye I'll read go to the text to see if the person talks about how/why they did something that way.

2) Yes, if the pics drew me in I want to know more details about it. This is especially true if I'm wanting to do the same/similar build. I want to know how people did things.

3) The why's intrigue me a lot on people's builds. We all have different building methods and what works for one person doesn't always work well for the next. It's interesting to have someone say, "I tried 'x' but it gave me issues, so I did 'y' and it worked much better" or "I chose this material because I interpreted my reference photos like..."

4) Sure! If you want to share personal events go for it!

In general what I like to see in build threads is not only the individual's progress but also their thought process. I try to at least browse every thread, and get great ideas from what people post in their threads whether or not it's a build I'm doing or want to do.
 
What do you all like to see in build threads?

Do you just scroll through to the pictures?

Do you like the explanation of the steps?

Or an explanation of the thought process behind choices?

Sometimes I throw personal events in to share a little bit about myself, do you like that?
I'll admit, for the most part it's mainly the pictures that catch my eyes. There can often be a lot of threads to catch up on here, and I don't get time to read them all thoroughly, so I'll usually scan through text to get the general idea or see if there's anything new/extra intreguing to read. Anecdotes are welcome too, because it gives an insight to someone's workflow and processes.

But here's how I generally treat my threads: it's a journal. I don't write mine so much for other people to get wrapped up in like a good novel, I write it to keep track of what I've done in how much time, what mistakes I made, what I learnt, what's next, etc. This helps me reflect on all those things too. So I encourage people not to just write what might tickle everyone's fancy, but write their full journey, with the hope it's as useful for them as it is for someone else.
 
Now..... my least favorite part! Seeing how fat I've become. :(
I'm not super happy with Armorsmith's proportions, but I'll be sure to double check every piece before I fabricate anything. This just gives me a chance to see if I like my creation.
Not sure if you used the automatic setup but I'd highly recommend going through each measurement and checking them by just clicking on the individual sections of the mannequin. The armorsmith "Set up guide" is still a bit buggy.
 
Thanks for the feedback everyone!

PlanetAlexander , I too have always typed build logs for myself. Wanting to remember what brand/color of paint I used, or scaled the file to. Even the anecdotes are nice for me to remember, oh yeah this costume I build when my brothers graduated college!

I'm glad to share and have you all along for the ride.

I've made some progress, but first an anecdote! The reason this is all possible is due to a new PC! I have not been able to get much done at home without a computer. TurboCharizard was kind enough to donate his old PC. Unfortunately, somewhere in storage or transportation something failed and through replacing almost every piece I have completed a childhood dream of building my own PC!

20230115_202911.jpg


Since my last post I have:

1. Purchased all the purchasable pieces

2. Put in my order for 1/2" industrial foam.

3. Scaled/Printed all my foam files.

4. Successfully requested sewing machine use from another 405th Member!

5. Successfully recruited a friend to 3d Print me the helmet.

Now I have some foam left over so I'll start smithing some pieces.


And yes, Rock Lobbster , I did both. That was a very good recommendation though.
 
Now..... my least favorite part! Seeing how fat I've become. :(
I'm not super happy with Armorsmith's proportions, but I'll be sure to double check every piece before I fabricate anything. This just gives me a chance to see if I like my creation.

View attachment 326868
View attachment 326871
We learned a thing the other day! If you have the properties tabs minimized everything in Armorsmith stretches to accommodate. It was driving me nuts when both Rock Lobbster and I had similar pieces open and his were distorted.
 
Dang, this is such an in depth build log! I’m super excited to see where you go from here!
 
Thanks Sylvacan - I like recording as much as I can, but if you have any questions about any of the processes I do or to elaborate, just ask.

I made some progress. A little slower due to a cold and then some leg injuries.. I know I could have worked more, but I wanted to focus on recovering. I'm feeling quite a bit better.

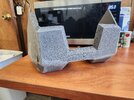
I'm probably 30% of the way through foam construction. I'm feeling a little overwhelmed since it has been so long since I've worked with foam and wasn't doing all pieces all at once with the same steps.
20230128_125741.jpg


Next up is the larger chest piece and the backpack façade. I'm just going to keep going as best I can.
 
As I'm working through these pieces I thought I would catalog my foam process. Maybe you all might have a suggestion or it may jog my memory on other things I've tried.

Currently, I'm working with
10mm Foam - EVA Floor Mats (accent pieces)
12mm - Y40 Industrial Foam (main pieces)

You can see in the last post photo, most of those are the 12mm Y40 foam. But, the shoulders I used Floor Mats since I wanted something a little more flexible. Floor mats are rarely denoted, but usually range from Y25-30 in density.

CUTTING:
1. Print out FOAM patterns from Pepakura Designer onto paper.
2. Laying the patterns on the foam, I shade overtop the edges with a marker so when I lift up the pattern what is left is a void where the pattern use to be.
3. Make note of which edges need to be bevel cut and which should be 90 degrees straight up and down.
4. I use an Xacto knife because I find it easy to keep sharp and cheap to replace when needed. I'll cut out the part being sure I keep the same angle and very aware of making smooth consistent cuts.
5. Every 5-6 cuts I make I then rub both sides of the blade on the self healing mat to sharpen the edge of the xacto knife.

ASSEMBLING:
1. First I check parts together to see how they would look once connected.
2. I may rebevel cut pieces to get the proper angle. I also will use a belt sander or dremel to get nice smooth surfaces to glue.
3. I use CA Glue with accelerant to join the foam together. It is quick and easily sandable.
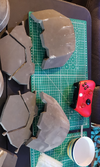
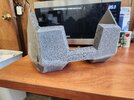
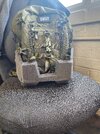
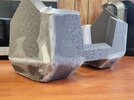
4. I'll then use the belt sander and dremel to clean up the seam and try to blend the hard edges. This picture shows one shoulder with the glue seems as is and the other with the seams sanded and rounded. I use a 4x36 belt sander with 120grit Silicon Carbide belts.
1675283592856.png

DETAILING:
1. Next is fixing any little gouges or seems that have voids. I use Kwik Seal, rub it on with my finger, then rub it with my finger after dipped in water to smooth it out. I can then sand it if needed, but if I did the water part right it is usually pretty good.
2. Then I cut out any detail pieces, little squares, chevrons, etc out of 2mm craft foam and CA glue them in place.
3. Using the xacto knife I can cut detail lines into the foam and then hit it with the heat gun to open them up a bit.
5. I'm planning to also hit everything real quick with a heat gun, but you have to be careful doing it this late in the game as it can shrink the foam and ruin your seams.
6. In the past I've then hit everything with Plastidip, but this time I will try LeakSeal. Regardless, don't forget to warm those cans up under the tap!
 
Successful day! I got to meet up with HotPockets who let me use his sewing machine for this afternoon. I was able to cobble together a couple pieces. Namely the fake bedroll (real pillow) that will dangle below my back pack and the puffy collar that all Marines have.

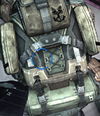
This reference picture shows both examples:
IMG_20230211_214848.png


First up is the bedroll, complete with zipper and filled with quilting cotton. Was very challenging two sew in a circle, but it turned out the right shape in the end somehow! It's actually a very comfortable pillow which will be perfect for those long con days far away from home.
20230211_174259.jpg


Next was the collar. In my build for ArcSol I concluded this collar was part of a flak jacket and sewed him a pretty snazzy one. But, since you only see the collar, for my build I decided to go easy and only make the visable part. I'll probably attach it directly to the chest armor.
20230211_174318.jpg


Now some less fun news. Part of the slow progress has been due to recent increase in health issues. I'm not certain, but it is looking like I have diabetes and it has been very painful. I've started to manage my diet and I'm already seeing results. It's certainly a bummer having something like this at 34, but it's better than being in pain and not knowing why.

I think I'm still on track to have some version of this suit ready for ECCC! Wish me luck!
 
Those sewn parts look awesome! And super comfy. And yea, circles can be quite challenging, especially when they get reaaaallly small.
Sorry to hear about your health issues. Good thing you're starting to see some results with your diet. Keep us posted, we're all wishing the best for you
 
Status
Not open for further replies.
Back
Top