Hello All! This will be my first build ever for cosplay. I am a huge fan of the ODST look and style. I can't wait to get building this piece. Honestly, I may attempt 2 builds at once just to have the flexibility of working on one when I hit a wall with the other. I understand this is probably not wise, but I can't help myself.
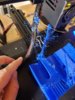
My primary ODST build will be using the 3d printed build by Moe. I am also around 185 and 5'10 so sizing has worked with me with this so far.. I am using an Ender 3 pro with Hatchbatch PLA for my material. I am using PLA due to roommate and odor concerns. I started printing at 20% infill for some segments but am probably going to 10% for filament conservation. I am attempting to go towards the landfall halo ODST look since I think its one of the most visually appealing.
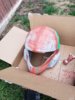
I haven't decided what Foam build to do yet since I really want something detailed yet not difficult. I am looking to potentially do the Halo Reach ODST build; however, I am still trying to wrap my head around pepakura and how to best use it to get a more detailed and better looking ODST set. I haven't had the chance to look at the tutorials yet. (No printer paper atm isnt helping). Any help on deciding what I should do would be good! Is the files in the armory just need to be sized to the person for the foam or is there more I need to do before hand? The foam build will be using EVA foam I picked up from Amazon. I have most of the supplies to start cutting as soon as I get the templates to work
I do not have a target end date. I hope to have the 3d prints done by November assuming no critical issues/downtime due to parts. I hope to get as much work done before the weather turns cold. For the foam build, as long as I have it ready by spring/summer I will be happy.
Constraints:
I look forward to seeing how this comes out. Please feel free to give me any advice or feedback on my progress/build! I will post pictures later when I have more time.
Here is my List of parts to be printed.
My primary ODST build will be using the 3d printed build by Moe. I am also around 185 and 5'10 so sizing has worked with me with this so far.. I am using an Ender 3 pro with Hatchbatch PLA for my material. I am using PLA due to roommate and odor concerns. I started printing at 20% infill for some segments but am probably going to 10% for filament conservation. I am attempting to go towards the landfall halo ODST look since I think its one of the most visually appealing.
I haven't decided what Foam build to do yet since I really want something detailed yet not difficult. I am looking to potentially do the Halo Reach ODST build; however, I am still trying to wrap my head around pepakura and how to best use it to get a more detailed and better looking ODST set. I haven't had the chance to look at the tutorials yet. (No printer paper atm isnt helping). Any help on deciding what I should do would be good! Is the files in the armory just need to be sized to the person for the foam or is there more I need to do before hand? The foam build will be using EVA foam I picked up from Amazon. I have most of the supplies to start cutting as soon as I get the templates to work
I do not have a target end date. I hope to have the 3d prints done by November assuming no critical issues/downtime due to parts. I hope to get as much work done before the weather turns cold. For the foam build, as long as I have it ready by spring/summer I will be happy.
Constraints:
- Apartment no strong or toxic odor
- Limited access to space to outside for anything with strong/toxic odor
- Cold weather
I look forward to seeing how this comes out. Please feel free to give me any advice or feedback on my progress/build! I will post pictures later when I have more time.
Here is my List of parts to be printed.
HelmetODST SMG- Back_-_Lower
- Back_-_Lower
- Back_-_Top
BeltBicep_-_LeftBicep_-_Right- Boot_-_Front_-_Left
- Boot_-_Front_-_Right
- Boot_-_Heel_-_Left
- Boot_-_Heel_-_Right
- Butt
Cod (in Progress)Forearm_-_LeftForearm_-_RightHip_-_LeftHip_-_Right- Neck
- Shin_and_Knee_-_Left
- Shin_and_Knee_-_Right
Shoulder_-_Left (Resized needed)Shoulder_-_RightShoulder_Buckle_-_LeftShoulder_Buckle_-_Right- Shoulder_Strap_-_Left
- Shoulder_Strap_-_Right
- Thigh_-_Inner_-_Left
- Thigh_-_Inner_-_Right
- Thigh_-_Outer_-_Left
- Thigh_-_Outer_-_Right
Torso_-_Center_LowerTorso_-_Center_Top12 (printed but may need to be reprinted)
Torso_-_Ribs_-_LeftTorso_-_Ribs_-_Right
Last edited:

") I'm just not ready for the looks I'll get when I start working on it outside... I already got some looks as I spray paint minis/terrain for painting.
I'm just not ready for the looks I'll get when I start working on it outside... I already got some looks as I spray paint minis/terrain for painting.