Foam Halo 3 SRS-99D-S2AM Anti Material Rifle Build

Shadowshail

RMO
405th Regiment Officer
Been a hot minute since ive done a build thread but im finally at a place in life where i can knock something out with enough progress to begin a build thread so here we are!

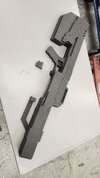
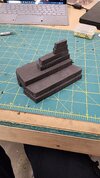
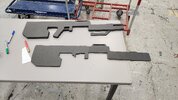
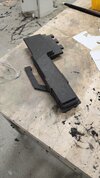
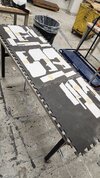
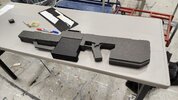
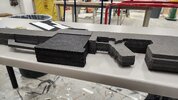
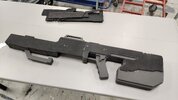
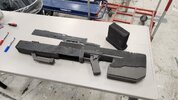
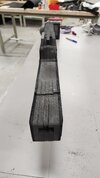
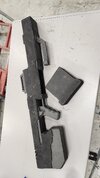
Almost have half the body of the weapon finished up as well as about half of the muzzle suppressor (probably not what its called but meh) done as well.

Tomorrow i should be able to get the muzzle completely done as well as glue the first half of the body together and then also make the magazine. Next week would be the other half of the body, a 1/4 plywood middle support and then sanding stuff down to make it blend in.
 

Attachments

  • 20230627_094314.jpg
    20230627_094314.jpg
    1.2 MB · Views: 65
  • 20230628_144408.jpg
    20230628_144408.jpg
    989.3 KB · Views: 83
  • 20230628_144240.jpg
    20230628_144240.jpg
    1.2 MB · Views: 67
  • 20230628_112405.jpg
    20230628_112405.jpg
    2.5 MB · Views: 64
  • 20230627_150245.jpg
    20230627_150245.jpg
    1.4 MB · Views: 67
  • 20230627_114945.jpg
    20230627_114945.jpg
    1.9 MB · Views: 72
  • 20230627_094317.jpg
    20230627_094317.jpg
    729.9 KB · Views: 65
So i messed up and used the wrong thickness of foam for the weapon. All of the layers were cut using 10mm foam instead of 5mm foam. So i had to adjust by removing layer 4 and then changing layer 5 to a 5mm and then layer 6 to a 3mm foam. I also kept layer 1 as a single and not doubled up on it. Going to have to do the muzzle part all over again probably with 5mm foam as it was intended.

So far i have most of the main part cut and glued. Will be gluing it all up tomorrow and hopefully get some time to sand into it and give it some cleanliness to its look. Hell, im optomistic ebough to maybe have a couple coats of plastidip on it tomorrow!

Images are of layers 1-3 and 4 with magazine (without outside details)
 

Attachments

  • 20230705_172612.jpg
    20230705_172612.jpg
    2.3 MB · Views: 59
  • 20230705_172616.jpg
    20230705_172616.jpg
    2.6 MB · Views: 59
So finally got the main part glued up and about halfway to what i want sanded before i put a coat of plasti-dip on. Either way its good enough for the convention tomorrow as a display piece.
 

Attachments

  • 20230706_115537.jpg
    20230706_115537.jpg
    1.9 MB · Views: 75
  • 20230706_135507.jpg
    20230706_135507.jpg
    2 MB · Views: 67
  • 20230706_150330.jpg
    20230706_150330.jpg
    2.1 MB · Views: 77
  • 20230706_150337.jpg
    20230706_150337.jpg
    886.9 KB · Views: 72
  • 20230706_150352.jpg
    20230706_150352.jpg
    1,018.3 KB · Views: 62
Oof...More than 8 months old and no updates...Well wait no more!

I downloaded a bunch of reference images and realized the details for the rifle isn't accurate so I started adding details. Also changed jobs and got my office all setup for me to work on the costumes and such in my off time.

Here is the details and the starting of the upgrades and more progress pics!

1. Making the rifle barrel and the front little barrel thingy
2. Adding details on the magazine
3. Re-worked the handle under the barrel to a firm posterboard and added details
4. Re-worked the entire back end details.
5. Began foam putty and smoothing.


20240318_141350.jpg


20240318_141354.jpg

20240318_141414.jpg
 
Update time!!! Got a lot done before Wyoming Pop Culture Con and just have a little more to do before starting to paint and weather!

434019623_1631850080973760_4043988902176877859_n.jpg


Redid the side details and made them more accurate.

433696137_1571684920289792_7938305852269462597_n.jpg


Also redid the back end details.

433848528_946073807190668_9153394509756466381_n.jpg


Cleaned up and foam puttied the muzzle break

433853131_337357658799225_2827774131979212688_n.jpg


First part of the barrel getting attached

438209066_690199949845168_3652518177665712667_n.jpg


438245695_942295777431734_6012651068928840146_n.jpg


Extra details and cutouts from the base templates.
 
Wanted to break the updates up so it wasnt one post bogged down by so much images.

438204496_313365918461930_6494942949757992473_n.jpg


Other barrel pokey thingy (Delta told me what it was and it was something to do with gas exhaust or something for the rounds to chamber themselves but i forgot the name of it lol)

438237724_1355038968525984_6700139036499715812_n.jpg


More detail for the top of the rifle cause I didn't like the look of it before and those back stripes were wonky...

438204060_354249710523974_6801049645296035375_n.jpg


Finishing up the barrel for details. Instead of cutting grooves into the PVC like i wanted to I just put strips of 2mm foam on them in an equal spacing to imitate it.
 
Finish work on what i got done including attaching the barrels to the body itself.

438231805_737180608620674_8049439113082690491_n.jpg


438267537_1200448647940738_1070828963895374719_n.jpg


438238327_1563287810917781_5983336770539035766_n.jpg


438245757_472375452028256_3595469349896068661_n.jpg


All attached!!

438204058_990170135861907_2891994419585671875_n.jpg


438231503_1695262977973449_8947601766978812936_n.jpg


Must be the 'Murica' in me that just makes this look amazing displayed on the end of a truck bed! Assembled for what i had before plasti-dipping

438196120_1146556853049566_5853915126653755694_n.jpg


PLASTI-DIP!!

438209092_800968524911707_6438559143710489918_n.jpg


438267378_465325012600216_6577911942554341746_n.jpg


Displayed so beautifully by our very own Mountain member vTRONCATv !!!

Next is to work on securing the PVC parts more and then work on the handle, bipod, and scope and then off to painting and weathering!
 

Your message may be considered spam for the following reasons:

If you wish to reply despite these issues, check the box below before replying.
Be aware that malicious compliance may result in more severe penalties.
Back
Top