Leviathan475
New Member
Hello everyone,
This post should have been made around last October, but I procrastinated and never got around to posting it. Now I have decided to upgrade my ODST suit and thought that I might as well post about it.
This suit was made entirely out of foam and was rushed... and I mean really rushed. I started on September 1st and wanted the costume done by Halloween. I spent almost every hour I wasn't in school working on this thing, and in the end, I think it came out alright.

Now I do have a couple of problems with it.
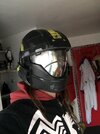
First, the helmet is way too big and the visor doesn't look too good. I plan on redoing the entire helmet by 3d printing it as well as using N8TEBB's method of vacuum forming and dying the visor.
Second, the shoulder pieces are too small. I plan on resizing them. I'm not sure whether or not to 3d print them or use foam, but I am leaning towards foam.
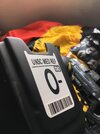
Third, there is currently no decals on the armor, no blood type or nickname. I plan on adding these to make it more personal.
I plan to keep this thread updated with the changes I make to the armor.
I am currently working on the helmet and I am about to 3d print it. If anyone has any useful tips, I would be all ears.
This post should have been made around last October, but I procrastinated and never got around to posting it. Now I have decided to upgrade my ODST suit and thought that I might as well post about it.
This suit was made entirely out of foam and was rushed... and I mean really rushed. I started on September 1st and wanted the costume done by Halloween. I spent almost every hour I wasn't in school working on this thing, and in the end, I think it came out alright.
Now I do have a couple of problems with it.
First, the helmet is way too big and the visor doesn't look too good. I plan on redoing the entire helmet by 3d printing it as well as using N8TEBB's method of vacuum forming and dying the visor.
Second, the shoulder pieces are too small. I plan on resizing them. I'm not sure whether or not to 3d print them or use foam, but I am leaning towards foam.
Third, there is currently no decals on the armor, no blood type or nickname. I plan on adding these to make it more personal.
I plan to keep this thread updated with the changes I make to the armor.
I am currently working on the helmet and I am about to 3d print it. If anyone has any useful tips, I would be all ears.
Last edited: