Halo Reach Spartan Build
- Thread starter S225
- Start date
- Status
- Not open for further replies.
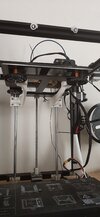
I wish I had done this day one. The Ender-5 build plate is only mounted from the back and there's no support for the overhanging bed. With only light pressure you could offset the front of the bed close to a centimeter, if not more! The same amount of force only bends it like 1-2 mm now with these support arms! There was a significant improvement even without mounting the arms back plates. I also went ahead and printed a cable hider so I don't bust any wires. It's a wonderful thing to print your own upgrades for issues like these.
Work / Life balance has been non existent for a good minute so no other parts of the armor have been worked on. So, while I don't have any time to finalize parts, there's plenty of time to run the printer for a new prop! I'm torn between the OddWorks Halo Reach DMR ( good god the level of insane, unnecessary detail is so cool) and The Messenger from Destiny. Got a few good rolls of this recently and I'd forgotten how nice it looks.
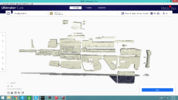
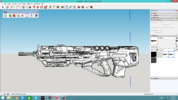
While I have no problem with kit/ IP? bashing, The Messenger would likely be separate from everything else or a nice prop to mount on a wall. I have mixed feelings on the DMR but I can't deny it would be an awesome addition to a Spartan III cosplay.
Now I'd like to make a poll to get some feedback but... how does one actually start a poll?
- Member DIN
- S144
I vote DMRWork / Life balance has been non existent for a good minute so no other parts of the armor have been worked on. So, while I don't have any time to finalize parts, there's plenty of time to run the printer for a new prop! I'm torn between the OddWorks Halo Reach DMR ( good god the level of insane, unnecessary detail is so cool) and The Messenger from Destiny. Got a few good rolls of this recently and I'd forgotten how nice it looks.
View attachment 311394
View attachment 311393
While I have no problem with kit/ IP? bashing, The Messenger would likely be separate from everything else or a nice prop to mount on a wall. I have mixed feelings on the DMR but I can't deny it would be an awesome addition to a Spartan III cosplay.
Now I'd like to make a poll to get some feedback but... how does one actually start a poll?
I just want to see someone else build it before I take the dive on it.
Went ahead and got everything ready in CURA. Looking at about 12, 10 hour prints and 3 14+hour ones with how everything is sorted. Definitely room to do more parts at once but I'd be aiming to keep print time down. I cant see any problem spots to watch during a print, its the assembly that will be interesting. I'd prefer to use printed pegs for the areas that call for screws as it looks like the barrel shroud is the only part that would "need" to be easily removable. It might be neat to mess with the scope mount in order to add different sights (The Messenger files have like all the D1 weapon sights so I might use some for other projects)I vote DMR
I just want to see someone else build it before I take the dive on it.
- Member DIN
- S144
- Member DIN
- S144
What files are you working with? And have you found any difficulties with printing them at all?
I'm using OddWorks files from thingiverse. The only "issues" are that some of the curved parts and front of the gas system under the barrel didn't print very well as there wasn't enough infil for the filament to sit on and I ended up with some very minor gaps. This is absolutely my fault and it's an easy fix in post. I started using the gradual infil setting to increase the % at the top so everything comes out better. I'm printing with two .5mm walls out of a .4mm nozzle with 5% infil that bumps up to 10% at the top of a part.What files are you working with? And have you found any difficulties with printing them at all?
- Member DIN
- S144
Correct me if I'm wrong since im not an expert in 3d printing yet but shouldnt your wall setting be a multiple of your nozzle size? Like a .4 nozzle having 1.2mm walls for 3 walls totalI'm using OddWorks files from thingiverse. The only "issues" are that some of the curved parts and front of the gas system under the barrel didn't print very well as there wasn't enough infil for the filament to sit on and I ended up with some very minor gaps. This is absolutely my fault and it's an easy fix in post. I started using the gradual infil setting to increase the % at the top so everything comes out better. I'm printing with two .5mm walls out of a .4mm nozzle with 5% infil that bumps up to 10% at the top of a part.
That's the right idea. However, setting the wall width +or- 25% of the nozzle width can still give good results as a little more filament is fed and squishes out the extra. 1mm. This is more of a time saving trick than anything else, being able to print a 1mm thick part in 2/3 the time it would take to do a 1.2mm. Time saved is only on the wall printing time of course, if single wall takes 3 seconds to print for example, you print a 1mm wall in 6 seconds instead of a 1.2mm one in 9. Alternatively you can print and extra .3mm in the same time as a 1.2mm part with 3 walls! I've not had any issues with under or over extrusion doing this and I'm pretty sure most of my larger prints are done in this way. Smaller, more detailed prints would likely benefit from thinner walls as to not obscure minor details.Correct me if I'm wrong since im not an expert in 3d printing yet but shouldnt your wall setting be a multiple of your nozzle size? Like a .4 nozzle having 1.2mm walls for 3 walls total
Last edited:
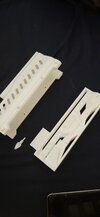
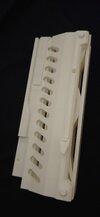
Always a good feeling when something you do works. I'd like to try and detail these pegs and maybe give the tab a detent so they don't flop around but it's so nice that they work! It's super sturdy with just one so I think it'll be rock solid once the rest go in. Thus is going to be a good size too...
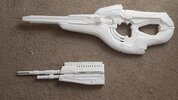
So after a myriad of set backs including but not limited to relizing that PLA pegs are far to weak, switching to screws and finding that there's low tolerance for the screw openings and super glue clogging up all of the hex nuts, I got most everything sorted!
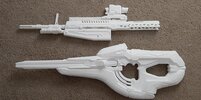
I have the handle printing now and it should be done around midnight here. Not too upset about the screws, I have far more confidence in the prints integrity now and I'm considering giving the heads an acid wash to fit with the dark gun metaly color of the DMR. I making quite the excellent guinea pig of myself.

I have the handle printing now and it should be done around midnight here. Not too upset about the screws, I have far more confidence in the prints integrity now and I'm considering giving the heads an acid wash to fit with the dark gun metaly color of the DMR. I making quite the excellent guinea pig of myself.
SPRTN 2043
Active Member
Q: were you able to print the forearm and biceps (separately) but did you have to cut them up first , did you use supports?
the biceps and fore arms are my next prints, unsure on whether or not to use supports
the biceps and fore arms are my next prints, unsure on whether or not to use supports
I printed the forearms and biceps as a whole part, only using supports for overhangs. I think they took 12-16 hours to print but that was months ago so I can't really remember. The biceps were definitely Moe's while the forearms were a modified version of the MKVB obj files. I printed them vertically with the opening cloest to the elbow on the print bed for each. What printer were you working with?Q: were you able to print the forearm and biceps (separately) but did you have to cut them up first , did you use supports?
the biceps and fore arms are my next prints, unsure on whether or not to use supports
SPRTN 2043
Active Member
Ender 3 v2, the bicep and forearm will fit vertically... with supports it said 3 day without 1 day 12 hours...I printed the forearms and biceps as a whole part, only using supports for overhangs. I think they took 12-16 hours to print but that was months ago so I can't really remember. The biceps were definitely Moe's while the forearms were a modified version of the MKVB obj files. I printed them vertically with the opening cloest to the elbow on the print bed for each. What printer were you working with?
Yikes, what do your wall, infill, support density settings look like? I way overdid the thickness on my arms and it was still a fraction of that time.Ender 3 v2, the bicep and forearm will fit vertically... with supports it said 3 day without 1 day 12 hours...
Last edited:
- Member DIN
- S144
Are you using the creality slicer? Seems a little long with supports but could be just a difference in size.Ender 3 v2, the bicep and forearm will fit vertically... with supports it said 3 day without 1 day 12 hours...
In this screenshot I used supports everywhere and its nowhere near 3 days and those aren't even my speed print settings. Also these are NerdForge files I'm using which I think are thicker.
- Status
- Not open for further replies.
Similar threads
- Replies
- 21
- Views
- 1,307

