YTunz
New Member
Howdy all!
I'm rather new here and have recently begun my journey on building an ODST armor set. I bought my files from Aguilar Workshop and have my filament all ready, but I have no clue on a few things. The idea is to print it on my Bambu P1S out of Matte Grey Filament to help with sanding visibility / painting. I was wondering if anyone could give me tips on a few things
1) How do I size this to my body? I'm 5'11ish and the armor was designed for someone who is 5'10
2) What should I do for an undersuit? I was thinking a set of black BDUs from Amazon and to wear the armor over it.
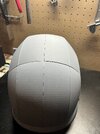
3) How do I do the visor for the helmet? I've 3d printed both the buck for the vacuum former, but the one at my college is too small to fit it in. Currently I just have a Printed visor just for Aesthetics, but I'd love to be able to see through it.
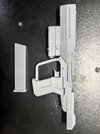
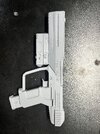
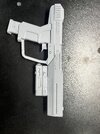
4) Painting the weapons? Do I legally have to add the orange tip since it is a prop? It is the non-firing version that Aguilar has, but I didn't know if there are laws about this (Im from Pennsylvania if that specifies anything) I've already printed the SOCOM, and plan on also printing the SMG.
Thank you for any advice you can give me on my journey! I hope to post some pictures of everything here soon!
I'm rather new here and have recently begun my journey on building an ODST armor set. I bought my files from Aguilar Workshop and have my filament all ready, but I have no clue on a few things. The idea is to print it on my Bambu P1S out of Matte Grey Filament to help with sanding visibility / painting. I was wondering if anyone could give me tips on a few things
1) How do I size this to my body? I'm 5'11ish and the armor was designed for someone who is 5'10
2) What should I do for an undersuit? I was thinking a set of black BDUs from Amazon and to wear the armor over it.
3) How do I do the visor for the helmet? I've 3d printed both the buck for the vacuum former, but the one at my college is too small to fit it in. Currently I just have a Printed visor just for Aesthetics, but I'd love to be able to see through it.
4) Painting the weapons? Do I legally have to add the orange tip since it is a prop? It is the non-firing version that Aguilar has, but I didn't know if there are laws about this (Im from Pennsylvania if that specifies anything) I've already printed the SOCOM, and plan on also printing the SMG.
Thank you for any advice you can give me on my journey! I hope to post some pictures of everything here soon!