Journey to make Kai-125 helmet. Need to fill hollow parts from a mesh, 0% blender experience, only solidworks

Status
Not open for further replies.

SolomonValhalla

New Member
Since kid i always wanted to make a Halo armour irl. But i never had the money, experience or an adult that care about it. Now i am in a position where i can finally fulfill that dream. What armour i wanted to make was something that always change over time, but after Infinite and the Halo Tv show all flags pointed at Kai 125 helmet to be the one.
And that seem to be a huge challenge to begin with, it seems like i am the first one trying to make one. (I want this also to be a guide/refence for people that want to make lesser know/popular armour pieces)

I am still debating about if i am gonna go for the Mk Vi gen 1 or Mk Vi 3 for the body but i am very confident to know there is plenty of models, tutorials and resources.

Ok, so all i have is 2 pieces of concept art, 4K screenshots, solidworks and the will to do it....and the progress really was not optimal. I sink here like 10 hours
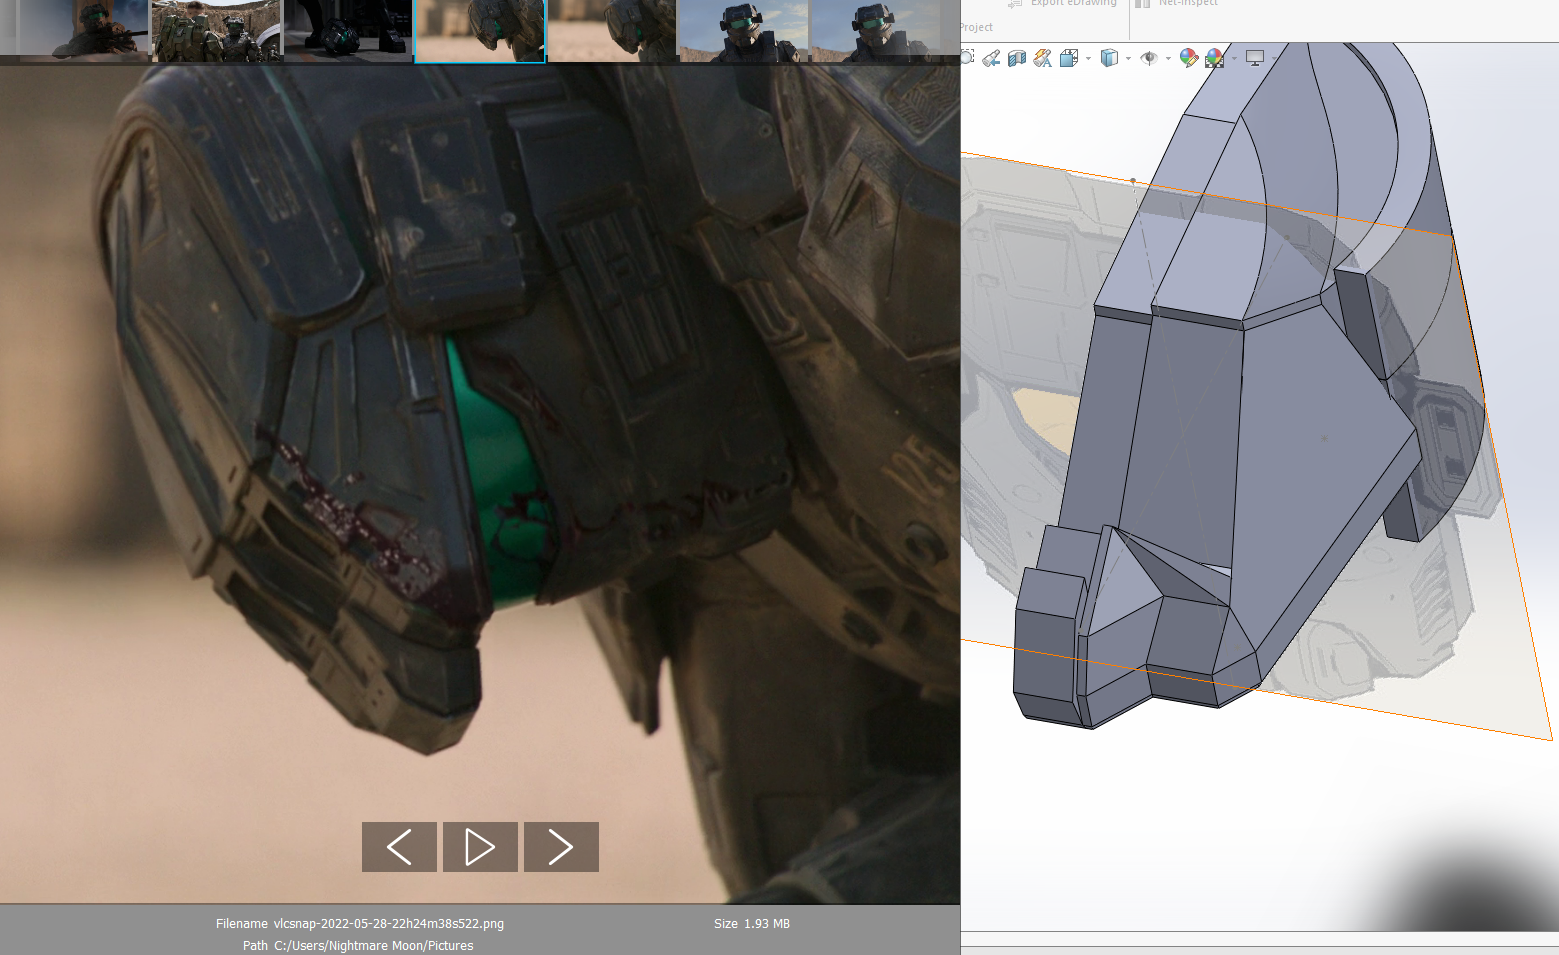
screen1.png

The concept art model and the TV helmet were actually different so it added another layer of difficulty. There must be some model or reference somewhere and yes! there was: there was some snapchat filters that made use of lower quality models.
But i am not a data miner or ripper, thankfully a render artist called "iso" made some renders of those and credited some other dude called "Coarforge" and "Dean" for ripping the models. So long storyshort i contact Iso and he point me where to find this "Dean", but it was the wrong dean (there are like 3 apparently), this nice dude called "Mayman" help me out and i finally manage to get my hands on the Tv show snapchat filter models.
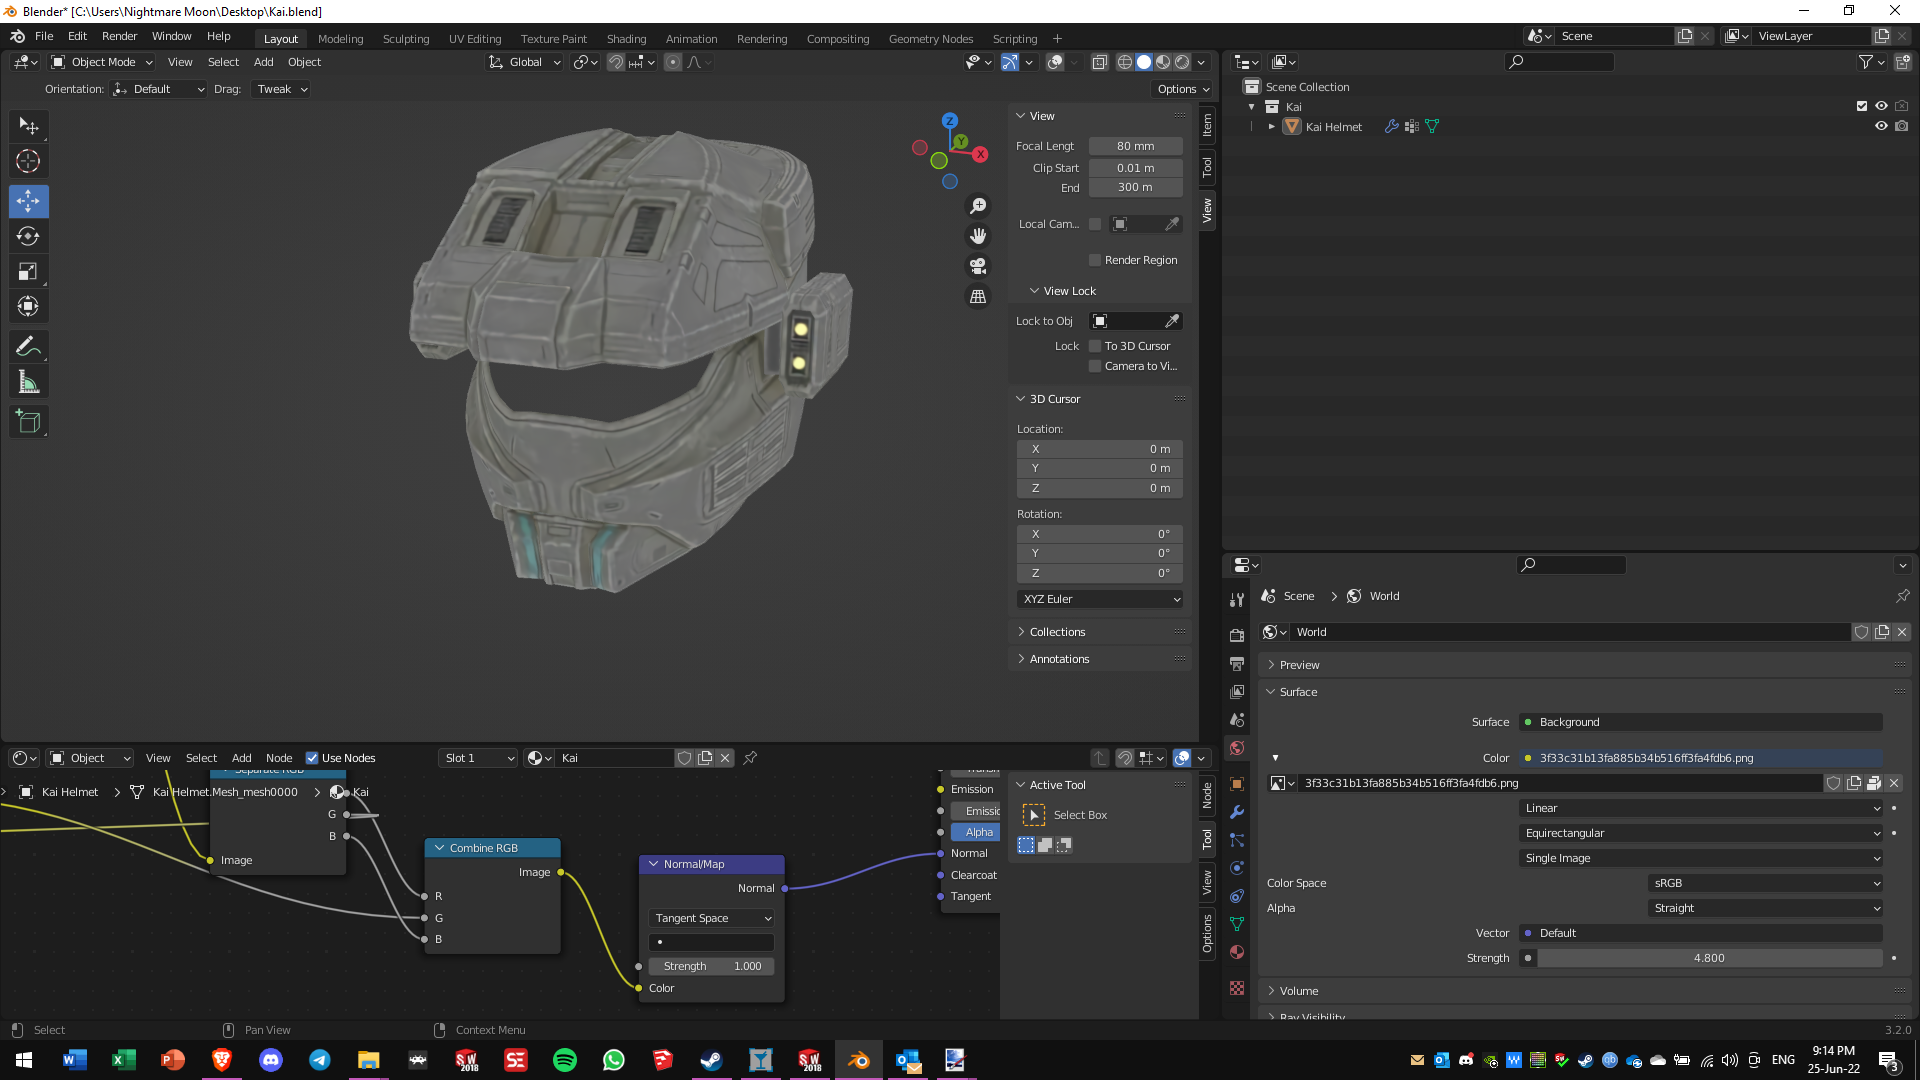
1656213285561.png

After downloading blender, screwing around and deleting everything that was not Kais helmet i export it as a STL to open it in Solidworks. And pretty much here is where i am stuck. And here are some of my main problems
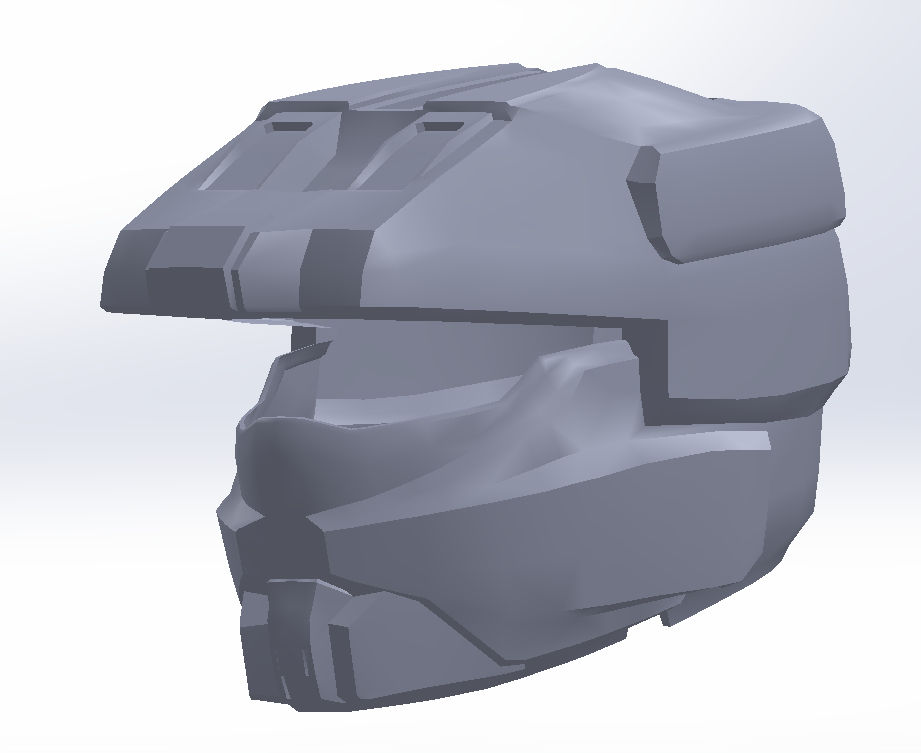
1656213537531.png

1656213643614.png

1. When i import the model i can "get it" to be smooth or with a bunch of triangles (Rough). I don't know witch one is the one i should use.
2. The model in blender comes with those fake 3d textures and the model lacks the cool details.
3.Before i add the details i notice that its like a mesh and i need to "fill it"
4.I also remember that i need to scale it for my head and have the support for it
And i don't know which thing to address first or that i must do these things i blender or that i need to start somewhere else

Advice and help will be appreciated.
 
Last edited:
Are you planning on using the ripped model straight or do you just want to use it as a reference?
The smooth and 'rough' versions are just shaded flat or shaded smooth, the model stays the same. For using it as a reference for modelling, smooth shading might be better.
To get the details from the normal map, you can bake the normal map onto the model again. I don't know how to do this off of the top of my head though, but I can look it up/try it tomorrow.
By filling it, I assume you mean giving it thickness/making it a closed body. You can do this in blender using the solidify modifier. If you set the thickness too thick though, the model usually starts to clip through itself, which you don't want. If you're just using the model as a reference though or are planning to use pepakura, you don't need to add thickness. (I don't know if solidworks supports editing open meshes though)
For scaling there are a few ways, one is described here. Using armorsmith is another popular one.
 
Since kid i always wanted to make a Halo armour irl. But i never had the money, experience or an adult that care about it. Now i am in a position where i can finally fulfill that dream. What armour i wanted to make was something that always change over time, but after Infinite and the Halo Tv show all flags pointed at Kai 125 helmet to be the one.
And that seem to be a huge challenge to begin with, it seems like i am the first one trying to make one. (I want this also to be a guide/refence for people that want to make lesser know/popular armour pieces)

I am still debating about if i am gonna go for the Mk Vi gen 1 or Mk Vi 3 for the body but i am very confident to know there is plenty of models, tutorials and resources.

Ok, so all i have is 2 pieces of concept art, 4K screenshots, solidworks and the will to do it....and the progress really was not optimal. I sink here like 10 hours
View attachment 319573
The concept art model and the TV helmet were actually different so it added another layer of difficulty. There must be some model or reference somewhere and yes! there was: there was some snapchat filters that made use of lower quality models.
But i am not a data miner or ripper, thankfully a render artist called "iso" made some renders of those and credited some other dude called "Coarforge" and "Dean" for ripping the models. So long storyshort i contact Iso and he point me where to find this "Dean", but it was the wrong dean (there are like 3 apparently), this nice dude called "Mayman" help me out and i finally manage to get my hands on the Tv show snapchat filter models.
View attachment 319574
After downloading blender, screwing around and deleting everything that was not Kais helmet i export it as a STL to open it in Solidworks. And pretty much here is where i am stuck. And here are some of my main problems
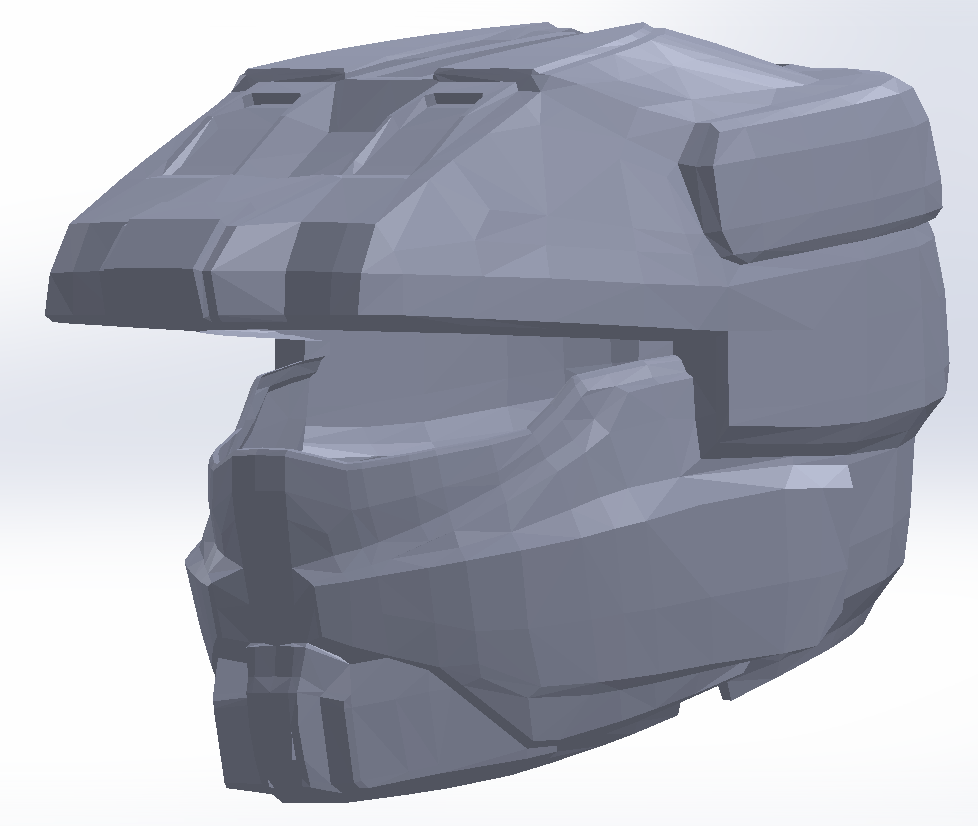
View attachment 319575
View attachment 319576
1. When i import the model i can "get it" to be smooth or with a bunch of triangles (Rough). I don't know witch one is the one i should use.
2. The model in blender comes with those fake 3d textures and the model lacks the cool details.
3.Before i add the details i notice that its like a mesh and i need to "fill it"
4.I also remember that i need to scale it for my head and have the support for it
And i don't know which thing to address first or that i must do these things i blender or that i need to start somewhere else

Advice and help will be appreciated.
Sorry I don't have any advice for you as I am not very familiar with 3D designing. But I just want to say that it looks impressive so far! My daughter was just saying how she wanted a Kai helmet so I looked around but couldn't find one. I hope you are able to get things figured out. When you do I would buy that stl if you plan on selling it.

Keep up the good work!
 
Are you planning on using the ripped model straight or do you just want to use it as a reference?
The smooth and 'rough' versions are just shaded flat or shaded smooth, the model stays the same. For using it as a reference for modelling, smooth shading might be better.
To get the details from the normal map, you can bake the normal map onto the model again. I don't know how to do this off of the top of my head though, but I can look it up/try it tomorrow.
By filling it, I assume you mean giving it thickness/making it a closed body. You can do this in blender using the solidify modifier. If you set the thickness too thick though, the model usually starts to clip through itself, which you don't want. If you're just using the model as a reference though or are planning to use pepakura, you don't need to add thickness. (I don't know if solidworks supports editing open meshes though)
For scaling there are a few ways, one is described here. Using armorsmith is another popular one.
By the looks of it, i will use the smooth model straight and add the missing details, i already share my experience doing it by reference. If i cant get over the "fill mesh" thing i will end up using it as a reference but with all the inner and outer details made.

I am not sure if the "normal map" can get me the details i am looking for or the true 3D ones.

Yeah, Solidworks has some tooks to work with meshes. But its rare to use, not the kind of software for those things, i might need to rip the band aid off and start to learn some blender. I am also looking into other software for this and the other scaling stuff. Thanks for the scaling tutorial
 
Last edited:
Sorry I don't have any advice for you as I am not very familiar with 3D designing. But I just want to say that it looks impressive so far! My daughter was just saying how she wanted a Kai helmet so I looked around but couldn't find one. I hope you are able to get things figured out. When you do I would buy that stl if you plan on selling it.

Keep up the good work!
Thanks, i don't know about selling it. There is already lot of help and credit behind the model. Right now i just wanna learn and hoping this will help others.
 
1656346675248.png

I tried baking the normal map onto the model using the displacement modifier, and either I did something wrong, or the normal map is too low res (I don't have the upscaled version handy, so I just used the original one). It got better with more subdivisions on the mesh, but at 6 subdivisions, blender already sits at 3.8GB of ram, and spiked up to 10GB while subdividing, so I'm not sure if I can go higher with 32GB of memory. At 19.3 million triangles, it also shouldn't be necessary though.
 
View attachment 319649
I tried baking the normal map onto the model using the displacement modifier, and either I did something wrong, or the normal map is too low res (I don't have the upscaled version handy, so I just used the original one). It got better with more subdivisions on the mesh, but at 6 subdivisions, blender already sits at 3.8GB of ram, and spiked up to 10GB while subdividing, so I'm not sure if I can go higher with 32GB of memory. At 19.3 million triangles, it also shouldn't be necessary though.
Looks overkill hehe, but cool try. I am researching, looking examples and toying with blender for the model before i settle for what method i am gonna use. Since i am gonna 3D print it, its looking that i am gonna use a smooth reference model and tracing my own surfaces on top of it with solidworks. I am new to using surfaces but it seems i am getting the hang of it.

Thanks for looking in to it
 
Update. I have been learning the ropes and shenaningans that comes with Splines, unsual surfaces and keeping things "flat when need it and when not". And for the model i finally settle for the polygon one because allows me to place points of reference directly to it to trace parts.

Instead of starting with the flat and easy parts of the helmet i decided to tackle the parts that i think i will have the more trouble first.
pain.png
 
I’m learning blender as I use it. So I don’t have advice but this is looking great! Kai is definitely my favorite spartan from the show.
 
I used to be just like you. I started off with SOLIDWORKS, but I learned blender to work with game models. While it is possible to model a helmet entirely in SOLIDWORKS (using surface modeling et al), you'll probably have a better time using blender. Blender has support for normal maps, and there's an addon that lets you make parametric sketches that you can use for extrudes or cuts.
 
I used to be just like you. I started off with SOLIDWORKS, but I learned blender to work with game models. While it is possible to model a helmet entirely in SOLIDWORKS (using surface modeling et al), you'll probably have a better time using blender. Blender has support for normal maps, and there's an addon that lets you make parametric sketches that you can use for extrudes or cuts.
What's the addon? I may have heard of it but I've probably forgotten
 
View attachment 319649
I tried baking the normal map onto the model using the displacement modifier, and either I did something wrong, or the normal map is too low res (I don't have the upscaled version handy, so I just used the original one). It got better with more subdivisions on the mesh, but at 6 subdivisions, blender already sits at 3.8GB of ram, and spiked up to 10GB while subdividing, so I'm not sure if I can go higher with 32GB of memory. At 19.3 million triangles, it also shouldn't be necessary though.
How’s the helmet coming along!? It’s looking good, need more updates!!!!!
 
Status
Not open for further replies.
Back
Top