You are using an out of date browser. It may not display this or other websites correctly.
You should upgrade or use an alternative browser.
You should upgrade or use an alternative browser.
JUSTINIAN's Mark VI
- Thread starter JUSTINIAN 117
- Start date
- Status
- Not open for further replies.
That is some beautiful work their, i wish I could offer advice but you always seem to one up me when it comes to making armor.
I was originally planning on doing that, but I just didn't have enough time. So I went back and filled the edges in with hot glue. It's not as perfect as I would have liked, but it's still pretty good.Look very nice! Is that tube silicone you used to fill in the edges?
Thank you. I'll take any advise. Knowledge is the key to making anything.That is some beautiful work their, i wish I could offer advice but you always seem to one up me when it comes to making armor.
Thanks. I am trying to squeeze every second out of each day, to focus on this build. I hope that I never have to do this again. I like builds that I can take my time with.Incredible suit. Not to mention the fact that you're building it so quickly. Amazing work.
I'm slowly getting there.
The plasti dip went on very well. I did 6 coats in 2 hours.
I also got a test pull from the helmet mold. I am very pleased with the results.
I also got the chest buckles done.
And as if I wasn't too pressed for time already, I made a mold for my hand plate.
One day left. I think I may need to pull an all nighter tonight to get this finished in time.
Attachments
-
 102_4052_zps76188495.jpg195.2 KB · Views: 255
 -
 102_4049_zps87e8c765.jpg95.1 KB · Views: 272
 -
 102_4050_zps8561fcbd.jpg110.9 KB · Views: 258
 -
 102_4051_zps245be877.jpg104.9 KB · Views: 267
 -
 102_4078_zps482a6a2a.jpg138.3 KB · Views: 269
 -
 102_4076_zps8f29c0e2.jpg135.3 KB · Views: 262
 -
 102_4070_zpsa0263295.jpg94 KB · Views: 260
 -
 102_4071_zpsb6a3acc1.jpg174.1 KB · Views: 247
Xtremenoob
Active Member
It's coming along great nice work.
You'll get there!
Good luck!!
Good luck!!
Well, I made it just in time for Dragon Con.... Barely. But before I get to any of that, let me get you guys caught up on what I did.
I have had a few people aske me how to install a visor, so here are my steps... because I had plenty of spare time to make a tutorial lol.
Cut the visor section out of the helmet.

Get a gold visor (or whatever color you want)

Be sure to inspect it for imperfections. This one was defective, and the gold film peeled right off. This was going to be a tutorial for a double layer visor, but now it is a single visor.

Neatly cover the visor with tape, front and back.

Place it in the helmet, and draw a line where it goes.

Take it out and trim it to fit. I usually leave about 1/2 an inch around the line.

Put the visor back in place, and fill in any gaps with Bondo.

Let the Bondo mostly cure. While it is still a little soft, you can remove the visor.

Then sand down the bondo, so that it is completely flat with the helmet.

Test to make sure that the visor is a perfect fit.

Then you can peel the tape off, and glue it in place. I use some super glue to hold it down, and then use epoxy along the edges inside.
I also got my armor painted.

I will upload more pictures in the morning.
I have had a few people aske me how to install a visor, so here are my steps... because I had plenty of spare time to make a tutorial lol.
Cut the visor section out of the helmet.
Get a gold visor (or whatever color you want)
Be sure to inspect it for imperfections. This one was defective, and the gold film peeled right off. This was going to be a tutorial for a double layer visor, but now it is a single visor.
Neatly cover the visor with tape, front and back.
Place it in the helmet, and draw a line where it goes.
Take it out and trim it to fit. I usually leave about 1/2 an inch around the line.
Put the visor back in place, and fill in any gaps with Bondo.
Let the Bondo mostly cure. While it is still a little soft, you can remove the visor.
Then sand down the bondo, so that it is completely flat with the helmet.
Test to make sure that the visor is a perfect fit.
Then you can peel the tape off, and glue it in place. I use some super glue to hold it down, and then use epoxy along the edges inside.
I also got my armor painted.
I will upload more pictures in the morning.
Attachments
-
 102_4088_zps55587db9.jpg82.6 KB · Views: 265
 -
 102_4094_zps3f60332e.jpg109.6 KB · Views: 253
 -
 102_4090_zpsd8c10593.jpg132 KB · Views: 263
 -
 102_4092_zps35e79585.jpg204.8 KB · Views: 272
 -
 102_4089_zps297ca201.jpg166.5 KB · Views: 247
 -
 102_4100_zpsad697484.jpg96 KB · Views: 278
 -
 102_4099_zpsf281665c.jpg127.6 KB · Views: 261
 -
 102_4098_zpse1f35933.jpg120.3 KB · Views: 267
 -
 102_4095_zpsbe2f0b82.jpg168.8 KB · Views: 273
 -
 paint_zps7aecef32.jpg176.3 KB · Views: 262
 -
 102_4101_zps5b3a799a.jpg128.7 KB · Views: 250
Your visor turorial really helped me out. It gives me hope to finally install my visor I'm working on.
BTW, your armor looks rad!
BTW, your armor looks rad!
So I spent most of the last few weeks working on building a vac form table.

I just finished it yesterday, and will now be able to make visors for my helmets.
I also discovered that I have an obsession...

For some reason, I can't make just one of anything. I have to mass produce everything.
I just finished it yesterday, and will now be able to make visors for my helmets.
I also discovered that I have an obsession...
For some reason, I can't make just one of anything. I have to mass produce everything.
Attachments
- Member DIN
- S091
First off, the vac table looks incredible Justin! I can't wait to see the visor pulls that come from it.
Secondly, I have one of these helmets and I have to say that it is extremely clean. There is VERY LITTLE clean up involved with these castings before painting. If you are in the market for a Mk. VI helmet, I highly recommend you pick one of these up. You won't be sorry.
Secondly, I have one of these helmets and I have to say that it is extremely clean. There is VERY LITTLE clean up involved with these castings before painting. If you are in the market for a Mk. VI helmet, I highly recommend you pick one of these up. You won't be sorry.
Justin, those helmets look amazing. If I wasn't such a purist about making my own stuff, I'd be all over that classifieds thread.
I'm am really, really looking forward to seeing some visor pulls from that vac former, though.
What are the measurements for that helmet? I don't doubt people (me included) would be interested in a nice bubbled visor like that (if it'll fit my rig).
I'm am really, really looking forward to seeing some visor pulls from that vac former, though.
What are the measurements for that helmet? I don't doubt people (me included) would be interested in a nice bubbled visor like that (if it'll fit my rig).
Spartan1313
New Member
Are you ever considering sharing the laser cutter files for the foam or the 3D files for the helmet? I have tried to make a foam build with a laser cutter before, and failed miserably because it is so painful converting the pepakura files over to the proper format for a laser cutter.
O why must you tempt me so? Those helmets are spot on.
I thought it was time that I got this thread started again. I have gotten a lot of progress done, but just never updated this thread. I'll just start up where I left off.
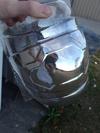
The vac table works perfectly, and it can pull some serious detail. I pulled them out of .100 PETG plastic. I also discovered the best way to chrome plate a visor. Using a real chrome plating system. I made a few tweaks, and was able to make it visible from the inside, but give a perfect mirror finish from the outside.


The entire process is very complicated, and requires professional automotive painting equipment. But I used a gold tinted candy clear coat on the outside, to give it the gold look. And as usual I can never make just one, so here is a army in the works.

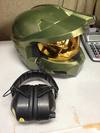
Here is the helmet almost finished. It still needs weathering, but this is good enough for now.


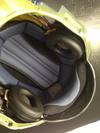
One last thing for this post. I had the idea to use a pair of electronic noise cancelling earmuffs. They were pretty inexpensive, and seemed like they would be great to help me hear people talking to me.


My initial testing works pretty good, but I will put it to it's full test out somewhere soon.
The vac table works perfectly, and it can pull some serious detail. I pulled them out of .100 PETG plastic. I also discovered the best way to chrome plate a visor. Using a real chrome plating system. I made a few tweaks, and was able to make it visible from the inside, but give a perfect mirror finish from the outside.
The entire process is very complicated, and requires professional automotive painting equipment. But I used a gold tinted candy clear coat on the outside, to give it the gold look. And as usual I can never make just one, so here is a army in the works.
Here is the helmet almost finished. It still needs weathering, but this is good enough for now.
One last thing for this post. I had the idea to use a pair of electronic noise cancelling earmuffs. They were pretty inexpensive, and seemed like they would be great to help me hear people talking to me.
My initial testing works pretty good, but I will put it to it's full test out somewhere soon.
Attachments
-
 1426310_10202607262491540_1289325676_n_zpsadfc872e.jpg72.3 KB · Views: 237
 -
 1458449_10202537694232377_588743934_n_zps065d2b00.jpg71.1 KB · Views: 243
 -
 576668_10202667317792885_516848091_n_zps3d430ee5.jpg147.8 KB · Views: 265
 -
 Helmet2_zps43ed593c.jpg134.5 KB · Views: 277
 -
 visor_zps0a6d9995.jpg59 KB · Views: 270
 -
 padding_zpsf94cdcdb.jpg92.3 KB · Views: 280
 -
 earmuffs_zpsdb87a14b.jpg89.5 KB · Views: 280
 -
 helmet2_zpse5a8f3c9.jpg59.3 KB · Views: 271
Holy bejoly, those visors are so beautiful. They are spot on.
- Status
- Not open for further replies.
Similar threads
- Replies
- 14
- Views
- 1,318
- Replies
- 1
- Views
- 396


