March 31st, 10 days until C2E2:
Still haven't put any work into the soft parts, though I did bring the padded shirt down from my spare bedroom that I store all my cosplay stuff in so that when I get a chance, I can experiment with sewing some buckles to the shoulders.
Carbine:
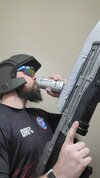
For Con Crunching, the Carbine can be considered to be done. The color shift rattle can that I used ran a bit more than I would like, so if I have some free time I will lightly sand those areas and hit them with another coat, but if I don't get around to it I'm not too worried. I'd love to get some neon green color added to the body somehow, but I think that might have to be a future project. I need to slap a couple of coats of clear coat on it, but that can wait until the week of the Con. Right now the ammo cannister and cover are held in with friction, I might super glue some velcro to them to make it less likely for stuff to wiggle apart while walking around the Con floor.
Pauldron:
Got the chrome blue applied, clear coat, and some light weathering. For whatever reason, the acrylic wash didn't stick to this one nearly as well as the other pauldron so the weathering is much lighter, but I'm not too worried about it. The only thing needed for this piece now is to add padding and buckles for rigging.
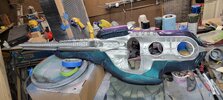
Knives:
I bought some 1/4" aluminum rod to use as support for the knives, but it appears that the rod is ever so slightly too big, and trying to expand the hole in the PLA handle wasn't going well. I considered chucking the rod on my lathe and turning it down a few thou (I need to justify my lathe somehow), but opted instead to just 3D print some solid connecting rods. They won't hold up if I try hitting things with the knives, but will be plenty sufficient for holding them together. The sheathes are painted and ready to go. I need to paint the blades and apply plastidip to the handles, and then pick Y mounting locations. I'll probably have to suit up and figure out where I actually have enough mobility to reach, as well as where I can put them that won't interfere with my current mobility.
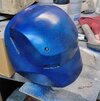
Helmet and torso armor fixes are the main priority for this week. At the very least I need to glue one of the ears back on the helmet, but getting the fan running again is also a highly desired goal. I would like to be able to leave the helmet on for as long as I want.
Torso armor fixes (chest buckle and shoulder strap) will be fairly easy fixes that I can knock out in an evening. Some hot staples for the shoulder straps and a Chicago screw for the chest buckles.
While I have the Chicago screws out, I'll probably also do something about the calf armor straps.
For C2E2, that's probably all that I have time for, since I still have work to do for my Jayce Talis and Judgement Paladin cosplays.
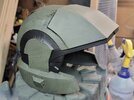
Also finished the Marine helmet for my friend. After C2E2, I might need to make my own, because I feel like it has a lot of potential for silly tiktoks.
Still haven't put any work into the soft parts, though I did bring the padded shirt down from my spare bedroom that I store all my cosplay stuff in so that when I get a chance, I can experiment with sewing some buckles to the shoulders.
Carbine:
For Con Crunching, the Carbine can be considered to be done. The color shift rattle can that I used ran a bit more than I would like, so if I have some free time I will lightly sand those areas and hit them with another coat, but if I don't get around to it I'm not too worried. I'd love to get some neon green color added to the body somehow, but I think that might have to be a future project. I need to slap a couple of coats of clear coat on it, but that can wait until the week of the Con. Right now the ammo cannister and cover are held in with friction, I might super glue some velcro to them to make it less likely for stuff to wiggle apart while walking around the Con floor.
Pauldron:
Got the chrome blue applied, clear coat, and some light weathering. For whatever reason, the acrylic wash didn't stick to this one nearly as well as the other pauldron so the weathering is much lighter, but I'm not too worried about it. The only thing needed for this piece now is to add padding and buckles for rigging.
Knives:
I bought some 1/4" aluminum rod to use as support for the knives, but it appears that the rod is ever so slightly too big, and trying to expand the hole in the PLA handle wasn't going well. I considered chucking the rod on my lathe and turning it down a few thou (I need to justify my lathe somehow), but opted instead to just 3D print some solid connecting rods. They won't hold up if I try hitting things with the knives, but will be plenty sufficient for holding them together. The sheathes are painted and ready to go. I need to paint the blades and apply plastidip to the handles, and then pick Y mounting locations. I'll probably have to suit up and figure out where I actually have enough mobility to reach, as well as where I can put them that won't interfere with my current mobility.
Helmet and torso armor fixes are the main priority for this week. At the very least I need to glue one of the ears back on the helmet, but getting the fan running again is also a highly desired goal. I would like to be able to leave the helmet on for as long as I want.
Torso armor fixes (chest buckle and shoulder strap) will be fairly easy fixes that I can knock out in an evening. Some hot staples for the shoulder straps and a Chicago screw for the chest buckles.
While I have the Chicago screws out, I'll probably also do something about the calf armor straps.
For C2E2, that's probably all that I have time for, since I still have work to do for my Jayce Talis and Judgement Paladin cosplays.
Also finished the Marine helmet for my friend. After C2E2, I might need to make my own, because I feel like it has a lot of potential for silly tiktoks.