My First Armor Build; Halo Infinite Master Chief

UPDATE:

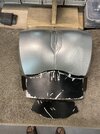
Finally started painting & weathering some of the pieces. Both boots and ankles are done! First, I laid down a coat of silver, then coated with Rustoleum Earthy Green. After the green was dry, I used a small piece of 80-grit sandpaper to scuff it up, revealing the silver underneath (I may have gone a little heavy on the damage, but I will adjust when I do the rest of the pieces. If anything is gonna be more beat up, it would likely be the boots anyway). Used black and brown oil paints, thinned with paint thinner, for the wash. This was the first time I've used oil-based paints, instead of acrylic. I like the results a little better. The oil paints seem to "gunk up" a little better than the acrylic.

I have the shins painted, but haven't done any weathering on them yet. You can see the difference. I knew the weathering would darken it up a bit, so I went with a slightly lighter green. It's not an exact match (still more grayish-green, instead of the slightly yellowish-green from the games). Still, I'm really happy with the final shade I was able to get. (y)
This looks seriously awesome so far, keep us updated as you continue to paint and weather!! I can’t wait to see how this suit comes together!
 
Another weathering technique is to use masking fluid on the places you want the silver undercoat to show through. After the silver you just use a q tip and mark around where you want the damage to show, let dry and then paint with your top coat, once dry you simply rub of the areas where the masking fluid was to reveal the ' bare metal' underneath. The masking fluid is a latex based fluid.
 

Attachments

  • IMG_1159.jpeg
    IMG_1159.jpeg
    295.8 KB · Views: 54
  • IMG_1760.jpeg
    IMG_1760.jpeg
    2.7 MB · Views: 54
  • IMG_1401.jpeg
    IMG_1401.jpeg
    2.8 MB · Views: 63
  • IMG_1398.jpeg
    IMG_1398.jpeg
    1.5 MB · Views: 61
UPDATE:

The last 6 months have been pretty crazy, and I wasn't able to get much done on my suit. I've finally had some time to get back to working on MC in the last couple weeks. Originally, I had hoped to have everything done by HWC, but I don't know if that will happen.

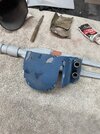
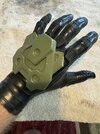
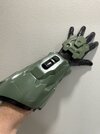
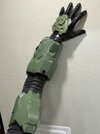
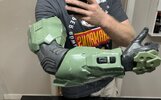
I think I finally found a paint combo that I'm happy with. Couldn't find any spray paint colors that gave me the look I wanted, so I kept experimenting. You can see the color difference in the photos. The hand plate is the final color, while the forearm and bicep haven't had the yellowing applied or been weathered. I ended up doing a base coat of Rustoleum Metallic Silver, then a layer of Rustoleum Earthy Green, and finally hitting it with a light coat of Montana Transparent Ethereal Yellow before damage/weathering.

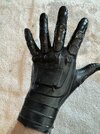
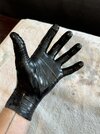
Also, I finally got the sizing right for the gloves (this was attempt #3). I 3D printed the core, made a mother mold, and then cast it in 20A rubber. The glossiness should wear down a little bit, to match the elbow joint better. I do think I may end up down-sizing the hand plate a little bit. Looking at my refence photos, my hand plate seems to be a little bigger than its supposed to be.
 

Attachments

  • IMG_1428.jpg
    IMG_1428.jpg
    3.4 MB · Views: 77
  • IMG_1423.jpg
    IMG_1423.jpg
    3.2 MB · Views: 63
  • IMG_1421.jpg
    IMG_1421.jpg
    3.9 MB · Views: 56
  • IMG_1432.jpg
    IMG_1432.jpg
    2.3 MB · Views: 61
  • IMG_1434.jpg
    IMG_1434.jpg
    3.6 MB · Views: 56
  • IMG_1441.jpg
    IMG_1441.jpg
    2.2 MB · Views: 63
  • IMG_1439.jpg
    IMG_1439.jpg
    1.4 MB · Views: 76
They turned out great! How easy are they to put on and remove? They look quite tight ...
They’re easy to put on, and mostly easy to take off. I coated the inside with baby powder to reduce the rubber “stickiness”. That 20A rubber has great stretch to it, so I scaled it a little small for it to be a tighter fit. That also helps to keep it from bunching up as much in the palm when I flex my fingers.
 
I've heard people using those bandages vice making it out of fiberglss. I'm wondering how strong it is by comparison especially on a big mold like for a full face mask?
 
They’re pretty strong (I believe it’s the same stuff they use for broken bone casts), and lighter than fiberglass.

When I cut the bandages, I fold it over to get 3 layers, then usually apply 2-3 layers of those folded sections over the mold. I’ve dropped a couple of my mold shells, and haven’t had one break yet (aside from small chipping on the edges of the base).
 
Hi, everyone. I just recently started my first full, 3D printed armor build! Naturally, my first and only choice was to do Master Chief.

I'm using the Halo Infinite design from Galactic Armory for the armor, and I found some files on Etsy for the under-suit. It might be more trouble than its worth, but I'm attempting to print all the joint details in soft TPU. The ankle pieces that I've printed seem to be working great so far...

Current problem I'm dealing with, is sizing the chest and back pieces. Apparently, my rib cage is wider than "normal". Lol. I don't wanna just scale up the chest piece, as this will restrict my shoulder and arm movements... I was thinking of using a heat gun to widen the connections around my rib cage. Does anyone have any better ideas that have worked for them in the past for "stretching" parts without just scaling up the whole part??

For the boots, I sliced off the bottom half inch, printed that separately, and will be attempting to cast a mold with a hard urethane rubber.

Also, any tips/tricks you have to help me avoid those rookie mistakes would be greatly appreciated!

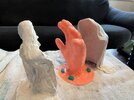
I'll try to keep updated with new pics as I progress with my build. Thanks! (My cat's name is Moby, and he still doesn't know what to make of the armor...


View attachment 336345View attachment 336346View attachment 336347View attachment 336348View attachment 336349View attachment 336350View attachment 336351View attachment 336352)
Everything looks like it’s coming along nicely. As for sizing, I use the Armorsmith program to size all my armor prints. Also if you have small adjustments to the shape or size, sometimes I take a heat gun to the inside of where I need to manipulate/adjust. Hit it for about few seconds and it softens just enough to manipulate but doesn’t ruin the print. I would suggest practicing on any failed prints you might have laying around.
 
They’re pretty strong (I believe it’s the same stuff they use for broken bone casts), and lighter than fiberglass.

When I cut the bandages, I fold it over to get 3 layers, then usually apply 2-3 layers of those folded sections over the mold. I’ve dropped a couple of my mold shells, and haven’t had one break yet (aside from small chipping on the edges of the base).
that's good to know. I've done a fair amount of fiberglass , making both fiberglass molds & parts from those molds but its relatively expensive and very messy. I need to look into those bandages. Where do you source them?
 
I have usually gotten mine from brickintheyard.com, but you can find them lots of places, in a bunch of different widths. Typically, I use the 6” or 8” rolls.


This thread is more than 4 months old.

Your message may be considered spam for the following reasons:

  1. This thread hasn't been active in some time. A new post in this thread might not contribute constructively to this discussion after so long.
If you wish to reply despite these issues, check the box below before replying.
Be aware that malicious compliance may result in more severe penalties.
Back
Top