My First Build - Props and Armor

Vortex

New Member
I'm going to be using this thread to keep track of my progress, but also look for feedback from all the experienced members that have made the mistakes I'm going to make soon enough.

To describe the build concept, I'm using Caretaker's Snowdst build as inspiration: Snowdst

Though for my iteration I'll be using Rakshasa armor and the Artaius Helmet instead of ODST armor.

I'll be using an SRS99-S5 and two silenced magnums for the loadout.

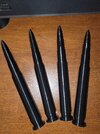
I started by printing some SRS 14.5x114mm APFSDS bullets to test quality as I just recalibrated my printer for PETG and have only done test benchys so far.

Also in hindsight, I might have printed them horizontally for better strength but they're just going to be decorative and attached to the rifle so we shall see if I break them or not.

This is my first time cosplaying, and I'm very new to 3D Printing but I've done a lot of research and prep so now I'm putting all of that knowledge to the test!
 

Attachments

  • 20240912_114918.jpg
    20240912_114918.jpg
    2.1 MB · Views: 38
Last edited:
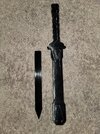
Alright! 2nd print is done. Been keeping it small to make sure I like the results and don't waste too much filament. I printed this awesome knife from Galactic Armory and I love how it turned out. It feels really solid and my printer is doing such a beautiful job. Now it's time to move on to the 1st of two handguns that are going to go with the build!

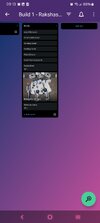
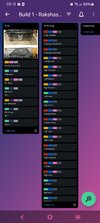
I also took some inspiration from other creators here and have put together a Trello board to help track my progress because just my Google sheet wasn't gonna cut it.
 

Attachments

  • Screenshot_20240913_091339_Trello.jpg
    Screenshot_20240913_091339_Trello.jpg
    646.8 KB · Views: 37
  • Screenshot_20240913_091335_Trello.jpg
    Screenshot_20240913_091335_Trello.jpg
    797.7 KB · Views: 38
  • 20240913_091227.jpg
    20240913_091227.jpg
    2.8 MB · Views: 35
Last edited:
Welcome to the forum! Your to do list is full I see. And you allready doing a really nice start with those small props. Starting small and then getting to the bigger pieces. Learn from your 3D printing mistakes and grow with every print!
If you have questions, dont hesitate!
 
I agree. Starting off small and then working your way to bigger props is the way to go. And also not being impatient (like me); it is tempting to print lower quality and faster, but you always have to do more sanding afterwards. Sometimes it is well worth it to print slower to get the smaller details. Just my two cents. Looks like your prints are coming along smoothly. Looking forward to seeing your journey. Keep it up!
 
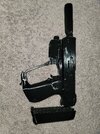
Pistol 1 is done printing, and I learned a lot of lessons.
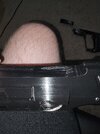
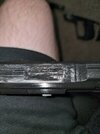
- I need to adjust the model or learn if I can fill the slide in Orca because it tried printing supports inside the slide, and one of the supports failed. So the top needs some filling and sanding, and now I have loose supports inside. Oops.
- The mag is too big, I'm hoping I can sand it down as I printed the walls thick, but for the 2nd pistol I'm going to scale it down a few percent.
- I sliced the slide and grip in a weird spot and the back of the grip is holding on for dear life, so I need to reslice for the 2nd pistol.
- Lastly, the rail for the laser is too big, so I will probably sand that down but I may scale the laser up slightly, I just don't want the 2nd pistol to look too different from the first. Lol.

Overall. Progress is being made. I'll be doing my sizing in Armorsmith today to hopefully start printing the armor by next weekend.
 

Attachments

  • 20240915_112354.jpg
    20240915_112354.jpg
    3 MB · Views: 30
  • 20240915_112921.jpg
    20240915_112921.jpg
    2.1 MB · Views: 32
  • 20240915_112858.jpg
    20240915_112858.jpg
    1.8 MB · Views: 32
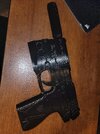
Alright. Made a minor loadout change for my own sanity. Got some higher quality models with the work already done. Only modification I made to this is the cutout for the magnet to attach the pistol to my armor.

I switched to the Sidekick from Galactic Armory, and his Infinite BR as well. Honestly I'm pretty happy with how the print went but have a few questions/issues.

- I ran out of filament mid print, and this caused a huge strand of filament to tangle on the startup point after putting in a new roll, even after extruding and making sure it was ready to print.
- There is some minor stringing that isn't really effecting the print quality, just bothers me. Would Increasing the nozzle temp fix this? In my original post I stated I am using PETG.

Overall, I've learned some things and I'm happy with the course I'm on. I plan to finish the second Sidekick and my BR by the end of the weekend. By then I should have my armor scaled and can start printing next week. Post processing should be... fun...
 

Attachments

  • 20240920_001304.jpg
    20240920_001304.jpg
    2.5 MB · Views: 26
Though for my iteration I'll be using Rakshasa armor and the Artaius Helmet instead of ODST armor.
As someone who has the Artaius helmet I strongly recommend getting a formed visor for this helmet, the shape just brings everything together.

20230820_193447.jpg
20231113_220125.jpg


We do have tutorials about making a vacuum former and dyeing/chroming.
 
As someone who has the Artaius helmet I strongly recommend getting a formed visor for this helmet, the shape just brings everything together.

100% agree.

There are lots of helmets you can get away with basic flat visors but with the Artaius helmet, a vacuum-formed visor should be the end goal if you need to use a temporary basic visor.
 
As someone who has the Artaius helmet I strongly recommend getting a formed visor for this helmet, the shape just brings everything together.

View attachment 352859View attachment 352860

We do have tutorials about making a vacuum former and dyeing/chroming.
I will most definitely be doing that. I've found a guide for the vacuum former that I think will be perfect. I already own a shop vac so that helps.

Right now the main thing slowing this project down is finances, but I should be back on track soon so I'll be posting more updates when that is.
 
I will most definitely be doing that. I've found a guide for the vacuum former that I think will be perfect. I already own a shop vac so that helps.

Right now the main thing slowing this project down is finances, but I should be back on track soon so I'll be posting more updates when that is.
Understandable, finances always dictate how fast you can build
 
There is some minor stringing that isn't really effecting the print quality, just bothers me. Would Increasing the nozzle temp fix this? In my original post I stated I am using PETG.
enabling z-retraction can help with this. But really it comes down to how fast the filament cools after it's extruded. To completely eliminate stringing, you'll want to look into upgrading the fans on your printer.
 

Your message may be considered spam for the following reasons:

If you wish to reply despite these issues, check the box below before replying.
Be aware that malicious compliance may result in more severe penalties.
Back
Top