My first cosplay (Halo reach Spartan)

Status
Not open for further replies.

KadstaBlitz

New Member
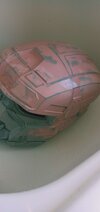
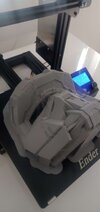
Hello everyone! only a select few of you in this massive community have met me, so for the people that haven't met me yet I'm KadstaBlitz. I've been in the 405th just after halo infinite's release date but I haven't been active in the community until NOW! So, to get you all up to date I've recently bought a 3d printer (Ender 3 Max) and have started my journey of pain and suffering of learning new things. I bought a LEGENDARY file made by nerdforgedesigns and printed it which it came out better than expected! I've only gotten so far as sanding the raw print, applying putty and sanding it smooth. I'll put images below so you guys can have a look! I have a rough idea of what the final product should look like so soon ill post my ideas. I'll keep this nice an updated every time I cross a new milestone!
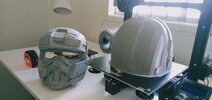
IMG20221102150616.jpg IMG20221106094508.jpgIMG20221106173157.jpgIMG20221119103244.jpgIMG20221119140119.jpg
 
Hello everyone! only a select few of you in this massive community have met me, so for the people that haven't met me yet I'm KadstaBlitz. I've been in the 405th just after halo infinite's release date but I haven't been active in the community until NOW! So, to get you all up to date I've recently bought a 3d printer (Ender 3 Max) and have started my journey of pain and suffering of learning new things. I bought a LEGENDARY file made by nerdforgedesigns and printed it which it came out better than expected! I've only gotten so far as sanding the raw print, applying putty and sanding it smooth. I'll put images below so you guys can have a look! I have a rough idea of what the final product should look like so soon ill post my ideas. I'll keep this nice an updated every time I cross a new milestone!
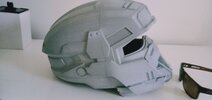
View attachment 325676 View attachment 325670View attachment 325671View attachment 325672View attachment 325675
Looks great, what colors are you thinking of doing?
 
Hello everyone! only a select few of you in this massive community have met me, so for the people that haven't met me yet I'm KadstaBlitz. I've been in the 405th just after halo infinite's release date but I haven't been active in the community until NOW! So, to get you all up to date I've recently bought a 3d printer (Ender 3 Max) and have started my journey of pain and suffering of learning new things. I bought a LEGENDARY file made by nerdforgedesigns and printed it which it came out better than expected! I've only gotten so far as sanding the raw print, applying putty and sanding it smooth. I'll put images below so you guys can have a look! I have a rough idea of what the final product should look like so soon ill post my ideas. I'll keep this nice an updated every time I cross a new milestone!
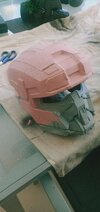
View attachment 325676 View attachment 325670View attachment 325671View attachment 325672View attachment 325675
Ah heck yeah another EOD fan!
 
always happy to see more reach cosplayers, looks good so far. ive been printing for over a year now and if i learned anything its that Creality support is worthless.
 
I love the Reach era armor sets. They look tactical and practical for their world. The EOD set hardly gets the love it deserves. I have an Ender 3 pro and I’m curious if you had to cut the files up or if they were already precut?
 
I love the Reach era armor sets. They look tactical and practical for their world. The EOD set hardly gets the love it deserves. I have an Ender 3 pro and I’m curious if you had to cut the files up or if they were already precut?
I agree, Halo reach armor is amazing! I don't see many EOD helmets floating around! To the question, you asked I did have to cut the file myself using mesh mixer. I have an ender 3 Max so I only had to cut mine into 2 pieces, but if you're thinking to get one of the files you might need to cut it into 3.
 
I agree, Halo reach armor is amazing! I don't see many EOD helmets floating around! To the question, you asked I did have to cut the file myself using mesh mixer. I have an ender 3 Max so I only had to cut mine into 2 pieces, but if you're thinking to get one of the files you might need to cut it into 3.
10-4. I’ve been looking at nerdforge and I’m fully convinced that I will be buying all the files! Seeing this EOD helmet just cements my decision
 
As of right now I'm thinking to do a dark grey and vibrant, midtone green. I've also made a rough design of my costume using a blender file which was created by lobster cosplay on YouTube, its below:
By the way Jeff released a new pack of this available on the forums here
My basic little tutorial was just to fill the gap until the main man got the files out to us. Figured I'd link you just incase you wanted any of the new files/mess with new MCC things. Helmet is looking great!
 
By the way Jeff released a new pack of this available on the forums here
My basic little tutorial was just to fill the gap until the main man got the files out to us. Figured I'd link you just incase you wanted any of the new files/mess with new MCC things. Helmet is looking great!
thanks for letting me know, thats great news for me! havent really been active the past week or 3 just from holidays but have got all the models I need to make this armor real!!!, now I have a question in what orientation would you recommend printing this forearm???
forearm orentation.PNG
 
I printed a set just like that in 1 piece. Just aligned it with the bottom the best I could and hoped the print gods treated me fairly. Either that or slice it in the middle and print a front and back half.
 
thanks for letting me know, thats great news for me! havent really been active the past week or 3 just from holidays but have got all the models I need to make this armor real!!!, now I have a question in what orientation would you recommend printing this forearm??? View attachment 326501
These are the same files I used for my armor and my wife's. I actually just cut off a little of the model so it would sit flat on the plate for better adhering. I'd definitely recommend printing out some sizing rings for these things tho cuz the forearms especially can be a pain in the ass to scale properly.
 
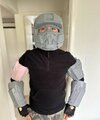
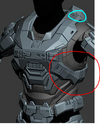
PROGRESS REPORT I have printed most pieces of the arms (I have to print the shoulders, i have printed the hand plates just need to get some gloves for them.), but I have three questions. Firstly, for armor would I use resin to fill print lines instead of the bondo? Since there is a lot of detail especially in the forearms that I don't want to lose. Secondly, I am about to start printing the big boy chest piece but at the red circle there are 3 parts that are needed to be connected (which ill add a picture of) (I am planning to use magnets for the aqua circle area) I do not know the best way to connect them when I wear the armor. If there are any suggestions, PLEASE let me know! Lastly what magnets do you guys reccomend?
 

Attachments

  • image1.jpeg
    image1.jpeg
    1.2 MB · Views: 147
  • torso.PNG
    torso.PNG
    174.1 KB · Views: 140
PROGRESS REPORT I have printed most pieces of the arms (I have to print the shoulders, i have printed the hand plates just need to get some gloves for them.), but I have three questions. Firstly, for armor would I use resin to fill print lines instead of the bondo? Since there is a lot of detail especially in the forearms that I don't want to lose. Secondly, I am about to start printing the big boy chest piece but at the red circle there are 3 parts that are needed to be connected (which ill add a picture of) (I am planning to use magnets for the aqua circle area) I do not know the best way to connect them when I wear the armor. If there are any suggestions, PLEASE let me know! Lastly what magnets do you guys reccomend?
Looks like you're going for a 2 part clam shell for your chest? Magnets at the top and bottom would work fine or attaching the bottom to a harness and velcroing the side plates are some options. I went with the one solid piece option and velcro for the side plates.
 
PROGRESS REPORT I have printed most pieces of the arms (I have to print the shoulders, i have printed the hand plates just need to get some gloves for them.), but I have three questions. Firstly, for armor would I use resin to fill print lines instead of the bondo? Since there is a lot of detail especially in the forearms that I don't want to lose. Secondly, I am about to start printing the big boy chest piece but at the red circle there are 3 parts that are needed to be connected (which ill add a picture of) (I am planning to use magnets for the aqua circle area) I do not know the best way to connect them when I wear the armor. If there are any suggestions, PLEASE let me know! Lastly what magnets do you guys reccomend?
For filling in layer lines, resin is an option (such as XTC3D), which makes it much easier to fill those pesky lines. However, it can be kinda costly, not to mention messy too. At Supercheap Auto you can get SCA brand Spray Putty (which I've found works a bit better than the primer filler) and apply that to the print, sand, prime, sand and repeat using increasingly higher grit sandpaper until you reach a finish you want.

For the magnets, rare earth (AKA neodymium) magnets are some of the best commercially available magnets. These ones from Bunnings might do the job, and if you do find they are too strong, you can put something between them, such as 1mm foam, to weaken the connection.
 
Looking really good there KadstaBlitz. Ton of work to be proud of there.
PlanetAlexander and I clearly shop the same stores. I'm also a fan of the SCA brand sprays. I tend to alternate between a coat of the Filler Primer, and the Spray Putty. Partly because that makes it alternating coats of thicker and thinner filling, but they are two different shades of gray which makes it nice when sanding to see how deep you're going. I notice Alexander is referencing Australian stores: Are you Australian Regiment as well?

Another filler/smoothing option is Monocure3d resin paste. And yeah, its not cheap but its good value. I find its nice to work with and less waste than a Bondo-like body filler. It doesn't dry while you're applying it. Its UV cure just like 3d printer resin, but with a consistency of hair paste. You can apply it, smooth it, use a plastic razor blade to apply it with a scraping motion that only fills the grooves and leaves a flat smooth surface and put the excess putty back in the jar for later, before shining a UV flashlight on it to set it. I find I'm not racing the clock and the drying speed of body filler paste.
 
Status
Not open for further replies.
Back
Top