1st Build My ODST Journey

KocourUS

Jr Member
Rather than clutter up the forum with a dozen individual threads...

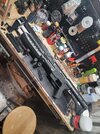
After printing and assembling my M1 Combat Knife, the next step was the ubiquitous M6S/SOCOM, because what ODST would be caught dead without their sidearm? All parts were printed on my FlashForge Adventurer 5M Pro, FlashForge Black PLA, 15% gyroid infill, 3 walls, tree supports.
20240512_215152.jpg


20240512_214534.jpg


20240512_214604.jpg


Next up: the M7S SMG and the M45 Shotgun.
 
Last edited:
I stopped tracking how many grams of filament per print, but I can tell you that the M7S alone has represented nearly 24 hours of print time... And I'm on my second roll of black...

I always forget how absolutely goofy the SMGs magazine is, being mounted on the side and feeding caseless ammo.
20240514_153835.jpg


20240514_211243.jpg


20240514_181337.jpg


20240515_201010.jpg
 
Last edited:
All told, the M45 represented the better part of 60 hours of total print time, including a couple parts I had to modify and reprint because they didn't quite fit properly on the PVC, and came up to about 1800 grams of filament.
image.png
20240517_194939.jpg
image.png
image.png
20240518_090915.jpg

20240519_083025.jpg
image.png


20240519_221245.jpg
 

Attachments

  • 20240519_183043.jpg
    20240519_183043.jpg
    1 MB · Views: 76
Last edited:
I wound up having to modify the barrel plugs for two reasons. First, they're sized to fit in the included barrel inserts, which you don't need if you use 3/4" PVC, except then they're too big. So I took a caliper measure of the ID of the PVC, imported the parts to TinkerCAD and made a collar (basically) to reduce their diameter. Worked like a charm. The other thing I did was enlarge the hole on the actual barrel, because its entirely too small to pass for an 8ga barrel. Its a severe choke. Once I did that, I was much happier with the finished result, and now this monster joins its brethren on the wall!

20240521_161033.jpg

Paint is coming soon for these, but thats another weekend of work to do.
 
Last edited:
Wow, yeah, I've been neglecting this for...a while. Alright, so I've moved on from the guns to the armor, and there was a point of about a month there where my printer didn't cool down...

I decided to continue printing all of the ODST suit using Flashforge PLA in Black. At $26 for 2kg, its cheap and readily available.

20240524_171406.jpg

20240526_155131.jpg

20240524_171412.jpg
 
Last edited:
I haven't touched Bondo in 20 years, so I had to relearn how to apply the stuff. I'm not entirely happy with the result, but I'm learning.
20240527_204440.jpg


20240605_194510.jpg

20240605_194506.jpg
 
Last edited:
Sanding in the workshop during that heatwave we had, even with a bunch of fans going it was still 80+...
20240622_135524.jpg

20240622_140027.jpg
 
Last edited:
Starting the helmet

I know, I know, do the helmet last, its the most important piece, its what everyone looks at, the issue is that I have a lot of work that needs to happen to the helmet, such as electronics and some custom paint and decals, so I need to get started early!

My first attempt a helmet...yeah, game devs cheat by having heads just clip through solid objects...

1722803741812.png


Thankfully, MoeSizzlac had the foresight to make a model of the ODST helmet with a removable nape, which makes getting the helmet on a lot easier whilst avoiding the bobblehead look.

1722803823992.png


1722803835990.png


I actually wound up putting the forehead section back together since my printer was able to handle a section that large. But given shrinkage and a few other things, it didn't exactly line up in a few places, but its nothing that can't be fixed in post.
1722803850743.png


1722803933966.png


I know it looks a little small, but its actually sitting very far back on my head because it didn't want to balance otherwise. Once I get padding and stuff in, it'll fit a little better.

After some bondo and a coat of primer filler, I realized I really needed more bondo, but thats just part of the learning experience.

1722804025442.png
 
Last edited:
My base layer for all of this is going to be a set of Multicam Black combat pants and matching shirt. The issue is, these pants aren't meant to be worn under armor, and they have a lot of extra pockets that won't be accessible, so all they're going to do is be extra layers to hold in heat, which is a major concern. So its time to cut off some pockets.

1722804193274.png


A few minutes with a seam ripper and a lighter, and now we have pants with 60% fewer pockets!

1722804228443.png


Unfortunately, my next issue is, quite frankly, I'm built like a bendy straw, with no hips or butt to hold my pants up, and adding weight is going to make that problem worse. Doesn't look so cool when all your armor is hanging down around your knees. So I made a pair of suspenders based on a design I encountered years ago in the military, with a few modern upgrades and a couple changes. These also have the advantage of, well, when you gotta go you gotta go, but getting suspenders off when wearing armor and clothing over the top can be a challenge, so they're detachable at the belt line, for easy removal, without having to actually take the suspenders off.
1722804430826.png


1722804465248.png


And now my pants won't fall down! Atleast, I hope not, but we'll see how they hold up...
 
Last edited:
Boots and shins!

1722806460325.png


1722806494064.png


The heel and toe caps are attached with a mix of webbing and elastic. There's probably a better way to attach this, but it involves some redesign of the original files and I'm just not there yet. I made loops of webbing using Weld 16 and a lot of patience, and the laces of the boots are threaded through these loops. There's a loop of elastic that stretches across the instep, just to keep the cap held down. The heel caps are also on elastic, glued directly to the boots. I couldn't figure out a better way to do this, and the elastic doesn't like to glue to the elastic. Again, I think a modification of the original design may be called for.

1722806752343.png

1722806642306.png

1722806673147.png
 
Last edited:
Oh, a new update! Looks nice. Peaches directed me over here, and then I realized I'd already seen the start of your build. Glad I came back and saw the progress. Looks great!
 
Yet another tool added to my arsenal, now I own a Cricut cutter! Time for custom decals!

1723088413881.png


The Med Ref, Pacific Reg logo, and CWO-3 decal were printed on my inkjet using Cricut Printable Vinyl, then everything was cut out on the Joy Xtra!
 
Last edited:
Moving up the leg to the shins, I found that printing them at 100% was actually fine for me, but they have a tendency to ride further down the leg than I'd like, so I needed some way to keep them higher up the leg. Adopting the methods used for the tow caps, I just glued some 1.5" webbing to the backside of the calves, sewed some tri-glides into the back of the legs of my pants, and hey presto, adjustable ride height shins with minimal obvious attachment.
1723094883591.png
1723094915350.png
 
Last edited:

Your message may be considered spam for the following reasons:

If you wish to reply despite these issues, check the box below before replying.
Be aware that malicious compliance may result in more severe penalties.
Back
Top