Odst 2.0 and introduction!

FvWrstNghtmare

New Member
Hi everyone!

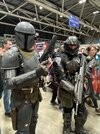
I've been quietly on the forums for awhile now but recently I've worked up the courage to post for the first time, with a build thread at that! I've been cosplaying for about 4-5 years on and off, with the majority of that working on my odst suit that i've been slowly upgrading throughout the years, moving from eva foam to 3d printed parts, never quite considering it finished

Last October i was trying to print all of the required pieces in time for planet anime but naturally, i waited too long and was only able to get a few new parts for it
odstv2.jpg


So this year im hoping to actually once and for all finish this suit and be able to finally be satisfied with it. Not only am i printing the missing parts (legs, shoulders, other smaller less noticeable parts), im also going back and touching up the rushed, albeit salvageable parts that got the 3am paintjob treatment originally.

Currently im working on assembling the chest plate and sanding down the gauntlets while i wait for the calves to finish printing, ill update again once those are ready for the next steps. Let's see if i can actually make it to the finish line this year!
 
Another Stanchion! Your suit looks amazing, I can't wait to see it when you've considered it done. Also you mentioned Planet Anime, so naturally I'm assuming you're in the great big corn field of the Midwest, so welcome to the corn chaos!
 
Thank you! The stanchy belongs to SpartanSweed (unsure how to tag) who graciously let me take a picture with it (never in my life have i been so scared to potentially break a prop). And yes, midwest native!
Ah that makes sense, Sweed loves that thing lol.

To tag someone it's done the same as Instagram, Discord, Twitter/X, etc. just type an @ then start typing the name and click on the member you want to mention. Like this: SpartanSweed
 
Wait a second I think I recognize that build. I think we met a few times at past Planet comicons.
 
Sorry for the long update time! Life and school got pretty busy there for a sec, but with the con crunch kicking in for planet, im back at it!

So, getting up to speed, the new chest piece has been assembled, given a 'much to be desired' sanding job, and some gap filling treatment. i used some kiwk seal caulk just to see how it would work on a 3d printed part (the most important one naturally), since ive only ever used it on foam
IMG_7137.jpg


Next up, i got the calves and shins fully assembled, waiting on the next stages for post processing
IMG_7141.jpg


The leg parts fit like a glove thats on the slightly snug side but as far as im concerned as long as they stay on and dont cut off circulation, its fine by me. not entirely looking forward to the processing on these guys but at this point anythings gonna be better then my old leg parts, i've been using them for about 3ish years now and since i rushed while making them, theyre falling apart pretty bad.

I wanted to go back and give my gauntlets some love since when i initially made them, i just threw on some spray paint at 3am the night before i needed them done (seeing a pattern yet?). Since it was a rushed job theres a whole lot of paint globs on it. Not only that but it was my first time trying out the toothpaste method for getting paint chipping and naturally i missed some spots, which grosses me out so im also trying to hit those too. On my old set pictured in my first post you can kinda see it.
IMG_7139.jpg

still needs some more work but some progress is better then none!

On a much more somber note, my 3d printer (ender 3 s1 pro) is on the fritz (AGAIN), so i've been slowing down a bit on working on this stuff. luckily i planned accordingly for once and got my most important parts printed, my shoulders are really the only priority thing left (besides my thighs but i can live without them).

A tiny update considering the amount of time thats passed but i've been hard at work lately, and while i would say i'll be updating more frequently, i am very prone to forgetting things! Plus too ill be trapped in the sanding tips so when i do ill do my best to make it worthwhile.
 
Looking great so far my man. How well did the Kwik Seal Caulk work? Been trying to experiment with getting flush seams recently.
So far it seems to be working like a charm. on my chest piece i started with filling the massive, potentially breakable problem gaps with kwik seal, then hit the smaller areas with bondo for a more consistent and even surface. i have noticed a few proud spots that could use some extra sanding attention but beyond that no major problem have popped up (yet!)

just make sure to give it plenty of time to dry, and try and make sure it doesnt have any massive globs when drying because they will chip and take extra caulk with it when sanding. i’ll post some pics later of the results so far.
Sounds good I'll give it a shot. I recently had a Recon helmet drop and the bondo split apart along the seams, looking for something that'll be easier to use and tougher. I'll give this a shot!
 

Your message may be considered spam for the following reasons:

If you wish to reply despite these issues, check the box below before replying.
Be aware that malicious compliance may result in more severe penalties.
Back
Top