Progress!
So it's been going slow, and I haven't worked on this as much as I should have, but there has been progress since my last post.
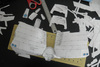
I've mostly been working on the small bits and indents, and put together the front of the chest (mostly to make room on my table). Today, I'll be trying to figure out the back detail panel. It's not something I want to end on, so why not get it out of the way now?
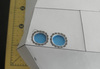
Now, in the picture above, you might have noticed some blue spots like this:
They're spots where I'm sort of... "cheating" to get my round indents done. I've no problem with geometric indents, but the little round ones have always driven me nuts. There's about a million little folds for something the size of a dime. So, instead of cutting out the pep pieces for the round indents or carving out later, I've been using the pieces as stencils and backing it with layers of craft foam. I've tested how resin reacts to it, and it doesn't eat it like rigid foam board. If this works, I'm also going to use it on shin pieces (since I have to redo those). This can be done with some patience in just a few simple steps.
Step 1: Cut out the holes on your pep piece and stencil them onto a sheet of craft foam.
Step 2: Mark out where you need to cut your piece. Make sure you cut it out at a size to leave room for tabs to fold and glue together.
Step 3: Glue your foam to the back of the pep piece. This is also a good time to run a pencil or pen around the edge of the circles to smooth and widen them.
Step 4: Glue a solid piece of foam on the back. Keep it about the same size as your cut piece.
And there you go! You now have round indents with only a fraction of the headache and cutting. I've been doing mine before I glue them into the piece so I can apply more even pressure to it, but you could try it while glued in if you want. I just think it would be a lot harder. I might also try this on some of the back detail depending on how it goes.
Tell you how it turns out when I get to the resin stage.
 gonna need to go through the entire thing again, YAY!! XD