Unleashing Festive Fury: Peppermint Laughter Mk VII Build

Fallen

BCO
405th Regiment Officer
Community Staff
Member DIN
S922
HIS1MP_Event_Winter_Contingency_VisID_Clean_1920x1080.jpg


With GalaxyCon coming up in December, and this project progressing fairly smoothly it's time to get a build thread up. During last year's holiday Winter Contingency event and the release of the Sweetsight visor, Silent Nightcap helmet attachment, and Holiday Cheer chest attachment I got it in my head that I wanted to do a holiday themed Spartan. Because I still wanted to keep with all items that are wearable in-game, I made the decision to do a Peppermint Laughter armor coated build. Considering I'm starting this thread just days after the first teaser for this year's event and new armor coating I admit I debated switching gears and replicating that to the best of my ability without full release instead. Telling you now, that's the plan for changes next year.

full-body-1.png
full-body-6.png
full-body07.png
full-body-10.png

Basic Plan
Start from the same templates from my current Mk VII Build and same armor elements to make things simpler. Already know the fit of those pieces and make adjustments as needed and learned while wearing that suit. Figure out how to make the sweetsight visor work. I've tested my idea on a small scale; now I just have to make it work on a full visor sheet. No vacuum formed visor this year, maybe next. Holiday Cheer grenades are a high priority, and adding magnets to the helmet and a Santa Claus hat to be able to wear that or take it off. Bonus points if I choose a location that lets me swap the hat with reindeer antlers in the future.

All in this is just a fun, goofy project because why not?

Build Links
 

Attachments

  • full-body-1.png
    full-body-1.png
    453.4 KB · Views: 154
  • full-body-10.png
    full-body-10.png
    1.3 MB · Views: 118
  • full-body07.png
    full-body07.png
    1.4 MB · Views: 99
  • full-body-6.png
    full-body-6.png
    1.3 MB · Views: 90
  • full-body-5.png
    full-body-5.png
    986.1 KB · Views: 86
Last edited:
Foam Construction
Given I've built this entire suit once before construction was fairly straightforward. Reuse my templates and have the part from my current suit sitting next to me so I can reference that and look at how I'd opted to cut various angles or alter the original templates to make my other suit. I made adjustments here and there for a better fit such as swapping out 10mm foam for 6mm foam in the forearm wrist so it's not quite as tight and cut away a section at the bottom of the bicep to let me pull it up higher on my arm for greater mobility. Wish I'd taken more photos during this part of the process, but I was trying to get through this stage as quickly as I could. I basically set up in my crafting area over the course of a few Saturdays and worked on banging out a part or two for both left and right starting at the boots and working my way up. So first Saturday I think I got done with the boots, shins, and knees. Second weekend I did the calves and thighs since I separate my shins from the calves and clamshell them for easier packing and wear.

2023-08-15 14.53.28.jpg 2023-06-20 12.42.48.jpg 2023-06-19 20.15.49.jpg
One change I made to the calves so I can still kneel and sit easily without squishing the foam was to slightly cut down the sides of the calves. I'd done this on my other suit but didn't transfer that change to my templates, so this time I lined up my template to the real piece and traced that line then cut it off my template. Should be able to work for any rebuilds or replacements I need to do in the future.

2023-08-20 21.09.26.jpg 2023-08-20 21.12.54.jpg
Within a few weeks I had all of my primary foam work completed and it was time to do any cleanup and prep for priming. That however would end up waiting until after September as I shifted my focus to other priorities.

Honorable Mention
I did originally build the belt out of foam with a plan to resin print the greeblies even going so far as to construct all of the elements. However, TurboCharizard's Mk VII files were too tempting, so I ended up 3d printing those. Foam templates for these had been extended to fit me better, but I noticed w/ my current build that my belt is starting to fit a little looser, so hopefully the printed ones will last longer and simply end up sitting closer together as time goes on. I'll be strapping the belt with elastic between the segments. One thing I did like is that the hip boxes I'd made functional pouches initially with a 1mm foam piece over both the magnet and metal plate, but I did end up cutting back off the extra foam. That's probably the one thing I'm going to miss with the printed ones, but not a big deal. The pouches were only going to hold a few stickers or a couple of mini protein bars.

2023-08-21 13.40.28.jpg 2023-08-21 13.42.52.jpg 2023-08-14 10.54.48.jpg
 
ANOTHER BUILD?? ALREADY??
It feels like just yesterday you sprang up with your current green and black mk 7 overnight! Looking forward to seeing this new one though! Love the idea!
 
ANOTHER BUILD?? ALREADY??
It feels like just yesterday you sprang up with your current green and black mk 7 overnight! Looking forward to seeing this new one though! Love the idea!

This one was being planned out while that was in the works. That one was never actually planned, more of a, "Hey Planet is coming up in a couple of months can I bang out a new suit in time?" kind of thing.

There's another full suit in its starting phases w/ a C2E2 deadline, but after that I have asked a couple of people to hold me to NOT starting another full suit build next year.
 
3D Prints

During this process I donated my oldest printer and bought an Ender 5 Plus. Figured after some initial setup prints that my first real print would err on the side of caution and be small. Hand plates worked well for that. While the orientation on the bed could have been better for a smoother result, wasn't horrible for the first actual print on a new printer.
2023-06-27 10.02.48.jpg

Started printing the chest but stopped part of the way through deciding to repurpose my old chest and back plates for this build and use new printed ones on that instead. Ended up w/ 2 helmets thanks to my not factoring in the electronics I want to fit into it on the first pass. Current one might still be a bit tight, but I'm not opposed adjusting for future iterations.
2023-08-25 08.58.15.jpg IMG_5103.jpg


And lastly on the prints made Turbo's belt printed and used Ataraxia Flexible PLA in white to print a neckseal. If I reprint it I'll want to dial in the retraction settings better and might switch to another model I found instead, but I can work with this. The highest priority right now is getting the build done in time. Any polish or adjustments can come after that.
2023-10-09 10.25.25.jpg2023-10-11 12.02.05.jpg


Bonus Items

Maybe I'm taking this whole Christmas Spartan theme a bit too far, but I've added some other additions for the fun of it.
1) my old suit had speakers that sat inside the thrusters on the back, but they were tiny, not powerful, and had a short battery life considering. I ripped out the old shelf I'd put in the back for those speakers, bought some larger ones that claim to last 16hrs, cut holes on the inside of the backplate to access inside the thrusters and am swapping out the old speakers. Maybe I'll share how I did the speakers in the back in a future update
2) Bags. Who doesn't want to carry around a big gift bag? I didn't want to go super large, but I didn't want something tiny either, so I picked up a 3 pack of "gift bags" that I can swap around each day. I'll likely just put filler in them.

2023-10-04 11.04.31.jpg 2023-10-03 11.27.50.jpg

I'm nearly done with paint on most parts now, so hopefully it won't be long before there's another update.
 
Last edited:
Helmet

The helmet is probably one of the most important parts as it's what most people will focus on when talking to you. It's also that part that even when a suit is retired I'll keep that helmet as a display piece, so of course it deserves its own build post.

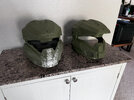
For starters I used the Cavallino model from SkookumProps found here. I love that many of the smaller bits that are hard to sand when fully assembled. As mentioned in my previous post I ended up printing 2 as the first pass was going to be too small to fit electronics. This one may still be a tight fit when I add the audio since both sizes were printed before I ever added audio to a helmet.

Attempted something I haven't done on a print before and used UV resin to start with smoothing layer lines. I already had a UV light so I picked up this stuff and gave it a go. If you do the same, wear gloves and work in a well ventilated space or outside. I'd still recommend a respirator and glasses to be safe. I also protected my work area by covering it with builder's paper and a large silicone mat on top. Wish I'd taken photos during that process, but I wasn't exactly thinking about my build thread at that point. One thing I would change if I were to do this again is to have a few toothpicks and to spend more time focusing on all the little grooves in the model to ensure I don't lose them in the resin coat. A scribing tool managed to get a few back, but I definitely lost some details that filled with resin. From there I went to the same old sand, prime, and spot putty routine until I considered it good enough. Not going for perfect here; there's not enough time. When done silver coat and apply liquid mask to the areas I plan to have larger battle damage.

2023-10-27 16.46.00.jpg 2023-10-27 16.46.13.jpg

Paint time!
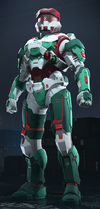
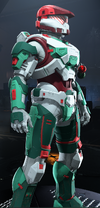
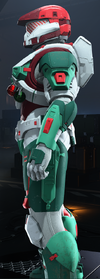
Given the colors for this suit, I made a plan to start with white and then add the other colors on top instead of my usual primary, secondary, tertiary, etc. process. 5 coats of white paint later I was ready to tape and move on. I'll touch on paint colors choices later, but 3 of the 5 colors are interior house paint from the hardware store, and 2 are hobby paints. I was waiting on a shipment with my bright red, but the dark red came from Lowe's, so I got those sections done and taped them off. Finish up airbrushing the bright red, and we're mostly done. I still need to touch up the small areas that wouldn't mask well with a paint brush.

2023-10-28 21.26.23.jpg 2023-10-29 17.35.07.jpg 2023-10-31 10.19.41.jpg

Now for a challenge, I apparently wanted to suffer, so I chose to replicate the sweetsight visor. I'm sure if you look around long enough you could find a tint or something to provide the candy cane pattern, but I wasn't finding one in my search. Thankfully I do have a Silhouette Cameo that can cut the pattern for me, and I wasn't planning on buying a vacuumformed visor.

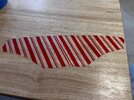
Start with some mini tests. Using leftover tint from my main Mk VII visor. Visibility wasn't bad and the Cameo could cut the tiny stripes at a small scale.
IMG_5007.png IMG_5010.jpg 2023-11-01 20.23.33.jpg

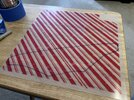
Larger test to get blade depth and force of cut then cut out a full sheet. I ended up being able to get 2 visors out of a full sheet of the visor material I used. Still don't know where I got that material from, but it's made visors for 3 suits for me now. One difference you'll notice between the small scale and large scale is instead of 3 small stripes I only have the 2 that were whitespace in the test piece. At the larger scale my Cameo had troubles making the 3 tiny stripes useable, so slight change. I doubt most anyone would notice if I didn't call it out. I will say carefully removing the whitespace stripes while not losing more red stripes was a slow process, and I have no idea how many small scale tests I did to figure out what my machine was capable of cutting.

2023-11-01 20.23.44.jpg 2023-11-01 20.24.01.jpg 2023-11-01 20.28.58.jpg 2023-11-01 20.40.46.jpg 2023-11-01 20.41.48.jpg

Remaining on helmet
  • Paint touch ups/details
  • Weathering
  • Electronics - audio, fans
  • Padding
  • Semi-permanently install the visor
 

Attachments

  • 2023-11-01 20.25.38.jpg
    2023-11-01 20.25.38.jpg
    6.5 MB · Views: 88
  • 2023-11-01 20.35.14.jpg
    2023-11-01 20.35.14.jpg
    6.8 MB · Views: 79
  • IMG_5103.jpg
    IMG_5103.jpg
    6.3 MB · Views: 89
Last edited:
That Visor turned out absolutely stunning and will add such a pop to that helmet! I would have never thought to make a visor using that method.

This suit is going to turn out amazing!

I also really need to chat with you about the flexible filament
 
Everything's coming along really nicely! The helmet looks great, and while I imagine that visor must be pretty trippy to see out of, it looks great to an outside observer. For the helmet, how many coats of resin did you apply before you went to using spot putty? The general idea I've gathered from tutorials and such is that you only need a few coats for most of everything to look smooth; putty is really only used for filling in missed areas. I've tried this method with some mixed results, so I'm wondering how much putty you used in comparison to the resin.
 
Everything's coming along really nicely! The helmet looks great, and while I imagine that visor must be pretty trippy to see out of, it looks great to an outside observer. For the helmet, how many coats of resin did you apply before you went to using spot putty? The general idea I've gathered from tutorials and such is that you only need a few coats for most of everything to look smooth; putty is really only used for filling in missed areas. I've tried this method with some mixed results, so I'm wondering how much putty you used in comparison to the resin.

I only used 1-2 coats of the resin. The stuff I used is thick compared to the resin you'd use in a printer, so I'd expect more coats if using that stuff possibly even if you were to mix in baby powder like many tutorials do. My goal was to mostly just fill layer lines roughly 50% or more so that I wouldn't have to spend eternity (by feel) sanding at 80 grit. For reference based on my spreadsheet layer height was 0.2 for the helmet parts. After it had cured I cleaned the helmet parts with IPA, sanded, then primed and started the spot putty, sand, primer, repeat process.
 
Love seeing this build coming to life, spreading some holiday cheer 1 spartan at a time.
Also, yes! more speakers! Mounting them in the rear thrusters is a fantastic idea.
 
The helmet and that visor turned out amazing! I can't wait to see the rest of the suit, I just know this one will turn out beautiful, especially when paired with a Christmas coating weapon.

Edit: Oh yeah, and I recommend using resin printing for handplates, they turn out way better that way in my experience!
 
I'm still hoping to get the peppermint laughter nerf repaint in. All general painting has been done for the armor, I'm just lazy and haven't staged them for photos yet. Working on the ab wrap this week and hope to have that and the thigh gaskets done this weekend. I've got my checklist for everything to finish the suit. Some of them are quick items to pull it together, and others are more time consuming like the ab wrap and a 2nd pair of boots that I can wear when I don't want to deal with platforms. Given the number of boots I've build now across 2 suits (and a cat eating a pair) I could probably knock out the construction on the spare set and have it primed in a day.

1700163528362.png
 
I'm so happy to see a peppermint laughter build! this one is on my list! Cant wait to see the progress!
You're in luck. The spine is getting E6000'd onto the ab wrap right now, and it should be cured just enough to do a full suit up this evening.

Mini update in the meantime. Everything is painted, ab wrap itself has been assembled and got a Santa hat that I'll sandwich with magnets I can still slide around my helmet to attach it.

2023-11-22 14.33.17.jpg 2023-11-16 18.15.32.jpg

Over Thanksgiving weekend I knocked out wrapping up my Nerf AR repaint. I still have small touchups to do, but I can do touchups and weathering in the hotel if I need to.

2023-11-26 11.15.36.jpg
And lastly I put together a little gift for people who work the booth at GalaxyCon this weekend. A few people know what it is already. I have enough for the number of people I saw on the attending list by the beginning of November plus a few extra just in case.

2023-11-20 19.00.00.jpg
 
Little known fact, Santa was part of the Orion-I project. It explains how he can carry all those presents and constantly fall from the sky without taking damage.

Spine and ab section look good. It might be a bit before I start mine, so I'm watching everyone else to learn.
 
Spine and ab section look good. It might be a bit before I start mine, so I'm watching everyone else to learn.
Thanks. While I didn't get a ton of pictures of it I'll do my best to get a full write up on that ab section as there's definitely some things I'd definitely do again and others that I tried and would not recommend.
 
This thread is more than 9 months old.

Your message may be considered spam for the following reasons:

  1. This thread hasn't been active in some time. A new post in this thread might not contribute constructively to this discussion after so long.
If you wish to reply despite these issues, check the box below before replying.
Be aware that malicious compliance may result in more severe penalties.
Back
Top