Carter Build

Status
Not open for further replies.
haha thanks road kill! i really like how the knife turned out as well too. idk how im going to harden it though...i was thinking about resining the outside so it holds it's shape then going to resin or rondo the inside...but idk if that'll make it too heavy...what do you think?

if you leave the bottom square piece at the bottom of the hilt...(it looks kinda like this [_]) and you pour in rondo after you resin the inside. after you pour in the rondo let it sit for 10 seconds at the blade then tip it over so the rondo can drain back into a cup and make sure the hilt gets covered. after you drain it and it hardens just hot glue the square piece into place
 
You're build seem to be coming right along. I like the lighting, the Blue sets it off nicely.
thanks!
if you leave the bottom square piece at the bottom of the hilt...(it looks kinda like this [_]) and you pour in rondo after you resin the inside. after you pour in the rondo let it sit for 10 seconds at the blade then tip it over so the rondo can drain back into a cup and make sure the hilt gets covered. after you drain it and it hardens just hot glue the square piece into place

awesome tip costumer! good thing i used hot glue so i can just heat up the tip again to take that piece off for hardening lol.


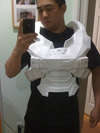
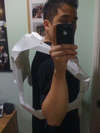
alright guys so here's some updates that i have. i've been working on a new hd version of the chest piece file that i got from wiyumishere (i dont think he modeled it but he had the file on hand). i have some good news and bad news...good news is that the pep is turning out awesome! but the bad news is that the piece doesn't fit...or atleast a part of it doesn't fit... here's some pics for some reference to what im talking about

2011-02-13195228_Honolulu_Hawaii_US.jpg

so here is what it started out as...
2011-02-17022638_Honolulu_Hawaii_US.jpg

day 1...
2011-02-17043535_Honolulu_Hawaii_US.jpg

day 2...
2011-02-21112755.jpg

day 4 (sorry no day 3) the front and back fit ok and look proportional...but there is a problem!!!
2011-02-21112823.jpg

the width front to back is just a tad too big...does anyone have any pointers as to how i can fix this without cutting and regluing pieces together...i really like the look of the pieces that come down below the arms and don't want to cut them but if there is no other way it looks like that will be how i will have to do that...does anyone have any other suggestions before i decide to move along with this approach?

2011-02-21112908.jpg

also my head doesnt fit through the neck opening but i was planning on hardening the piece and then cutting it out and making a foam replica so i can wear this comfortably...

soooo any suggestions?
 

Attachments

  • 2011-02-13195228_Honolulu_Hawaii_US.jpg
    2011-02-13195228_Honolulu_Hawaii_US.jpg
    14 KB · Views: 201
  • 2011-02-17022638_Honolulu_Hawaii_US.jpg
    2011-02-17022638_Honolulu_Hawaii_US.jpg
    14 KB · Views: 206
  • 2011-02-17043535_Honolulu_Hawaii_US.jpg
    2011-02-17043535_Honolulu_Hawaii_US.jpg
    14 KB · Views: 206
  • 2011-02-21112755.jpg
    2011-02-21112755.jpg
    14 KB · Views: 207
  • 2011-02-21112823.jpg
    2011-02-21112823.jpg
    14 KB · Views: 215
  • 2011-02-21112908.jpg
    2011-02-21112908.jpg
    14 KB · Views: 201
You can get about 4 inches take'n in if you modify the lower belt, that what I did on mine worked great.You'll probably have to cut that piece anyways as to get into and out of it. I've cut a 5 inch piece out of mine and plane on using velcrove to lock it in. As for the collar I've seen some one do it in foam and I've seen it done were the paper was modified leaving just the nubs in front. good luck I hope it works out for you. Note: make sure to add the upper front braces thats the only place were mine warped.
 
You can get about 4 inches take'n in if you modify the lower belt, that what I did on mine worked great.You'll probably have to cut that piece anyways as to get into and out of it. I've cut a 5 inch piece out of mine and plane on using velcrove to lock it in. As for the collar I've seen some one do it in foam and I've seen it done were the paper was modified leaving just the nubs in front. good luck I hope it works out for you. Note: make sure to add the upper front braces thats the only place were mine warped.

thanks thorn! you saved me a heck of a lot of time! good job on your build! i had to see your pics of what you meant when you said leave the nubs but now i understand. thanks again!
 
alright guys so i haven't really got a lot done recently but i did get a chance to finish bondo and painting on my one boot and both handplates as well as my right shoulder. for the metal look i basically layered the piece first with a silver metallic, then lightly sprayed some black to mask the overwhelming silver to give it a metal looking finish. i didn't really sand the boots down well because i figured they would get chipped and scratched etc and not look perfect so i just left most of the boot as it was. The handplates are painted using the same metallic method and then painted with a sponge. i am thinking about redoing the blue because im not sure how happy i am with the turnout...as for the right shoulder, because it's not a metal color like the lower pieces of armor from chipping etc. i painted it silver then used a voiding method on the battle damage. i then sprayed it with black then went over it with a grey primer lightly coating it so that the grey primer was tinted a little darker from the black underneath wiped the voiding material away with a wet paper towel and then used the brush method to add the scratches on the edges. for the unsc emblem i just printed out a picture off the internet and cut it out over a piece of painting tape on the piece so that i could peel away the voided area after painting. here's the pics! enjoy!

2011-02-26181128.jpg

2011-02-26181808_Honolulu_Hawaii_US.jpg

2011-02-26181200.jpg
 

Attachments

  • 2011-02-26181808_Honolulu_Hawaii_US.jpg
    2011-02-26181808_Honolulu_Hawaii_US.jpg
    14 KB · Views: 213
  • 2011-02-26181128.jpg
    2011-02-26181128.jpg
    14 KB · Views: 202
  • 2011-02-26181200.jpg
    2011-02-26181200.jpg
    14 KB · Views: 211
Dude, this is looking good. I really like the scrapes & battle damage. Keep up the good work.

P.S. I used the SurferBum chopstick technique on my build. Lol.
 
Dude, this is looking good. I really like the scrapes & battle damage. Keep up the good work.

P.S. I used the SurferBum chopstick technique on my build. Lol.

haha thanks blackula! i see that your carter helm came out fantastic as well! keep up the good work!

Mind if I ask where you got your visor?
i got it off of ebay this is the exact same model that i purchased online. be careful when installing because it will scratch if you scrape it along the inside of the helmet after it has been hardened =/... here's the link http://cgi.ebay.com/ebaymotors/M2R-MR-600-motorcycle-helmet-visor-GOLD-IRIDIUM-_W0QQcmdZViewItemQQhashZitem53dfcc18bcQQitemZ360236980412QQptZApparelQ5fMerchandise#ht_670wt_939
 
i love the battle damage you did to the MK V shoulder piece and the handplates, everything looks very nice.
 
am! the weathering and damage on those pieces looks amazing! i envy your ability with sandpaper and spray can
 
looks great cant wait to see more
thanks! sorry i've been kinda out of the loop had to get a new job so the project has been on hold for a while, i should be back to work soon so stay posted!
MOAR!!! I luv tis bild!!
haha thanks SPRTNBD50!
i love the battle damage you did to the MK V shoulder piece and the handplates, everything looks very nice.
thanks! if you have any questions on how or what i did to get these results just let me know and i'll try and break it down the best way possible so you can acheive the same awesomeness! :)

am! the weathering and damage on those pieces looks amazing! i envy your ability with sandpaper and spray can
thanks! it's really not that hard to get these results you just gotta test out different color combinations with the spray paint and figure out which layer should go on first to make it look good. this is my first build and so far the stickies have been golden! so read those stickies! if you want any suggestions or help just pm me and i'll be glad to give you some advice :).

any updates?
haha sorry none yet i'll be working on my chest tonight though. had to put the project on hold due to my new job situation but summer is right around the corner and i'm hoping to finish it before the end of summer. wish me luck! =P


Alright guys so picked up a new can or fiberglass resin today so i'm gonna finish up hardening my chest piece so it's ready for glassing and then i'll be able to post some pics of my progress since my last update. i also reordered some brushes from harbor freight because i am down to my last 5 brushes!!! :O!!!! i'll have some pics up when i have more progress to post. until then, thank you for stopping by and keep posted! also hit the subscribe button so you can be alerted of any updates when i post them! until then...you're on your own noble...carter out.
 
Too big ???

Hey Guys

Hows it going surfa??? glad to see that you're still alive and building ahahhaah. Anyways I've just finished my chest piece and i guess I'm concerned about the same thing you were. My question now is "is this how the piece is supposed to fit?"
Carter%20WIP

I did scale up the part slightly (i'm using rhinoc and jico's file)
IMG_0459.jpg
IMG_0460.jpg


http://www.405th.com/[ATTACH=full]126787[/ATTACH]
[IMG]http://www.405th.com/%3Ca%20href=%22http://s1190.photobucket.com/albums/z443/mw6/Carter%20WIP/?action=view&current=IMG_0460.jpg%22%20target=%22_blank%22%3E%3Cimg%20src=%22http://i1190.photobucket.com/albums/z443/mw6/Carter%20WIP/IMG_0460.jpg%22%20border=%220%22%20alt=%22Photobucket%22%3E%3C/a%3E
Carter%20WIP
Carter%20WIP
 

Attachments

  • IMG_0459.jpg
    IMG_0459.jpg
    83.5 KB · Views: 206
  • IMG_0460.jpg
    IMG_0460.jpg
    80.8 KB · Views: 202
Sorry guys i've been M.I.A. for a really long time. I've been super busy with a new job and haven't had any time to work on my project =(. I am gonna start working on it again probably sometime this weekend. My deadline is this halloween so I definitely need to get some work done fast. I'll keep you guys posted! Thanks for stopping by!
 
Status
Not open for further replies.
Back
Top