1st Build cyne's Halo Infinite Chief - EVA Foam

CYNE 739

New Member
Heya folks. My name is cyne (sign), and I'm making this thread to help me document my process and really get this project done before Adelaide Supanova on the first weekend of November. My plan is to create the boots, gloves, forearms, helmet and cloak in this timeframe. I'll use these to make an Infinite version of poncho chief (my beloved), as a kind of cheat code, since i don't have to make the harder items (time consumption and scaling-wise). After the event, I'd love to keep working to finish the full suit.

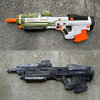
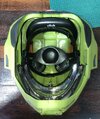
I'm starting by painting my Halo NERF MA40 on Monday morning, following TheRealVictor's guide, and creating the boots in the afternoon. I've gone with the Heroes Workshop files for Chief, as that's what this community seems to recommend after all my research. I've already got the Jazwares helmet, and I am content with the proportions (as the hood will hide the disproportionate rear). I'll obviously repaint it to match my other armour pieces when I get to that stage, as I seriously dislike the stock weathering.

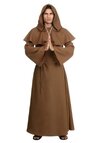
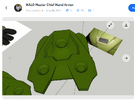
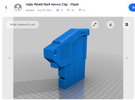
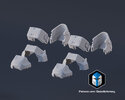
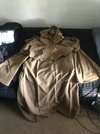
Going to a local library on Thursday to print off the hand armour, I've got the files bookmarked. While I'm there, I may print off the custom mag that zeckkoa made, as they did a bang up job and it'll help a lot with the proportions of my MA40. I've also ordered a 3XL size Monk cloak to act as the base for the poncho, the style is near perfect. I'll just need to cut it up and weather it once it arrives, I think it'll be a perfect match.

I'll hopefully follow up this thread on Monday with my progress, looking forward to getting this done. Crunch time!
 

Attachments

  • plus-size-brown-monk-robe-1.jpg
    plus-size-brown-monk-robe-1.jpg
    15.5 KB · Views: 37
  • ar_before_after.jpg
    ar_before_after.jpg
    1.5 MB · Views: 28
  • ChiefHandArmour.png
    ChiefHandArmour.png
    228.2 KB · Views: 31
  • HaloNerfMA40 CustomClip.png
    HaloNerfMA40 CustomClip.png
    235.7 KB · Views: 26
Last edited:
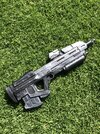
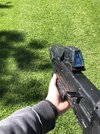
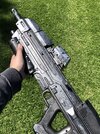
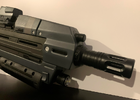
I am nothing if not a man of my word; yesterday I let the creative juices flow, started and finished the AR all in one afternoon. I also painted my BoomCO Halo 5 Magnum, which came out alright, not good enough for any photos. Not nearly as good as this beauty of an AR (which gives a crazy childish feeling when held). Making this has definitely motivated me to finish as much of this Chief cosplay as possible.
 

Attachments

  • IMG_2076.jpeg
    IMG_2076.jpeg
    4.3 MB · Views: 29
  • IMG_2077.jpeg
    IMG_2077.jpeg
    2.8 MB · Views: 34
  • IMG_2078.jpeg
    IMG_2078.jpeg
    3.3 MB · Views: 36
Last edited:
Thanks! I just can't stop holding it, it's too addicting! I'll need to do some more clear coats for protection though, a few spots have shown through the original colours. I reckon I'll just use silver to touch them up, then matte clear coat a couple more times. Next is the boots; once I have a few hours to get to em.
 
lol I know the feeling of just wanting to hold them. I do the same with my helmet every time I pass by where I have it displayed. I always have to stop and admire it, because wow, I made that!
 
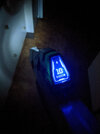
Will definitely go out this afternoon to 3D print the hand armour, super excited to get that done. Was thinking more about the AR: I wouldn't ever use it as a functional Nerf gun (although that is cool), so I may go all-in and put a blue LED behind the ammo counter, attach a small military flashlight to the front, then resin fill the screw holes. Just make it the ultimate Halo nerd prop. Will reply to this thread later today with the 3D printed hand armour results.
 

Attachments

  • LEDcounter.jpg
    LEDcounter.jpg
    60.3 KB · Views: 19
  • FlashlightLED.png
    FlashlightLED.png
    183.1 KB · Views: 17
  • CustomFlashlightReference.png
    CustomFlashlightReference.png
    581.4 KB · Views: 17
Made it to the library; we did a test print for scaling and quality, and it turned out perfect. I've started the print with them for the other hand, will pick it up tomorrow and provide some pictures (should've gotten some now but oh well)
 
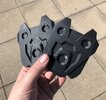
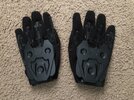
Glove armour printed and looking fire. Will only need really minor, fine sanding. Little mockup of the gloves for reference, the scale is perfect imo. Might add some small foam bits as finger armour with some spare sheets, not sure at the moment. Happy with how it'll look with just these elements.
 

Attachments

  • IMG_2110.jpeg
    IMG_2110.jpeg
    1.7 MB · Views: 25
  • IMG_2111.jpeg
    IMG_2111.jpeg
    2.5 MB · Views: 23
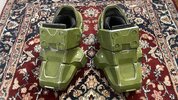
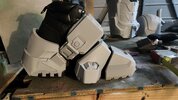
Going to focus on the boots this week; I've grabbed a lot of great reference images, and I like the look of having it in 4 separate parts. Makes me think it's easier than it seems. I did buy some $12 black mid Timbs from a thrift store, but after looking at the references (1), I think I want to go and buy some proper high-top boots. I won't need to do such a drastic height raise as the first image, but I think I still will add some supports to raise my height even further. I am naturally 6'5, so if I go for 6'7-6'8 that'd be stunning.

I can't wait to finish work and head home to start measuring for my feet, scaling the files on Pepakura, and cutting the parts out. Don't think I'll assemble it until I get the boots I want but I figure there's no harm in cutting out the foam early. Can always shape it around the boots when I get to it.

I'll have to wait until the monk cloak arrives before I decide to make calf armour, but I doubt I'll need it. I'll try and have the bottom of the cloak cut to show the bottom half of the boots at normal standing position.

I am pretty scared about the forearm armour, in my head it's going to be the hardest part of this whole project.

I've bought the green spray paints I'll need; I'm starting with a darker green base paint, and another lighter green to add some depth. It's a lot less saturated than cosplays I've seen on here, but I'd rather do that than make my own custom paint mix and but a whole airbrushing setup. And I can always repaint when I do the full armour set, right?!

(reference images below, not my own)
 

Attachments

  • CosplayBoots Reference5.JPG
    CosplayBoots Reference5.JPG
    1.9 MB · Views: 32
  • CosplayBoots Reference4.jpg
    CosplayBoots Reference4.jpg
    147.8 KB · Views: 34
  • CosplayBoots Reference2.jpg
    CosplayBoots Reference2.jpg
    6.2 MB · Views: 32
  • CosplayBoots Reference1.jpg
    CosplayBoots Reference1.jpg
    3.4 MB · Views: 35
Last edited:
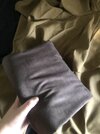
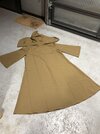
SO. Good news then bad news. Good news is the monk cloak arrived, and the fitment is perfect. I'll need to trim the sleeves down a bit but that's nothing. Bad news is I was stupid and didn't look at the material in the description; only went off the product image. It's shitty, translucent cheap whatever material. So I ended up running down to good ol' Spotlight to grab some material, which I will cover the garment with.

Might need to buy a harness to attach some rough armour shapes underneath the cloak, and I've got some old skateboarding gear for the shoulderpads.

Keepin on keepin on.
 

Attachments

  • IMG_2170.jpg
    IMG_2170.jpg
    2.9 MB · Views: 20
  • IMG_2172.jpg
    IMG_2172.jpg
    2.7 MB · Views: 24
SO. Good news then bad news. Good news is the monk cloak arrived, and the fitment is perfect. I'll need to trim the sleeves down a bit but that's nothing. Bad news is I was stupid and didn't look at the material in the description; only went off the product image. It's shitty, translucent cheap whatever material. So I ended up running down to good ol' Spotlight to grab some material, which I will cover the garment with.

Might need to buy a harness to attach some rough armour shapes underneath the cloak, and I've got some old skateboarding gear for the shoulderpads.

Keepin on keepin on.
can you just dye it grey to save the sewing time? but other than that this build look good and i like the idea i have not seen many of this type master chiefs here in the USA. i will watch to see how it comes out
 
can you just dye it grey to save the sewing time? but other than that this build look good and i like the idea i have not seen many of this type master chiefs here in the USA. i will watch to see how it comes out
I *could*, but it's more about the texture quality and weight, rather than the translucence. Personally I think it's well worth the time, I've worked with customising my clothes before. But I'll keep that in mind for sure, thanks for suggesting.

And yeah, I'm actually surprised there's not alot of poncho chief cosplays, it's one of his coolest looks imo.
 
I figure this is a good time to make a more info-heavy post, since I have all that I need now;
  • Spray paints (dark green for the base coat, lighter green for adjusting the colour and adding highlights, primer, matte finish)
  • EVA foam sheets (for the armour)
  • Foam floor tiles (for filling unseen gaps, and beefing up my shoe's height. (See CosplayBoots Reference1.jpg))
  • Painters and gaffa tape
  • Acrylic paints (Black for the wash, silver for the damage)
  • Mediocre side-zip boots from Kmart
  • Styrofoam ball and stand for foam shaping
  • Heat gun
  • 3M velcro strips (for the gloves/hand armour)
  • Contact cement
  • Monk cloak + fabric to cover it
  • A determined spirit
What I have to do within 16 days (minus 3 cos I'm going to Melb for Travis Scott);
Build the boots
  • Build the heels for the boots (aim is 5cm - 7.5cm to get my total costumed height to 6'8 - 6'9)
  • Scale the boot files on Pepakura and print off the foam cutting guides
  • Cut out and build the foam boot parts themselves, then build them onto the inner black boot
  • Prime and spray paint
  • Black wash and silver weathering
Build the forearms
  • Scale then print out Pepakura guides
  • Cut foam and shape
  • Assemble the forearms
  • Build out the inside with extra foam to fit snug
  • Prime and spray paint
  • Black wash and silver weathering
Build out the helmet
  • Pad out the inside of the helmet for a snugger fit
  • Painters tape off the visor and black sections
  • Prime and spray paint
  • Black wash and silver weathering
  • Take off the tape, then re-tape the visor and lights. Then darken the black parts some more
Build the "fake" armour for underneath the cloak
  • Chest armour - attach to some sort of harness, main areas for the illusion are the chest, over the shoulders and the spiky bits on the back.
  • Shoulder armour - build off of my old skateboarding pads, should be super easy.
Create the cloak
  • Trim the sleeves, hood and legs-area to match the references
  • Attach the new material over the cloak
  • Rough it up with a box cutter and cut shapes out to match the references
  • Black wash the cloak, rub some dirt and gravel over it
Create the gloves
  • 3D print the hand armour
  • Prime and spray paint
  • Black wash and silver weathering
  • Attach velcro straps to both glove and armour
I'll be adding this list to a handy-dandy app on my phone, I highly recommend Minimalist for anyone struggling to keep their schedules and plans in-check. 10 bucks a year for one of the greatest organisational methods is an easy purchase for me.

I expect this workload to take 10-13 solid nights of work. The only way I'll be able to complete my plans in time is if I fight off this damn Helldivers 2 addiction (but last nights patch was soooooooo good, it'll be hard to resist). Hoping to get some photos of my own stuff in this thread very soon, it's lacking.

Wish me luck brethren. 739 out.
 
Last edited:
Hey folks. It's the weekend, and I'm about to get all setup in one space. I have until next Saturday to get this scraped together before the con, so it's crunch week.

I picked up my neck fan for the helmet from Bunnings, rechargeable little thing for 10 bucks. I think I found the best place for it, with the fans up top slightly in front, and battery pack attached to the back. It will reverse the fogging up of the visor, wont impede my head, and is accessible to be pressed on and off / charged from the back. I've just used some blutack to hold it in place for now, planning to hot glue it in later tonight.

More updates to come.
 

Attachments

  • IMG_2237.jpeg
    IMG_2237.jpeg
    2.4 MB · Views: 15
Last edited:
Glove armour printed and looking fire. Will only need really minor, fine sanding. Little mockup of the gloves for reference, the scale is perfect imo. Might add some small foam bits as finger armour with some spare sheets, not sure at the moment. Happy with how it'll look with just these elements.
Sorry for the late reply, but when you go to mount those Hand plates, be sure to flip them. You currently have them upside down in your mock up. The armor kind of points towards your fingers. A lot of people do actually put them on in the wrong orientation at first.

Chief Holding.png
 
Sorry for the late reply, but when you go to mount those Hand plates, be sure to flip them. You currently have them upside down in your mock up. The armor kind of points towards your fingers. A lot of people do actually put them on in the wrong orientation at first.

View attachment 353853
Thanks for reminding me Cadet! Thankfully I am attaching these with velcro, to allow for some free movement while keeping attached, so they can be flipped either way.

It's funny, cos I knew that there was an aesthetically right but inaccurate way to put them on, and I still did it that way automatically anyway. Guess it just felt right to have the spikes coming out over the knuckles.

I will say, the glove armour doesn't sit too flush with my gloves. Guess the gloves I got are just not firm/boxy enough. I can always order better ones down the line.
 
Last edited:
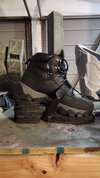
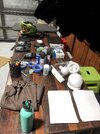
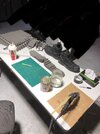
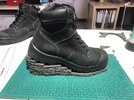
Took all the stuff I had lying around for the cosplay, and put it all in our big shed for work over the weekend. It's so nice to see everything in one place finally, and it gave me that jumpstart to make the platforms for the boots. Doing that first gave me a chance to work with both the foam and contact cement without needing to be precise.

That's setting in over night, then when I get a chance tomorrow I'll be securing the boots with the platforms, then working on creating the Chief boot armour. I have scaled the Pepakura files to the size of the inner boot + platform (plus some extra to account for the foam thickness).

I'll post some more updates tomorrow night (hopefully), and clean up this message cos I'm just rambling on before I fall asleep.
 

Attachments

  • IMG_2242.jpeg
    IMG_2242.jpeg
    758.5 KB · Views: 15
  • IMG_2243.jpeg
    IMG_2243.jpeg
    1.7 MB · Views: 16
  • IMG_2241.jpeg
    IMG_2241.jpeg
    670.1 KB · Views: 17
  • IMG_2240.jpeg
    IMG_2240.jpeg
    2.8 MB · Views: 16
Last edited:
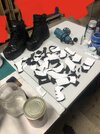
Hey folks. The parts for the left boot have been cut out, and I'm up to assembling it tonight. I honestly didn't think the foam cutting would be that difficult, but it really tested my patience. Maybe it's because I'm in the crunch, maybe cos I had a bad fight with a mate. It all just adds up.

I'll be trying to assemble the boot tonight, and also trying to finish covering the cloak in the new material. This'll give me a good gauge for if I can get this done in time for Saturday. "Pfff, I won't get burnout like these other people!" I say to myself. A foolish sentiment. "I really want to make this armour! I frickin love Halo! I'm sure I'll have enough passion to carry me through a crunch."

This is not a cry for help btw lol, it's just a small vent for me.

I'm trying to not push out a cosplay that I'll be unhappy with, cos I think I'll just regret wearing it during the con. At the same time, I really want this done in time for the event, cos it doesn't come around too often. I'm gonna clean up my previous messages now, hopefully more updates to come tonight.
 

Attachments

  • IMG_2249.jpg
    IMG_2249.jpg
    776.5 KB · Views: 11

Your message may be considered spam for the following reasons:

If you wish to reply despite these issues, check the box below before replying.
Be aware that malicious compliance may result in more severe penalties.
Back
Top