First Build (Halo: Reach) Mk:V

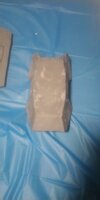
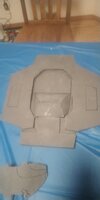
So got got the chest piece done yesterday, some things went wrong however the underarm things, don't know what their called, wouldn't bend into shape no matter what I did so I pinned it in place with toothpicks, an unholy amount of toothpicks. The back is the same. Working on the Thighs next, see you then.View attachment 353247
View attachment 353249View attachment 353250
View attachment 353248
Well if you can get another heat gun that doesn't commit self forever sleep that should help with bending into shape. You don't need an expensive one, just a cheapie with a low and high setting off of Amazon. For attaching the foam to each other you can try loctite 5 second superglue. I don't bother with contact cement, I use superglue and reinforce the seams from the back with hot glue. It works super well, is way faster and holds insanely well. You just have to deal with being careful getting things lined up on the first shot as the glue bonds almost instantly, and with picking dry superglue off you fingers lol .
 
For attaching the foam to each other you can try loctite 5 second superglue. I don't bother with contact cement, I use superglue and reinforce the seams from the back with hot glue. It works super well, is way faster and holds insanely well. You just have to deal with being careful getting things lined up on the first shot as the glue bonds almost instantly, and with picking dry superglue off you fingers lol .
Thank you for the suggestion I'll have to try that!
 
So the thighs didn't work out because I forgot to scale them before tracing on to paper. I'll have to wait to get more foam before continuing, so it's on to the waist.
 
Last edited:
So huge update but, not in a good way several things have gone wrong like the aforementioned heat gun and different foam. The new issue is the thickness of the foam in of itself is to big, this is causing my pieces to not bend or stick to each other. This means that I will have to retrace the chest, chest attachment, thigh, knees, and possibly the helmet. But now I'm going to vent a little.
I started this project back in late May, early June sense that point I have run into numerous problems not owning a printer for the pep templates and resorting to tracing off the computer screen, not being able to afford the materials and not the tools, the foam its self, and now these new problems. In all honesty I am considering just stopping and giving up, but I knew that this would be challenging, that I would be out of my depth. This is my long way of saying that it might be a month or two before I can start working again, if this does end up being the end to my project I would like to give a huge thank you to Lukavago, N8TEBB,and PerniciousDuke for inspiring me to join the 405th and make my armor without them I would not have gotten this far. Thank you all, see you all around!-Carrion
I wish I had seen this sooner!

Making a suit take a LOT of time. If you don't have an abundance of free time right now, that's totally ok. I would encourage you to not stop forever. A time will come where you have more access to tools and resources and you'll be able to build something you're really proud of. Don't think of these circumstances as setbacks or failures but rather a learning experience. Heck, for myself, between my two halo builds I could have another suit with how many pieces I've had to redo over time.

I'm glad I could be of inspiration to you. Thanks for saying so! It means a lot.

One question (and sorry if you've answered this already): What kind of glue are you using that it won't hold the foam on the chest piece in place? Also, if you're having trouble getting your foam to bend and stay in position, heat it up with a heat gun and let the foam cool while holding it in the shape you want. It will conform to that shape and stay bent in position. I had to use this trick for quite a few pieces, especially my shoulder pieces. Hope this helps! LMK if that makes sense
 
What kind of glue are you using that it won't hold the foam on the chest piece in place? Also, if you're having trouble getting your foam to bend and stay in position, heat it up with a heat gun and let the foam cool while holding it in the shape you want
I don't know the exact brand but it's contact cement, the issues stem from carelessness on my part the way I put it together was slightly incorrect and caused gaps and the contact cement couldn't hold. In the end I had to resort to using toothpicks to hold the foam in place and the reinforcing it with hot glue. This fix made some gaps that need to be filled but at the end of the day it was my fault it wasn't working as intended.
 
I don't know the exact brand but it's contact cement, the issues stem from carelessness on my part the way I put it together was slightly incorrect and caused gaps and the contact cement couldn't hold. In the end I had to resort to using toothpicks to hold the foam in place and the reinforcing it with hot glue. This fix made some gaps that need to be filled but at the end of the day it was my fault it wasn't working as intended.
Different brands of contact cement hold very differently. I use Barge contact cement. If it's applied correctly the foam will rip before the glue fails. LePage contact cement is basically water, I wouldn't recommend it.

Reinforcing with hot glue is a good idea.
 
Different brands of contact cement hold very differently. I use Barge contact cement. If it's applied correctly the foam will rip before the glue fails. LePage contact cement is basically water, I wouldn't recommend it
Just got back home apparently I've been using a brand called Weldwood so I can only assume that it's more ment for wood than anything else.
 
I wish I had seen this sooner!

Making a suit take a LOT of time. If you don't have an abundance of free time right now, that's totally ok. I would encourage you to not stop forever. A time will come where you have more access to tools and resources and you'll be able to build something you're really proud of. Don't think of these circumstances as setbacks or failures but rather a learning experience. Heck, for myself, between my two halo builds I could have another suit with how many pieces I've had to redo over time.

I'm glad I could be of inspiration to you. Thanks for saying so! It means a lot.

One question (and sorry if you've answered this already): What kind of glue are you using that it won't hold the foam on the chest piece in place? Also, if you're having trouble getting your foam to bend and stay in position, heat it up with a heat gun and let the foam cool while holding it in the shape you want. It will conform to that shape and stay bent in position. I had to use this trick for quite a few pieces, especially my shoulder pieces. Hope this helps! LMK if that makes sense

This is so true. I thought I could finish my first build in a few weeks as I am essentially retired and can work all day. I only got a the gloves, boots, and forearms done in that time and I worked non stop with little sleep and breaks. That was a year ago and I just finished (mostly) my suit. It didnt take a full year to finish it but I had some burn out and had to take a break. So I would say probably plan 3+ months minimum if you work in your spare time and want to get the details right/make it look good. The break and taking my time allowed me to learn new skills and buy new tools, so it was good. And I still had to remake the chest peice because of sizing issues and I'm not happy with a few peices (I feel like the shoulders are slightly too small, the thighs too big, and the boots just too roughly made since I made them first) so I will likely remake them too.

So take your time. Take a break if you need. Learn, practice, watch YouTube videos and buy some tools. But stick with it and it's totally worth it! But amazing work so far, keep it up!
 
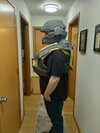
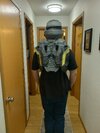
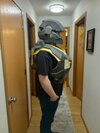
Well, Well, Well , hey I'm back to this thread Sadly not an update on the waist yet, my school work has been taking over my life, but my mom had asked me to put on the pieces that I've already finished and took some photos of me wearing it. Some plans have changed I won't be making a visor but instead I found a decent skull mask the helmet will be a haunted Hazop however the paint job will not change.
Now onto a concern I feel as if the chest is to big on me so I would like you guys honest opinion of how it looks on me.
1000000526.jpg
290980242412093511.jpg1000000523.jpg1000000525.jpg
 
Well, Well, Well , hey I'm back to this thread Sadly not an update on the waist yet, my school work has been taking over my life, but my mom had asked me to put on the pieces that I've already finished and took some photos of me wearing it. Some plans have changed I won't be making a visor but instead I found a decent skull mask the helmet will be a haunted Hazop however the paint job will not change.
Now onto a concern I feel as if the chest is to big on me so I would like you guys honest opinion of how it looks on me.
View attachment 354274View attachment 354275View attachment 354272View attachment 354273
Heck yeah brother! Looks sick!

I don't think it's to big... although it can be hard to tell without the rest of the armour. Width wise, you want the torso to sit mostly on the shoulder. See this post from when I made my armour and how my torso sits. I think yours covers roughly the same portion of your torso. It may be a bit large in the front which can be easily be taken down a tad, but don't make any changes until you have other armour pieces made. It will be much easier to see what needs to be changed once you see it in the context of the other armour pieces.

When I made my suit I did have to made modifications to a few pieces and even remake some, but I wouldn't have been able to tell if I didn't have all of the other pieces to compare it to. Right now you're still in a sort-of trust-the-process stage.
Thanks for the feedback, my mind has been hitting itself over this for a while.
 
Thank you all for your kind words and support it means the world to me. I gave it one last shot over the weekend and focused on on just the helmet. and this was the result-
View attachment 352971View attachment 352970View attachment 352972
The right side was cut improperly by me so it is always caving in but other than that and a few small gaps I am incredibly pleased with the result, going to sand it at some point this week or weekend.

This part is for the weapons I did not make them but instead are ether Halloween props or nerf products.
A Prop Needler:
View attachment 352975

The ODST Boomco Magnum:
View attachment 352974
This will be repainted with the Warship Collage shown above.

A Nerf sniper rifle a Stand-in until I can get a more accurate one:
View attachment 352973
Repainted into UNSC grey of course.
Helmet looks great don't be down on yourself!
 
Deeply sorry but still no update on the waist I am waiting to get more foam for insurance just in case something happens but while we wait, I have a yarn to spin. So the whole motto of the 405th is build YOUR spartan and of course I have but the suit felt incomplete without a name to call it by and as such I have given my spartan a name Aas Krahen which is just my profile name reversed and translated into German, is it simple yes but I feel as if it gives me and armor a real touch. On top of that I have already started planning by deciding what build I am doing next a Halo 3 custom spartan, this however will be in like 1-2 years at the rate I am going in this build alone but hey it is good to set future goals right?
Anyways sorry again that I don't have any progress to show but I think waiting until I have more foam to fall back onto is the right call here, so I think an actual update will come in three weeks at the earliest but, I am going to see this through to the end even if the product is horrid and can't be taken out to cons or events I promise you all that! :) - Carrion
 
Well, Well, Well , hey I'm back to this thread Sadly not an update on the waist yet, my school work has been taking over my life, but my mom had asked me to put on the pieces that I've already finished and took some photos of me wearing it. Some plans have changed I won't be making a visor but instead I found a decent skull mask the helmet will be a haunted Hazop however the paint job will not change.
Now onto a concern I feel as if the chest is to big on me so I would like you guys honest opinion of how it looks on me.
View attachment 354274View attachment 354275View attachment 354272View attachment 354273
I honestly was in the same situation as i made my torso from foam too. Once you have everything else on you it will look natural. Like N8TEBB said you have to trust the process here as it is alot of 'figure it out as you go' sort of thing and adjusting as you go.
 
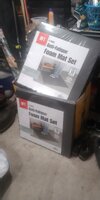
It's FINALLY done the most painful three hours of my life over:lol:. This picture represents every piece that I needed to put to foam: Biceps, Forearm, Thighs, and Shins. I'm not going to bother with the boots for this armor at all. Also surprise camo from my other cat, she says hi.
Also Also plans for the shoulders changed now doing CQC Left and FJ/Para Right
IMG_20250118_230810.jpg
 
All right Y'all after a 12 hour work session on Monday I got the chance to finish the waist and codpiece as well as the thighs. The waist turned out to be a little small but nothing some straps couldn't fix and extend. I used two parachute clips to attach and complete the entire thing
1000000574.jpg
1000000573.jpg
1000000572.jpg
1000000571.jpg
The thighs were much the same using some hot glue to reinforce some of the more... troublesome connections. Happy to report this time they do in fact fit unlike my previous attempt I'll have to find it to provide size comparison.
1000000570.jpg
1000000569.jpg
1000000568.jpg
 

Your message may be considered spam for the following reasons:

If you wish to reply despite these issues, check the box below before replying.
Be aware that malicious compliance may result in more severe penalties.
Back
Top