Right, I'm hella new to 3D printing, and this is the first print I've ever done, but could you explain Z-banding to me?Prints look great! Just a little bit of Z-banding, but that should be easy to smooth out. Can't wait to see how the finished product turns out.
Z banding will look something like this:Right, I'm hella new to 3D printing, and this is the first print I've ever done, but could you explain Z-banding to me?
Sorry, I meant ghosting. After seeing S225's pic I realized that I mixed those up. Lol.Right, I'm hella new to 3D printing, and this is the first print I've ever done, but could you explain Z-banding to me?
Gotcha, Appreciate you taking the time to help teach me a little about printing! Def gonna have to keep that all in mind next time.Sorry, I meant ghosting. After seeing S225's pic I realized that I mixed those up. Lol.
Ghosting is those little ripples in the print surface. They are especially prominent around complex details like text on the print. When this happened to my prints, it was usually one of two things...
1. My belts for the stepper motors were a little loose.
2. My print head was too heavy for the speeds I was trying to print at; especially after I converted to direct drive.
Either way, I second what S225 said... Those prints are WAY nicer than the first dozen or so prints I made. Great job!
I appreciate your tips aswell dawg. I'll be sure to put both of ya'lls advice to use in the future!Z banding will look something like this:
View attachment 336387
Left side is good but the right is all gross. For me this was caused by my printers z axis screw shifting as the print bed traveled down, this pushed/pulled the bed causing layer shifts during printing. A few other things can cause thing like bed heating fluctuations or any unintended mechanical movements. Best case is the print finshes but needs some extra care to make pretty. Worst case can be a totally unusable part. Most of my prints have some artifacts of very minor z banding that 100% won't effect the finished product. This is just the nature if how my printer is. It's only an issue if layers are measurably offset from where they should be. For your first Halo prop the raw prints look rather clean to me which is good! Sanding parts prior to bondoing/painting is usually a must and any minor imperfections will literally buff out at this point
I'm using an Elegoo Neptune 4 with Elegoo 1.75mm Rapid PLA+Those parts look great! Looking forward to seeing the painted results. I didn't see it above, what's your printer and filament of choice here?
This thing is actually phenomenal. I love this, does the light work at all? I saw you wanted it to.
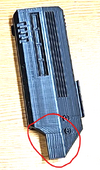
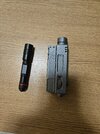
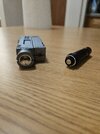
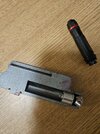
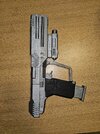
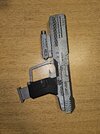
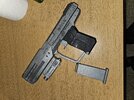
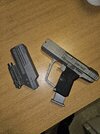
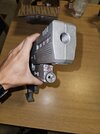
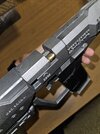
IT'S DONE! Really happy with the way my M6C SOCOM came out. Definitely a few areas I can touch up though. But as it stands right now, it's got some decent functionality to it. The magazine is retained by friction on the rear or it, so it can be removed and inserted freely. Made the suppressor friction based too so it can be removed to give the prop the Halo 2 M6C look (without the extra detailing on the barrel though). Put springs behind the trigger and inside of the slide, so both can have a realistic reset whenever operating either part. Decided to scrap the working flashlight, however. There are a few things I definitely want to do in the future. I want remake the light/laser module to give it more external detail and make it easier to wire for an operable flashlight. On top of that, I also want to give it LEDs to make it closer to the in-game model, as well as put a magnet inside so it can magnetically attach to an armor thigh plate like you see it in the games. For now though, I'm totally stoked to have this thing done. Now I can start working on my M7S I've already printed out![]()
Unfortunately, the light isn't functional at this time. I did find a more detailed file of the M6C SOCOM recently, and whenever I get around to printing that out, I'm going to try and make the light functional for that version.This thing is actually phenomenal. I love this, does the light work at all? I saw you wanted it to.