You are using an out of date browser. It may not display this or other websites correctly.
You should upgrade or use an alternative browser.
You should upgrade or use an alternative browser.
Glitch's Caboose Build!
- Thread starter Glitch
- Start date
- Status
- Not open for further replies.
Small Update!
Haha thank you all so much! meeting Nathan was just as amazing as it sounds, to those who didn't see me there this suit weighs 17 kilos so I don't actually stay in it for very long, and as for sydney nova next year I probably won't be there, but I'm thinking about coming down for RTX AU
Otherwise you'll definitely find me at Brisbane Supanova later this year, and anything else nearby like Ozcomicon, etc.
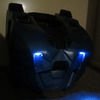
As for my small update, I cut out the vents on the front of my helmet, as I noticed while i was down at sydney that I ran out of oxygen a few times...
which is... bad.
I used a rotary tool (dremel) to carve out the vents then made them nice and clean with my small set of files
then I painted the inside of the holes black and hot glued in some black cloth to obscure my face (yes the inside of my helmet doesn't look as good as the outside)
so hopefully that'll provide me with some more ventilation!
other than that i've set my self some goals to finish caboose this month!
- Lighting! - chest/back, shoulders, thighs & shins
- Replace and fix boots
-repair chest connections (one of the buckles broke in sydney)
- make the rest of the undersuit... maybe...
I'm off to get some stuff from Jaycar to light the suit tomorrow, and another set of boots because my current ones are slip ons
the problem with the slip ons is that they also slip off when i walk because the armour they are attached to is too heavy for them.
so hopefully some ankle high boots will solve my problem there.
also gonna get some materials from Spotlight for the rest of the undersuit
and I have to feed my girlfriend's cat tomorrow, can't forget that one...
and for those of you who don't like to read things,
TLDR: LOOK NEW VENTS!!! (also i got a slightly newer little camera yay!)
Attachments
Update:
So I went to Jaycar today and got some AAA battery boxes for my LED's and hooked them up to my chest!
I've still got to cut the holes out for the rest of the lights on the suit, but after that I'll be a little brighter on the outside!
forgot to get the new boots though and some other minor things, dammit!
back to the shops tomorrow...


Edit:
Ok I only got time to go back to Jaycar, I don't know if anyone noticed but in my pictures one of my helmet's LED's is dim, specifically the top right one (facing the helmet)
So the helmet LED's are 8000MCD clear white LED's, annoyingly though one of the LED's I originally got was a 4000MCD
I got a replacement 8KMCD LED yesterday, but it didn't match the others for some reason (a different batch it seems)
So I got 4 of the new batch today and they all match! yay. many $$$ later.
anyway, on to more shopping tomorrow if i can be bothered
p.s. Ant man and Terminator 5 are awesome!!!

So I went to Jaycar today and got some AAA battery boxes for my LED's and hooked them up to my chest!
I've still got to cut the holes out for the rest of the lights on the suit, but after that I'll be a little brighter on the outside!
forgot to get the new boots though and some other minor things, dammit!
back to the shops tomorrow...
Edit:
Ok I only got time to go back to Jaycar, I don't know if anyone noticed but in my pictures one of my helmet's LED's is dim, specifically the top right one (facing the helmet)
So the helmet LED's are 8000MCD clear white LED's, annoyingly though one of the LED's I originally got was a 4000MCD
I got a replacement 8KMCD LED yesterday, but it didn't match the others for some reason (a different batch it seems)
So I got 4 of the new batch today and they all match! yay. many $$$ later.
anyway, on to more shopping tomorrow if i can be bothered
p.s. Ant man and Terminator 5 are awesome!!!
Attachments
Update:
Haha thanks halex, definitely a plus having a little more air to breathe!
also here's some more lights!
still gotta repair the connections on the inside of the chest, but once I get some epoxy tomorrow that'll be finished once and for all!


Haha thanks halex, definitely a plus having a little more air to breathe!
also here's some more lights!
still gotta repair the connections on the inside of the chest, but once I get some epoxy tomorrow that'll be finished once and for all!
Attachments
I cant wait to make my caboose armor. I love him. WE ARE GOING TO A FIELD!
So good.
Also, great work. I wish I could do any of that but I cant. Also, member of the 501st right here too
So good.
Also, great work. I wish I could do any of that but I cant. Also, member of the 501st right here too
Update:
Thanks fueledbychar,
hey I didn't know how to do any of this stuff too, I learned by looking it up in videos and tutorials all over the net and on here, it's worth it to learn!
as for my update, I've got the lights in on the shins and the shoulders!
just the thighs to go!
after that, I'm replacing my shoes because they scrape against my heels and that is not very.. fun.
so I bought new shoes and I'm in the process of removing the old shoes from the boots, and I glued them in good so it's a bit slow.
Attachments
I love love love your GIR!!!!!!!!!!!!!!
Update:
It took a while but I got the new shoes in to the fibreglass shells, made new chest connections and got the lights in the thighs!
So here's what the boots look like now

And this is what the connections in my chest look like


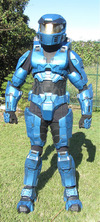
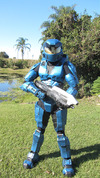
Here's what it all looks like right now!


I still think there's a bit not quite right proportionally, but I like where it is now

Got a heap of marine vinyl and materials for an undersuit, so that's the next part!
It took a while but I got the new shoes in to the fibreglass shells, made new chest connections and got the lights in the thighs!
So here's what the boots look like now
And this is what the connections in my chest look like
Here's what it all looks like right now!
I still think there's a bit not quite right proportionally, but I like where it is now
Got a heap of marine vinyl and materials for an undersuit, so that's the next part!
Attachments
-
 19829542933_764cf09a88_z.jpg89.5 KB · Views: 177
 -
 20263794339_7de874921e_z.jpg138.1 KB · Views: 181
 -
 20450442575_813a38dac8_z.jpg92.1 KB · Views: 192
 -
 19827896454_1eb158225a_z.jpg148.9 KB · Views: 185
 -
 20262718968_d351a43fc7_z.jpg185.9 KB · Views: 185
 -
 20424524576_18d06c8d9e_z.jpg123 KB · Views: 196
Wow this build has been a fun ride from start until now. Looking at what you did I definitely saw some things that I'm going to incorporate into my build when I get past this noob stage of pep work. Also that gir was adorable.
Update:
Thanks hacxor and shwarzwald! my LED's are just normal old white LED's, they look blue because i got a clear blue rubber ruler and cut that to pieces to make the light a bit diffused.
and as for fibreglassing, mine is all fibreglassed on the inside, if you do it on the outside you'll lose a lot of detail!
speaking of details, i have some mad new pictures for you!
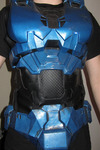
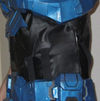
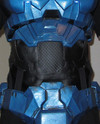
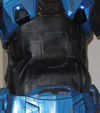
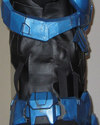
finished a new vest with sweet sweet undersuit details!
(I made a template for the back and the front using the game's texture files i found online somewhere.. might upload them later )
)

only problem is i'd put two of the straps in the front in the wrong place...
so here's the pictures of the undersuit as it is 20 minutes after i fixed that mistake


stay tuned for more updates on the undersuit!
...when I can figure out how to sew arms and pants
Thanks hacxor and shwarzwald! my LED's are just normal old white LED's, they look blue because i got a clear blue rubber ruler and cut that to pieces to make the light a bit diffused.
and as for fibreglassing, mine is all fibreglassed on the inside, if you do it on the outside you'll lose a lot of detail!
speaking of details, i have some mad new pictures for you!
finished a new vest with sweet sweet undersuit details!
(I made a template for the back and the front using the game's texture files i found online somewhere.. might upload them later
only problem is i'd put two of the straps in the front in the wrong place...
so here's the pictures of the undersuit as it is 20 minutes after i fixed that mistake
stay tuned for more updates on the undersuit!
...when I can figure out how to sew arms and pants
Attachments
This looks very, very, good!!! Don't know if anyone has mentioned it yet, maybe in the future you can build another torso. The proportioning on the torso looks like it could be scaled a little bit bigger. But, overall this looks awesome so far, keep it up. Subbing this thread!
- Status
- Not open for further replies.


