Hi. Noob's First ODST

Armor Update 6) Its Done Printing

Hello everyone, I hope you're all doing well! As the title says I have completed printing out my ODST Armor!
IMG_2219.jpg


God this was a heck of a project. Unintentionally posting this exactly 1/2 a year after my first post. I have finished printing out the entire suit, and I thought I should show off another update since it's been a bit and I'm trying to hit that 50 message requirement. So let's begin with the weapons!

(Just a quick side note, all of the items are completely unpainted. The only finishing work done was glueing the parts together when they were finished.)

In the last post I showed off that I had bought the files for some fun tools for my ODST. Well, I am glad to start showing the fruits of my labor.
IMG_1839_2.jpg

IMG_1841_2.jpg
IMG_2224.jpg


Yep, this is the MA5C From Halo 3 from Galactic Armory. Files turned out amazingly! my only issue was printing the ammo counter, but thankfully one of my good friends is helping me out by resin printing the ammo counter screen in transparent so that I can rig up some glowing LEDs. As you can see it is more manageable than the (H)SMG, being a little smaller than it. This print was a ton of fun to put together, and was sliced very well. From a distance you can barely see the seem lines. As for plans for painting, I plan on doing a game accurate paint job for it, along with all my weapons that will be shown here. Next up is my M-1 Combat Knife.

View attachment 355730View attachment 355731

Also from Galactic armory, and I am extremely proud with how it turned out. I am still blown away with the pattern on the grip. I know its not game accurate since these were added in Reach, but I thought it would look cool on my shoulder. I will eventually make a post about the modifications / customizations that I have made for my armor but thats for another day.

Moving on from the weapons, I have also finished up printing my ODST Backpack... but have come to a weird crossroad
IMG_2225.jpg


So when I first got the files for my backpack I thought "Wow. That thing would look great. I should scale it!" which in hindsight... was not a good idea. So this is FromTheBrink Studio's Design (Etsy) and they have a pretty good instructions for the actual build, specifying what standard size hinges, magnets, and other hardware to buy for the sections. So this one is printed in 95% scale, like the rest of my armor was, and now I'm having trouble finding all the hardware for it. I've been thinking and one of the ideas I had was to reprint it at 100% scale to save the headache of hardware searching, and to list the 95% version on the marketplace for anyone who would just like to search for hardware. If anyone has any tips or ideas on what I should do, please feel free to let me know. I haven't made any final decisions yet.

As for the future, I have started work on the finishing process of my armor. Plan is to do it all in sections, like Left Leg / Right Leg, Torso, Shoulders, etc... just so I can get a good match on the paint. For coloration I am planning on doing normal ODST base coloration with some "Rolling Surf" highlights. I've already started with some example painting. I'm currently in the work of finishing my SOCOM. I've already sanded it, I just need to fill some cracks that formed while sanding it. Otherwise, it looks amazing so far.
IMG_2222.jpg


But yeah, that's pretty much it. I'm going to go back to watching Netflix and finishing this gun. I'll post again in like 3 months with more progress probably. I'm terrible at making promises with this stuff.

See you in the field
-YTunz
 

Attachments

  • IMG_1836_2.jpg
    IMG_1836_2.jpg
    3.3 MB · Views: 23
  • IMG_2225.jpg
    IMG_2225.jpg
    2.4 MB · Views: 30
  • IMG_2222.jpg
    IMG_2222.jpg
    2.4 MB · Views: 29
  • IMG_2221.MOV
    38.2 MB
  • IMG_1842.jpg
    IMG_1842.jpg
    829.9 KB · Views: 27
  • IMG_1837_2.jpg
    IMG_1837_2.jpg
    3.1 MB · Views: 31
View attachment 355729

Yep, this is the MA5C From Halo 3 from Galactic Armory. Files turned out amazingly! my only issue was printing the ammo counter, but thankfully one of my good friends is helping me out by resin printing the ammo counter screen in transparent so that I can rig up some glowing LEDs. As you can see it is more manageable than the (H)SMG, being a little smaller than it. This print was a ton of fun to put together, and was sliced very well. From a distance you can barely see the seem lines. As for plans for painting, I plan on doing a game accurate paint job for it, along with all my weapons that will be shown here. Next up is my M-1 Combat Knife.
That MA5C print is *CLEAN*! I'll have to look into Galactic's file, because that rifle looks really nice. Can't wait to see how the ODST suit turns out!
 
Armor Update 7) Painted the M6C SOCOM

Howdy Everyone, Smaller update on the build. I have finished painted my M6C SOCOM! This is Aguilar's Files painted with Krylon "Metallic Dark Metal" for the main body and "Metallic Oil Rubbed Bronze" on the Grip. I also added a little bit of red for the highlights on the laser pointer module. This was the first item I actually printed and seeing it come
IMG_2668.jpg
IMG_2667.jpg

IMG_2664.jpg

And yes, since these are Aguilar's files, they have the LED Flashlight built into it. I will warn that if you are buying his files based on the light, the flashlight he has linked is currently not available on amazon, but if you look around their seller profile you can find the 2 pack of them instead.
IMG_2669.jpg
IMG_2672.jpg

But yeah, thats all for this post! I think I'll probably do my helmet next since I already have the paint colors picked, I'd just need to fit it in between Classes and other hobbies.

Thanks for Reading!

See you in the field
-YTunz
 
That is one beautiful M6! I made one with Ag's files a few years back, they really are a breeze to work with. How'd you enjoy the build?
 
Armor Update 8) Test Assembly

Hello all! I know it hasn't been long since my last post. With Zenkaicon 2025 around the corner, I'm working overtime in my free time trying to get this suit completed. I spent all of yesterday with my gf just getting everything attached, and this post is the culmination of all that work. You might be asking, why would I attach everything if I need to paint it still. Well even though I've been printing for the better half of a year, I never actually test fit most of it. Sure I had the posts with like the chest rig and belt, but that was the extent of it. Nothing really together together if you catch my drift. I am following Hype's recommendations for the chest rig under the armor and god did it make a world of difference. Its so much easier to put on and take off now that

Well I've yapped enough. Let me cut to the chase.​

76013126360__6BD5E0CB-A0BA-4B10-BE0B-7B5DA7801973.JPG

76013127369__3B3B9BBD-9B9D-49D1-B32B-750690B5B461.JPG


You might notice that I am missing my shins and boots. This is because I have terminal "Swiss Cheese Brain" and forgot to disable internal supports on those prints. Thankfully the calf prints are all good, but I have to reprint the shins.

IMG_2771.jpg

IMG_2788.jpg


Honestly the mobility inside the suit isn't that bad. I had some fun while wearing it. For how much It weighed, its distributed pretty well. I was able to move around and do dumb stuff inside the suit. For example:
IMG_2820.PNG


I'm sorry Frosty, I know its not proper form, but It's the best I can do for doing it in my armor.

Anyways. I just wanted to show off my armor! I took some more photos that I will try to edit to look cooler. Currently me walking out of the woods behind my house doesn't give off the vibes I was going for. Besides that, I am currently sanding down my helmet and shoulders so those will probably be the next post as long as I don't freeze my fingers off.

Thanks for reading, and see you guys in the field!
- YTunz / Ben
 

Attachments

  • IMG_2838.jpg
    IMG_2838.jpg
    3 MB · Views: 24
Your armor is looking fantastic! There’s no issues with putting everything on before paint. I always do that to make sure I’m not going to run into strange issues with mobility before I put all the work into painting it.

Speaking of which, how are you planning on painting it?
 
Your armor is looking fantastic! There’s no issues with putting everything on before paint. I always do that to make sure I’m not going to run into strange issues with mobility before I put all the work into painting it.

Speaking of which, how are you planning on painting it?
I've found a few issues with the fit so far, particularly where the belt goes. Since I'm using that plate carrier, the hip plates and and belt don't really have a place to fit without rubbing against the bottom.

I actually just got back from Lowes today with my paint. I'm planning on doing a metallic base coat of Rustoleum Metallic Titanium Silver, with Krylon Matte Dark Pearl for the main armor and Krylon Satin Brick for the highlights. I also have white and black for tertiary highlights.
 
Armor Update 9 & 10) Painting and my First Convention

Well folks, this is it! Con Crunch for my first convention... and I've written this after the fact. I originally meant for this to be two separate posts, but I got busy with con crunch, apartment shopping, and family stuff so I'm just going to mash the two posts together. Anyways, onto the armor:

So up till now, my technique for my armor has been as follows:
Step 1) Fill seams with Bondo and/or Rustoleum Filler Primer
Step 2) Sand everything down to 120, then 220.
Step 3) Paint with White Primer
Step 4) Paint with Rustoleum Metallic Titanium Silver

and it's been working pretty well for me. I had a rather big deadline coming up so I was trying to just get my metallic layer down first so that my armor at least had some sort of texture / color. I think my armor turned out pretty good in my opinion. I started painting around the end of February, which was freezing. I got talking to my Academic Advisor and he let me come in on the weekends, to sand and paint everything in the paint booths!
IMG_3301.jpg
IMG_3300.jpg

So during this time I split my armor down into 5 sections, those being: Helmet, Arms, Chest, Legs, and Belt. The pieces I really wanted to focus on were the helmet, shoulders, and chest because I felt that if I had to go to a convention without certain armor, that was the bare minimum I wanted to have on. I ended up finishing out all of those, plus my belt in time for my first convention and it turned out great:
IMG_3526.jpg
IMG_3548.jpg
IMG_3634_3.jpg


Honestly the chest piece turned out pretty good, and I'm incredibly proud of the helmet. I know I still have further paint to do, but seeing it in full silver got me really excited for the convention. Speaking of...

Zenkaikon 2025!
IMG_3682.jpg

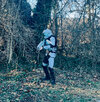
My first convention which was conveniently in my back yard! I ended up going only on the Saturday and Sunday but I had so much fun. I ended up being abducted by my D&D group who were going anyways which was a great experience. I have never gone to a con and honestly, I can't wait for C2. It was so much fun and I got a ton of compliments with my armor. I decided to wear everything on Saturday even though some of it needed finishing.
IMG_5660.JPEG
IMG_5662.JPEG

You've probably seen these images already, but in case you hadn't heres what I wore on Saturday. Full suit, all together at last! Yes I know theres visible Bondo but as one of the guys I was talking to at the convention said "Thats just some Flood Spores." I actually met two different guys who had ODST helmets which I thought was awesome. I ended up going without my shins or boots on Sunday due to a printing issue I'll talk about later. I wanted to try and bump into Lobbster but I didn't end up seeing him. Hopefully I'll catch him next year!

I got these two images on Sunday which I thought looked hilarous and I might use as a sticker reference one day.
IMG_3695.jpg
DE8CAB65-ED39-4FD3-98F2-A9B346411FA8.JPG


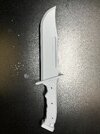
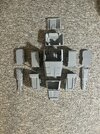
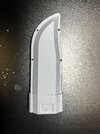
Now, onto Convention Casualties... I had a few armor pieces that ended up breaking, including my MA5C. It got knocked over while it was leaned against a wall and split right where the grips meets the trigger. I will end up repairing it with a wooden dowel to strengthen it, and plenty of glue to hold it together. The other major breakage I had was with my ODST Shins/Calves. When I printed them I oversized it slightly, so whenever I would step, the shin would detach from the calf, and begin to fall apart. This was solved with hot glue at the convention's cosplay repair station, but before C2 I am adding some foam in to hold my leg in place better. I figure that if I add enough around my leg, it wont shift as much. After C2 I will definitely reprint but for now I can use that. I've also realized that I need to add some storage around the thigh area. Maybe some pouches?

The only other issue was that I didn't clear coat my armor so I have a ton of scratches in the paint. Kinda sucks but theyre not deep enough to worry too much about. I'm getting everything to back silver this week to then next week get everything to my final color, right before C2E2... I've got time right? Right? Anyways...

I wanted to give a massive shout out to elizabizzle22 who has been helping me pretty much constantly with this project. Sanding, strapping, painting, and everything. Having her as a second set of hands has really doubled my production time and has me hopeful for a C2E2 Finish line! She just made an account as she may be accompanying us to C2 as my "Wrangler" (Her word not mine).

But yea, thank you for reading, and my next update post will probably be post C2E2. I feel like I've said it enough to summon MNKR like some sort of Malört-based-beetlejuice.

See y'all soon!
- YTunz / Ben
 

Your message may be considered spam for the following reasons:

If you wish to reply despite these issues, check the box below before replying.
Be aware that malicious compliance may result in more severe penalties.
Back
Top