1st Build Miranda Keyes (Halo Series Uniform)

Zylenko

Jr Member
Link-
Shirt (this post)
Jacket - 1st Build - Miranda Keyes (Halo Series Uniform) | Halo Costume and Prop Maker Community - 405th
Jacket Panels and shoulders - 1st Build - Miranda Keyes (Halo Series Uniform) | Halo Costume and Prop Maker Community - 405th
Pants - 1st Build - Miranda Keyes (Halo Series Uniform) | Halo Costume and Prop Maker Community - 405th
Details - 1st Build - Miranda Keyes (Halo Series Uniform) | Page 2 | Halo Costume and Prop Maker Community - 405th
Final! - 1st Build - Miranda Keyes (Halo Series Uniform) | Page 2 | Halo Costume and Prop Maker Community - 405th


I think the costumes in the Halo series are a really cool, real world interpretation of the games! I really like how some look simple like Miranda's uniform, but when you start to break them down there is a lot of detail. I want to start a costume and I can't settle on an armor set, but the uniforms I think are very slick!

This is how I go through a process of making a costume. I don't have much skill making a pattern but I have some sneaky ways to get around that.


First, I went through some of the episodes from the show, taking screenshots anytime I saw a new angle of Miranda's costume. Same thing if a scene had a close up with a lot of detail or a distance shot that showed the over all look. Once I had enough I drew out what the layers are, what pieces I will need to make and the detail they will have.

Screenshot 2024-01-23 142358.png
IMG_0299.jpeg


Each colour on the drawing is a different layer of the costume. If it will be made with the same colour of fabric then it is on the same layer. This helps me figure out how much fabric I will need and breaks up the costume so I can single out where I need to start.

Starting with the under-shirt, I know I want a sleeve that fits fairly snug but isn't baggy and the mid section doesn't really matter. This is where I think I am clever. To start the pattern I look for something I already have in my closet. This sweater fits pretty much the way I want in the arms and the body is a comfy fit. Instead of dismantling it I manipulate around the seams of the piece I want on some mockup fabric. I can then add a seam allowance and sew it together to see how it fits and draw any alterations directly on the mockup.

d894decf-6571-4052-bdca-52022173bc5b.jpg
IMG_20240124_145759.jpg


Once I was happy with it, I took it apart, cut off the seam allowance and labeled each piece with the amount I would need to cut out. The arrows tell me which way the pattern piece goes on the weave of the fabric.

cce57702-beb0-4a8d-b83f-a594fac6edb2.jpg


Now I can make the shirt!
I went for a dark fabric (kinda blue in colour) and traced out all the pieces. When I buy the fabric it is always folded in half with the 'good' side on the inside. So for the pieces that are x2 I could just draw them once and cut them 2 at the same time. If you keep your seam allowance consistent then you don't need to worry about drawing the seam allowance on the folded half of the fabric.

20240125_130332.jpg


The lines on the collar piece are reminders that I will have to cut in triangles so it will lay flat once folded inside out. Now let's put it all together!


87101ae8-7380-4d8f-bf22-e8690f28ce8d.jpg
20240125_223827.jpg


I am happy with the fit! Now I will move onto the next part. What I am calling the Jacket.
 

Attachments

  • 20240125_130332.jpg
    20240125_130332.jpg
    1.8 MB · Views: 103
  • 20240125_130332.jpg
    20240125_130332.jpg
    2.8 MB · Views: 80
  • cce57702-beb0-4a8d-b83f-a594fac6edb2.jpg
    cce57702-beb0-4a8d-b83f-a594fac6edb2.jpg
    541.7 KB · Views: 83
Last edited:
That's awesome! I love the look of the uniforms in the series.
Do you have a plan for the cuff stripes and rank/medal insignia etc yet? Curious if you're going to 3D print them or make them out of something else etc.
 
It looks great so far! We don’t see officer uniforms very often!
Thank you!
That's awesome! I love the look of the uniforms in the series.
Do you have a plan for the cuff stripes and rank/medal insignia etc yet? Curious if you're going to 3D print them or make them out of something else etc.
They are cool aren't they!
I am thinking to use ribbon on the cuffs and I may use craft foam and paint it for the insignias. I am hoping that will keep the cuffs flexible at least.
 
I have never heard of slopers. What are they?
They're essentially very basic patterns that fit certain measurements exactly with no ease or seam allowance. They give you the general shape of a garment from which you alter measurements and add your seams and whatnot.
 
They're essentially very basic patterns that fit certain measurements exactly with no ease or seam allowance. They give you the general shape of a garment from which you alter measurements and add your seams and whatnot.
Neat! That would be very useful, is there a good source where I can find those?
 
Neat! That would be very useful, is there a good source where I can find those?
Etsy is a great source for slopers you can print off yourself, which is what I did. Some designer pattern websites offer free sloper files, too. You can also order the physical items from multiple different websites if you'd like to skip that process. Those slopers will often be made of thicker paper, which will give you a lot more use out of them.
 
Now to start the Jacket.

I have a button up shirt that fits close to how I wanted, so it made it fairly easy to pattern this out. Once I had the mock-up sewn together I tried it on over the shirt to make alterations. I ended up taking in the back quite a bit and cutting out around the shoulder. It was a bit tricky to fit it properly on me while wearing it, I don't have a dress form that matches my measurement yet. The one in the photo just helps me get the general idea for marking.


20240126_113728.jpg
20240126_012117.jpg


Now that I have it shaped the way I want I am going to take it apart and lay it out on my good fabric. I will also add a 1/2" seam allowance to the pattern. I want the jacket to be finished on the inside and to be a little stiffer than the shirt so I am going to double up on the pattern.


20240126_123631.jpg
20240126_130017.jpg
20240126_163045.jpg


Starting with the 2 front panels, I added in a zipper and started sewing everything together. Essentially making 2 jackets that I will then attach and flip inside out.

20240127_162825.jpg
20240127_162834.jpg


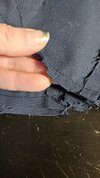
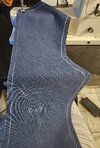
Before turning it inside out, I went over every curved or pointed piece and cut notches along the seam allowance. This will help everything lay flat and actually curve when I turn it inside out. Once turned inside out I am going to iron the jacket for a nice flat edge and later add detail to the bottom.


20240127_232506.jpg
20240127_165752.jpg
20240127_174838.jpg


The sleeves look like they are just attached on the side of the jacket so I will make them separately and attach them after. I don't have anything to go off of for them so I am going to guess based off the sleeve pattern I made earlier, doubling up on the pattern so it's the same thickness as the jacket also.

20240127_205244.jpg
20240127_224306.jpg


20240127_235537.jpg


I had to cut all along the top edge before turning it inside out.
 

Attachments

  • 20240127_205244.jpg
    20240127_205244.jpg
    2.5 MB · Views: 80
  • 20240127_232506.jpg
    20240127_232506.jpg
    1.9 MB · Views: 88
  • 20240126_173319.jpg
    20240126_173319.jpg
    2.8 MB · Views: 94
Last edited:
Next it to add the front and back panels and shoulder pieces. They look like they are all made in the same fabric so I am going to stick with that.

Screenshot 2024-01-23 140117.png
Screenshot 2024-01-23 140302.png

In the show it looks like the front panel connects to the right side so I think I'm going to attach them with eye-hooks.

I forgot to take photos of drawing out the panels and shoulder pads but I used the same process. Traced them out, basing them off of the jacket pattern and then cut them out on mock-up fabric. I wanted them to have some volume to them so I doubled up on the good fabric. Before I flipped them inside out I made sure to cut little notches along the seam allowance so it would sit properly. Then for the shoulders I took a big enough scrap pieces and drew on the mannequin where I think it should sit. I wanted extra volume in the pads so I used left over wool from another project.


20240129_101142.jpg
20240129_203123.jpg


I am pretty happy with how it is all sitting so I can pin it down!


rrsr.png
20240129_213216.jpg


It's kinda hard to see in the photo from the show, but there are lines on the bottom on the jacket. So I am going to mark out guides on the jacket with chalk and then sew them in. The lines go under the panels too so I will hold off sewing those down until I am done with the lines.

20240130_092841.jpg

**I realize as I am sewing I won't be able to line up the stich with the notches on my machine.. So I took some tape and used it as my guide. This worked out great!


20240131_151707.jpg
20240131_172336.jpg


The lines are a bit flat and 'wavy' and I think I could avoid that with more pins and maybe something in-between the two layers. A note for the next costume! But now I can sew the panels down and attach the sleeves and line up the shoulders.

20240131_181839.jpg

I just hand stitched them on as they don't attach the whole length of the arm hole.


20240201_010528.jpg
20240201_165249.jpg


For the shoulder pads I painted some leather I had left over. It works great to hold its shape and give some rigidness to the pads. If you either score a groove for the stitches or use a thin enough piece of leather, it will go through the sewing machine easily. To attach them to the jacket I had to get a friend to help me pin them in place and level them.. Thank you!


20240202_150119.jpg

Now to attach the front panel so I can get out of it! I am going to use eye-hooks, mainly because I think it will sit more flat and not pull on the fabric as much as snaps. Velcro, I think, would take too much space and leave too much of a gap.


20240202_134843.jpg

I think I might have done this the hard way.. Anyone have a better way to attach eye-hooks? First I marked out where they eyes should sit on the jacket and sewed them on. Then put on the hooks, laid the panel over top and pinned them in place. It let me unhook everything and still have an idea where I needed to sew the hooks.


20240202_150016.jpg

It worked fairly well. Next time I think I would chalk out a line and match it to the panel from the jacket.
 
Last edited:
A little pause from the top part, it's pants time!

Applying the same method I did for the shirt and jacket I traced out my pattern. Making sure to add a 1/2" seam allowance all the way around before cutting it out.
20240201_091541.jpg
20240201_095305.jpg

This fabric is not as stretchy as the jeans I traced from, (I really should have cut it on the bias. But I was eager to cut them out and wasn't thinking.) so I am adding a few inches in the middle of the pattern.

Once I have it put together I am going to add a zipper and hem the waist and cuff of the legs. I find ironing the edge once you have it folded helps with sewing. No bunching!


20240201_114858.jpg
20240201_113123.jpg


Pretty happy with the fit! In the show the pants are pretty simple however, there is some detail down the side of each leg. Might be pockets but they are a bit long for a pocket so I am going to sew it straight to the leg.

123.png
20240204_110524.jpg


While wearing the pants I trace out what I think the shape will be on some mock-up fabric. Marking the front and back as it is a bit different, then adding a 1/2" seam allowance. Looks like it sits pretty flat so I won't double up on the pattern but I will iron down the edge and sew it before attaching it to the pants.

20240204_113214.jpg
20240204_140849.jpg


Then I pin it on while wearing the pants. This is to make sure it follows the curve of my leg. Be careful getting out of them though..
When attaching them to the pants I followed the stiches that were already there when I sewed down the seam allowance. And now I have pants!

20240204_142253.jpg
20240204_145315.jpg
cf3ef698-8f03-4c6d-8557-27ae9eb7122e123.jpg
 
Link-
Shirt (this post)
Jacket - 1st Build - Miranda Keyes (Halo Series Uniform) | Halo Costume and Prop Maker Community - 405th
Jacket Panels and shoulders - 1st Build - Miranda Keyes (Halo Series Uniform) | Halo Costume and Prop Maker Community - 405th
Pants - 1st Build - Miranda Keyes (Halo Series Uniform) | Halo Costume and Prop Maker Community - 405th


I think the costumes in the Halo series are a really cool, real world interpretation of the games! I really like how some look simple like Miranda's uniform, but when you start to break them down there is a lot of detail. I want to start a costume and I can't settle on an armor set, but the uniforms I think are very slick!

This is how I go through a process of making a costume. I don't have much skill making a pattern but I have some sneaky ways to get around that.


First, I went through some of the episodes from the show, taking screenshots anytime I saw a new angle of Miranda's costume. Same thing if a scene had a close up with a lot of detail or a distance shot that showed the over all look. Once I had enough I drew out what the layers are, what pieces I will need to make and the detail they will have.

View attachment 341268View attachment 341269


Each colour on the drawing is a different layer of the costume. If it will be made with the same colour of fabric then it is on the same layer. This helps me figure out how much fabric I will need and breaks up the costume so I can single out where I need to start.

Starting with the under-shirt, I know I want a sleeve that fits fairly snug but isn't baggy and the mid section doesn't really matter. This is where I think I am clever. To start the pattern I look for something I already have in my closet. This sweater fits pretty much the way I want in the arms and the body is a comfy fit. Instead of dismantling it I manipulate around the seams of the piece I want on some mockup fabric. I can then add a seam allowance and sew it together to see how it fits and draw any alterations directly on the mockup.

View attachment 341270View attachment 341283

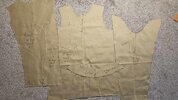
Once I was happy with it, I took it apart, cut off the seam allowance and labeled each piece with the amount I would need to cut out. The arrows tell me which way the pattern piece goes on the weave of the fabric.

View attachment 341284

Now I can make the shirt!
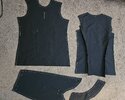
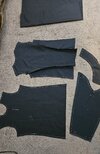
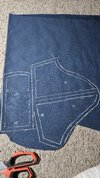
I went for a dark fabric (kinda blue in colour) and traced out all the pieces. When I buy the fabric it is always folded in half with the 'good' side on the inside. So for the pieces that are x2 I could just draw them once and cut them 2 at the same time. If you keep your seam allowance consistent then you don't need to worry about drawing the seam allowance on the folded half of the fabric.

View attachment 341287

The lines on the collar piece are reminders that I will have to cut in triangles so it will lay flat once folded inside out. Now let's put it all together!


View attachment 341288View attachment 341289

I am happy with the fit! Now I will move onto the next part. What I am calling the Jacket.
This looks amazing so far! I’m actually invested in this, and please keep us updated! Barely ever see officers running around so it’d be a nice change of pace. Get it done Ma’am.
 
This looks amazing so far! I’m actually invested in this, and please keep us updated! Barely ever see officers running around so it’d be a nice change of pace. Get it done Ma’am.
Thank you! I am going to be honest, I am really appreciating the support on this build. It is nice to get back to some sewing also. Updates to come.
 
Zylenko, you have done a great job so far and now i will be watching your build to see how it all comes together i would love to be able to sew like you im so jelly lol.
 
Link-
Shirt (this post)
Jacket - 1st Build - Miranda Keyes (Halo Series Uniform) | Halo Costume and Prop Maker Community - 405th
Jacket Panels and shoulders - 1st Build - Miranda Keyes (Halo Series Uniform) | Halo Costume and Prop Maker Community - 405th
Pants - 1st Build - Miranda Keyes (Halo Series Uniform) | Halo Costume and Prop Maker Community - 405th


I think the costumes in the Halo series are a really cool, real world interpretation of the games! I really like how some look simple like Miranda's uniform, but when you start to break them down there is a lot of detail. I want to start a costume and I can't settle on an armor set, but the uniforms I think are very slick!

This is how I go through a process of making a costume. I don't have much skill making a pattern but I have some sneaky ways to get around that.


First, I went through some of the episodes from the show, taking screenshots anytime I saw a new angle of Miranda's costume. Same thing if a scene had a close up with a lot of detail or a distance shot that showed the over all look. Once I had enough I drew out what the layers are, what pieces I will need to make and the detail they will have.

View attachment 341268View attachment 341269


Each colour on the drawing is a different layer of the costume. If it will be made with the same colour of fabric then it is on the same layer. This helps me figure out how much fabric I will need and breaks up the costume so I can single out where I need to start.

Starting with the under-shirt, I know I want a sleeve that fits fairly snug but isn't baggy and the mid section doesn't really matter. This is where I think I am clever. To start the pattern I look for something I already have in my closet. This sweater fits pretty much the way I want in the arms and the body is a comfy fit. Instead of dismantling it I manipulate around the seams of the piece I want on some mockup fabric. I can then add a seam allowance and sew it together to see how it fits and draw any alterations directly on the mockup.

View attachment 341270View attachment 341283

Once I was happy with it, I took it apart, cut off the seam allowance and labeled each piece with the amount I would need to cut out. The arrows tell me which way the pattern piece goes on the weave of the fabric.

View attachment 341284

Now I can make the shirt!
I went for a dark fabric (kinda blue in colour) and traced out all the pieces. When I buy the fabric it is always folded in half with the 'good' side on the inside. So for the pieces that are x2 I could just draw them once and cut them 2 at the same time. If you keep your seam allowance consistent then you don't need to worry about drawing the seam allowance on the folded half of the fabric.

View attachment 341287

The lines on the collar piece are reminders that I will have to cut in triangles so it will lay flat once folded inside out. Now let's put it all together!


View attachment 341288View attachment 341289

I am happy with the fit! Now I will move onto the next part. What I am calling the Jacket.
That looks amazing! I like your "sneaky" technique. I plan on stealing that idea when I make my Medical Corp uniform!!

Where are you from? Maybe we can showcase our uniforms together at a con or worlds?
 
Zylenko, you have done a great job so far and now i will be watching your build to see how it all comes together i would love to be able to sew like you im so jelly lol.
Hey marinesniper, thank you! I used to have such a hard time with sewing. Mostly with patterns, I would just stare at the fabric hoping it would sew itself haha! I still have some trouble with it but I enjoy it. If you ever have any questions send me a message and I might be able to help!
 
This thread is more than 7 months old.

Your message may be considered spam for the following reasons:

  1. This thread hasn't been active in some time. A new post in this thread might not contribute constructively to this discussion after so long.
If you wish to reply despite these issues, check the box below before replying.
Be aware that malicious compliance may result in more severe penalties.
Back
Top