ODST Project. Bobby Boucher --> 03MAR18 Latest

Status
Not open for further replies.
Very nice work! You are much better at gluing your pep files than I am! I just make up for it with lots of bondo and detail sanding :)

Nice T-21! I made a homebrew DLT-19...and it was voted the ugliest in my Squad (too ugly to troop with...)! :p
 
Looks good mate. I'm not a big fan of some model of the ODST helmet going around right now, the one with the giant jaw, but this one looks pretty sweet. Great job on the detail going into everything and keep it up!

Thanks! I agree with you, this is definitely my personal favorite as far as looks go. It's Hugh's model just to be clear. Short update on the helmet below!

Very nice work! You are much better at gluing your pep files than I am! I just make up for it with lots of bondo and detail sanding :)

Nice T-21! I made a homebrew DLT-19...and it was voted the ugliest in my Squad (too ugly to troop with...)! :p

I can pep for a whole day straight! All those childhood lego moments are paying off :) I'm the opposite. I need to pep really well so I have little to correct with bondo! Not as skillful as you on that front!
Thanks! It's coming along, no deadline so I'm taking my time. Hahaha that's funny! I would much rather have a DLT-19, I think they look way cooler but a T-21 is easier to build

Moderate Update!

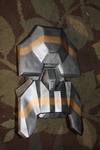
Almost forgot to add the bicep armor!
IMG_3410_zps1e8a7895.jpg

I added d-rings and webbing to the hips and front plates. But I ran out of rings before I got to the fanny pack! And yes the fanny pack does have the rings, it's hard to find photos showing them but they do.
f1de2dbd-5621-4a91-9723-c8d995c7bd10_zpsd060aca9.jpg

Aaaaaand I'm done with the bondo! I just need to print out some templates to re-cut the detail on the top then the painting can commence!
IMG_3411_zpsad8ee1a9.jpg
 

Attachments

  • IMG_3410_zps1e8a7895.jpg
    IMG_3410_zps1e8a7895.jpg
    46.5 KB · Views: 233
  • f1de2dbd-5621-4a91-9723-c8d995c7bd10_zpsd060aca9.jpg
    f1de2dbd-5621-4a91-9723-c8d995c7bd10_zpsd060aca9.jpg
    110.4 KB · Views: 255
  • IMG_3411_zpsad8ee1a9.jpg
    IMG_3411_zpsad8ee1a9.jpg
    49.1 KB · Views: 240
Turning out nice. Can't wait to see the detail com in more to the helmet.
 
I like your work and i think i will also build some grenades.
Mayby the blue ones. They seeme to be some sort of special typ (mayby little nukes) :rolleyes

Keep up the good work.
 
Turning out nice. Can't wait to see the detail com in more to the helmet.

So far haha… I'm hoping it comes out good! I also have the sniper goggles to add on after.

I like your work and i think i will also build some grenades.
Mayby the blue ones. They seeme to be some sort of special typ (mayby little nukes) :rolleyes

Keep up the good work.

Thanks! I have no idea what the blue ones are, I couldn't find it anywhere. But mini-nukes are a good start! If I can make these yellow ones work then maybe I will make some blues.

Update! Started painting the bucket! And the last week of class, finally.

First, two coats of gun metal.
IMG_3426_zps6c20e1b9.jpg

IMG_3427_zpsf8573354.jpg

Then added some detail with two coats of black!
IMG_3428_zps7558757b.jpg

IMG_3429_zpsf75bebf6.jpg

More updates to come. Should have the paint finished and visor mounted before the end of the week!!
 

Attachments

  • IMG_3429_zpsf75bebf6.jpg
    IMG_3429_zpsf75bebf6.jpg
    89.7 KB · Views: 224
  • IMG_3428_zps7558757b.jpg
    IMG_3428_zps7558757b.jpg
    64.9 KB · Views: 227
  • IMG_3427_zpsf8573354.jpg
    IMG_3427_zpsf8573354.jpg
    58.2 KB · Views: 226
  • IMG_3426_zps6c20e1b9.jpg
    IMG_3426_zps6c20e1b9.jpg
    47.1 KB · Views: 244
Not looking bad at all, Trooper, though I'd advise you close that gap in the left-hand brow of the helm, that poor join is going to stick out like a sore thumb.
 
Not looking bad at all, Trooper, though I'd advise you close that gap in the left-hand brow of the helm, that poor join is going to stick out like a sore thumb.

The gap is really not that bad. It is a little bigger than I would like, but the flash on my camera made it look huge. The sniper goggles will go over it too.

:).why don't you try sts less noisy :)

Hmmm I'm guessing wrong thread.

Update

Added my personal touch to the top! Really happy with how it turned out. I also pulled out the visor stand-in. I didn't touch it with fiberglass obviously, so it was really easy to remove. I just gently pulled on where I applied white glue, and it came off really nice. Sorry for the cellphone pics! I didn't have time to break out my camera.

IMG_1423_zpsbb48055f.jpg

IMG_1424_zpsa0c8338a.jpg

I also had to remake my visor…… I was starting to glue the seams when my glue exploded and ruined it. Really mad about that, but hopefully I can make/install a new visor today or tomorrow.
 

Attachments

  • IMG_1424_zpsa0c8338a.jpg
    IMG_1424_zpsa0c8338a.jpg
    106.2 KB · Views: 245
  • IMG_1423_zpsbb48055f.jpg
    IMG_1423_zpsbb48055f.jpg
    104.4 KB · Views: 246
Involuntary double post, because I need to post whenever I can.

Short Update

My first visor was made of plexiglass, which broke along the fold lines instead of bending. After that it took me three more tries to get the result I wanted! I didn't stay with gold because the headlight film was terrible to apply. Once placed on the window tint it was un-moveable, and I could not push the air bubbles out. So up close it looked really sloppy.

Until I find a good way to make the window tint gold without ruining it I am sticking with silver, even though it pains me. Metalcast and headlight film didn't cut it. Any, to the pictures! The visor hasn't been fastened yet, I just needed to put up some pics. I want some feedback! And I don't care if it is criticism.

IMG_3431_zps18f87286.jpg

IMG_3432_zps8a22e491.jpg

IMG_3433_zps86eadf64.jpg

IMG_3431_zps18f87286.jpg


IMG_3432_zps8a22e491.jpg


IMG_3433_zps86eadf64.jpg
 
Last edited by a moderator:
Looks awesome, great work! As for your issues with colouring of the visor, I remember seeing a tutorial video in which someone used a silver reflective inner, like you have, and then applied a thin layer of coloured spray paint to the outside of the visor. The result looked perfect. (In the video, the colour chosen was blue, but I don't see any reason why gold paint wouldn't work). Could be a solution to your problem! I'll be sure to keep up with this, looks very cool already!
 
The making of the visor can really be a pain. Have you used a window cleaner or pure water to apply the foil ?
And what kind of paint are you using ?
But the coloring looks really good, cant wait to see your armor finished.
 
Looks great! keep it up!

Much appreciated!

Looks awesome, great work! As for your issues with colouring of the visor, I remember seeing a tutorial video in which someone used a silver reflective inner, like you have, and then applied a thin layer of coloured spray paint to the outside of the visor. The result looked perfect. (In the video, the colour chosen was blue, but I don't see any reason why gold paint wouldn't work). Could be a solution to your problem! I'll be sure to keep up with this, looks very cool already!

I tried this after I read your post, since the window lining is reflective both ways. I got a spare piece of plastic, put the lining on one side, then sprayed a moderate coat of yellow metal cast on the other. It turned out really nice from the outside, but looking through it was like walking around without corrective lenses. So it was a little foggy. I will fool around with it some more, and if I get it to work I'll give it a go. Thanks for the suggestion!

The making of the visor can really be a pain. Have you used a window cleaner or pure water to apply the foil ?
And what kind of paint are you using ?
But the coloring looks really good, cant wait to see your armor finished.

Yes, I use the film applicator that comes separately from the film, it works well. For the visor I was using Duplicolor Yellow Metalcast, and as I said above I have started seeing some promising results, thanks to Connor.
Thanks! I did lots of research before I chose my paint.

Update Now that school is over for the summer I can finally post some more progress updates!


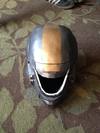
Finished installing the visor! Just need some padding on the inside, maybe football or baseball helmet padding. And I cut the fiberglass for the sniper goggles. But I need some new brushes so I didn't apply the resin yet.
IMG_3434_zpsdd38a07f.jpg

IMG_3435_zps611d747d.jpg

I finished painting the yellow on the last flashbang, it need some extra attention since it was my first try. And I rondo'd the inside of the gauntlets! I need to redo the gauntlet on the right, I used a 50/50 mixture and it was too runny and not strong enough. The left gauntlet is about 70/30, and came out nice and strong.
IMG_3436_zpsa1dd6cab.jpg
 

Attachments

  • IMG_3436_zpsa1dd6cab.jpg
    IMG_3436_zpsa1dd6cab.jpg
    63.9 KB · Views: 238
  • IMG_3435_zps611d747d.jpg
    IMG_3435_zps611d747d.jpg
    67 KB · Views: 228
  • IMG_3434_zpsdd38a07f.jpg
    IMG_3434_zpsdd38a07f.jpg
    88.4 KB · Views: 222
Pure pep-resin-bondo build, huh? Well it's looking awesome, so keep up the great work!

For the most part! The chest core is all foam, and the thighs will be part pep part foam. Thanks!

Update! Shoulder is done! Just need to make some decals for the blood type, I will as soon as I find my type out.
IMG_3439_zps53afb550.jpg

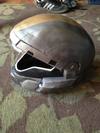
Next step in completing the helmet! Cutting some holes on both sides for external air, with a 40mm fan on both sides. I will add thin black mesh to the opening to help keep it dark. Trying to find some good padding, I've looked at baseball, football, or just some foam mats I have laying around. Not sure which to use quite yet.
IMG_3437_zps9099fb00.jpg

And I applied the first coat of paint to the gauntlets! Lots of details to be added when the paint is completed.
IMG_3440_zps1b7bdeb3.jpg
 

Attachments

  • IMG_3440_zps1b7bdeb3.jpg
    IMG_3440_zps1b7bdeb3.jpg
    70.2 KB · Views: 223
  • IMG_3437_zps9099fb00.jpg
    IMG_3437_zps9099fb00.jpg
    71.4 KB · Views: 228
  • IMG_3439_zps53afb550.jpg
    IMG_3439_zps53afb550.jpg
    81.6 KB · Views: 236
Is it dead on here or am I just that boring? I leave for a week and not much has happened!

Short Update

Started adding the detail paint to the gauntlets. I need to decide if/how I want to add extra detail.

IMG_3533_zps46eb297e.jpg

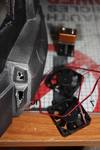
Wired the fans up. I just used a simple SPST switch, and rigged the batteries and fans in parallel. I will install them soon and see how they perform.

IMG_3534_zps9fa9e46f.jpg
 

Attachments

  • IMG_3533_zps46eb297e.jpg
    IMG_3533_zps46eb297e.jpg
    79.5 KB · Views: 227
  • IMG_3534_zps9fa9e46f.jpg
    IMG_3534_zps9fa9e46f.jpg
    118.1 KB · Views: 228
Nice looking ODST armor going on there. How many of you guys have used wood glue to reinforce papercraft armor?

Thanks! I don't think anyone uses wood glue as reinforcement. It's not sturdy enough. I only use it to seal the outside of a pep, about 3 coats. On the inside the traditional, methods work much better.
 
Ah, too bad... How long before fiberglass resin is safe? You see me and a friend of mine who goes by the name tobi2moodring on youtube worry that this could hurt us during convention going (well not her, she wouldn't be cosplaying the stuff I like to cosplay). And I'd like to know how safe it is. Although I would also prefer not to use this stuff, it sounds expensive... So if there are other reinforcement methods that would be great.
 
You're talking about the fumes right? Initially you want a good respirator and a well vented area, but after curing (about 30 minutes) it's really not that bad. Outside in the shade is not a bad place to leave them, the smell well eventually go away. It is perfectly safe after that.

I would suggest looking through the stickies in the noob forum, and in the pep/cardboard forum. There are lots of helpful tutorials and how-tos, as well as lots of good research to find! I can only tell you so much, give it a try.
 
Status
Not open for further replies.
Back
Top