alright alright alright....
I'm the worst. but with that out of the way:
Here we go: finished under-body-suit
*quick note, I built some of this in the wrong order but I'm writing this in the order I should've built it in.


The majority of the suit is made with 2 layers of spandex. If I was to do it over I would've tried to get moleskin spandex which is a lot thicker and has a tighter stretch, like it doesn't bag out under its own weight. but otherwise 2 layers works pretty well, I haven't worn it in the heat but luckily where I am in Canada doesn't ever get very warm. The leather portions (excluding shoulders) are a stretchy pleather that I had to salvage from leggings and other clothes so there are 2 different kinds, one has a duller shine and a fleece-y underside the other is shiny, thin and has a smoother polyester underside. The fleece kind was a lot nicer to work with. the shoulder patches were made with marine vinyl and snaps so that I can eventually attach my bicep armour without it falling down my arms. gamer arms.. you know what I mean.


The order of assembly is the most important part:
1) basic suit: (similar to Yaya hans bodysuit)
a) The front is made of 3 ish panels with princess seams. Ish because the middle one is cut in 2 right under the detail piece to make a pocket for the EVA foam insert to give it some dimension. Princess seams are the easiest way to get a nice shape for women but dont worry fellas, it'll work for you too if you want.
b) The back has 4 panels because it gets a zipper in the middle. (zipper doesn't go in yet)
c) The arms are all one piece but I made a decorative continuation of the princess seams down them.
Then I sewed all 4 sides (front, back, and both sleeves ) together raglan style (all the diagonal lines from the neck to the armpits. NOT the side seams) Raglan is the easiest way to sew sleeves on so for all the other beginners out there I would recommend it... unless that's not the way your cosplay is supposed to be.. luckily spartan undersuits don't actually have many rules because you cant see most of it haha! anyway..
**make sure you're happy with the fit, pin the sides together to test it. it sucks to adjust later I promise. also, stretch knits like spandex need stretchy seams so use a zigzag stich or a serger.
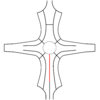


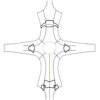
 *red represents where the zipper will go
2) The shoulder patches were added to the sleeves at this point because I could gauge roughly where I wanted them to sit on my arms. before I sewed them on I added the snaps and the zigzag stitch detail in the middle then they were sewn on to the arm with a tight zigzag stitch. The 3d printed clippys were glued on with superglue.

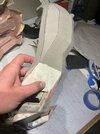
3) That spicy spicy Reach Butt. This was by far the most difficult thing to do, I did it about 3 times and almost ruined the suit in the process because of my maniacal cutting but in the end it turned out pretty good. I originally had made patterns from duct tape and cling wrap (like how you make the diy dress forms only I'm a monster and destroy them readily) but in the end I had to sort of make the patterns as I went along.
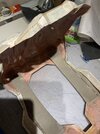
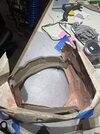
a) This will be confusing but bear with me. The spandex back panels were originally supposed to go all the way down to the crotch like in the drawing above but I kept messing up and ended up having to cut a new piece out and sewing it on. If you look at the picture of it inside out, you'll see that V of fusible interfacing, there is a seam underneath that was not originally supposed to be there. so, with that cleared up (hopefully) I can continue,
The large pleather area: this was patterned out after I had the back sewn together so I had to seam rip part of the "side seams of the back panel" so that I could re-sew them back up with the pleather sandwiched between them. (omg this must be SEW confusing!) sorry
The pleather was sewn from the top side to avoid messing with difficult angles like the V shapes at the top and bottom which can be fiddly if you're sewing it right sides together. Afterwards I hand-sewed all around the edges to keep them super smooth.
b) The 2 "pockets" looking parts were made separately then hand-sewed on. I'm not sure I could describe how I made them but its pretty much how you would expect from looking at the pictures. Bunch of stuff sewn together with more stuff sewn on top.. thats what I should just call this whole build, jesus....


4) The front detail. So this is really just a pocket that goes over the "slit" I made in the front panel. its super easy except that I sewed it on by hand to avoid seeing any seam lines. You can see the eva insert that makes it looks oh so spacey.


At this point it looked something like this or alternatively, put the details on before sewing the 4 sides together.. that's also an option.
5) Next was the collar and zipper. the collar is a simple rectangle collar folded and sewn to a rounded part underneath. The rounded part can be easily patterned out by tracing the same area around your neck. before attaching it onto the suit I added the lines using the same tight zig zag stitch from before. I hand sewed the 3rd pleather ring that goes into the 3d printed "clip" after attaching the neck to the suit. I had to rip an inch or two of the zipper seam in order to attach the collar nicely.


When I sew a zipper onto spandex I used 2 strips of fusible interfacing on each spandex side to keep the spandex from stretching while I sew. this way I keep the zipper smooth and not get a dinosaur back.
6) Now the side seams get sewn together all the way up the body and down the sleeves keeping the armpit seams lined up together. you can hem the sleeves at this point too.. or wait til the end.. doesn't really matter.
7) The hip panels may not be necessary but I added them for reasons probably. With the side seams all done up I could try it on pray there were no adjustments that needed to be made. seriously. you really don't want to have to do adjustments to any of the princess seams so make sure you're confident about the fit before putting on the detail. -hang on I'm putting this at the beginning-**
Cool.
K double checking that it fits and I was happy I made the pleather hip pattern with masking tape right on the suit and to avoid seeing stitching I sewed the right sides together. I cut the same shape of spandex (leaving seam allowance of course) out of the suit to make it easier to sew together.


8) I finished the leg holes with regular cotton bias tape and ran stretchy webbing through. not sure how sensible that is.. non stretchy cotton with stretchy webbing but here we are, it worked for me so whatever. don't @ me.
The crotch has 3 prong snaps to keep it closed.. hopefully they will.
th-th-thats all folks!
ps. sorry about my english, it's my first language.
pps. Subscribe to Pewdiepie
I'm the worst. but with that out of the way:
Here we go: finished under-body-suit
*quick note, I built some of this in the wrong order but I'm writing this in the order I should've built it in.


The majority of the suit is made with 2 layers of spandex. If I was to do it over I would've tried to get moleskin spandex which is a lot thicker and has a tighter stretch, like it doesn't bag out under its own weight. but otherwise 2 layers works pretty well, I haven't worn it in the heat but luckily where I am in Canada doesn't ever get very warm. The leather portions (excluding shoulders) are a stretchy pleather that I had to salvage from leggings and other clothes so there are 2 different kinds, one has a duller shine and a fleece-y underside the other is shiny, thin and has a smoother polyester underside. The fleece kind was a lot nicer to work with. the shoulder patches were made with marine vinyl and snaps so that I can eventually attach my bicep armour without it falling down my arms. gamer arms.. you know what I mean.


The order of assembly is the most important part:
1) basic suit: (similar to Yaya hans bodysuit)
a) The front is made of 3 ish panels with princess seams. Ish because the middle one is cut in 2 right under the detail piece to make a pocket for the EVA foam insert to give it some dimension. Princess seams are the easiest way to get a nice shape for women but dont worry fellas, it'll work for you too if you want.
b) The back has 4 panels because it gets a zipper in the middle. (zipper doesn't go in yet)
c) The arms are all one piece but I made a decorative continuation of the princess seams down them.
Then I sewed all 4 sides (front, back, and both sleeves ) together raglan style (all the diagonal lines from the neck to the armpits. NOT the side seams) Raglan is the easiest way to sew sleeves on so for all the other beginners out there I would recommend it... unless that's not the way your cosplay is supposed to be.. luckily spartan undersuits don't actually have many rules because you cant see most of it haha! anyway..
**make sure you're happy with the fit, pin the sides together to test it. it sucks to adjust later I promise. also, stretch knits like spandex need stretchy seams so use a zigzag stich or a serger.


 *red represents where the zipper will go
2) The shoulder patches were added to the sleeves at this point because I could gauge roughly where I wanted them to sit on my arms. before I sewed them on I added the snaps and the zigzag stitch detail in the middle then they were sewn on to the arm with a tight zigzag stitch. The 3d printed clippys were glued on with superglue.

3) That spicy spicy Reach Butt. This was by far the most difficult thing to do, I did it about 3 times and almost ruined the suit in the process because of my maniacal cutting but in the end it turned out pretty good. I originally had made patterns from duct tape and cling wrap (like how you make the diy dress forms only I'm a monster and destroy them readily) but in the end I had to sort of make the patterns as I went along.
a) This will be confusing but bear with me. The spandex back panels were originally supposed to go all the way down to the crotch like in the drawing above but I kept messing up and ended up having to cut a new piece out and sewing it on. If you look at the picture of it inside out, you'll see that V of fusible interfacing, there is a seam underneath that was not originally supposed to be there. so, with that cleared up (hopefully) I can continue,
The large pleather area: this was patterned out after I had the back sewn together so I had to seam rip part of the "side seams of the back panel" so that I could re-sew them back up with the pleather sandwiched between them. (omg this must be SEW confusing!) sorry
The pleather was sewn from the top side to avoid messing with difficult angles like the V shapes at the top and bottom which can be fiddly if you're sewing it right sides together. Afterwards I hand-sewed all around the edges to keep them super smooth.
b) The 2 "pockets" looking parts were made separately then hand-sewed on. I'm not sure I could describe how I made them but its pretty much how you would expect from looking at the pictures. Bunch of stuff sewn together with more stuff sewn on top.. thats what I should just call this whole build, jesus....


4) The front detail. So this is really just a pocket that goes over the "slit" I made in the front panel. its super easy except that I sewed it on by hand to avoid seeing any seam lines. You can see the eva insert that makes it looks oh so spacey.


At this point it looked something like this or alternatively, put the details on before sewing the 4 sides together.. that's also an option.

5) Next was the collar and zipper. the collar is a simple rectangle collar folded and sewn to a rounded part underneath. The rounded part can be easily patterned out by tracing the same area around your neck. before attaching it onto the suit I added the lines using the same tight zig zag stitch from before. I hand sewed the 3rd pleather ring that goes into the 3d printed "clip" after attaching the neck to the suit. I had to rip an inch or two of the zipper seam in order to attach the collar nicely.


When I sew a zipper onto spandex I used 2 strips of fusible interfacing on each spandex side to keep the spandex from stretching while I sew. this way I keep the zipper smooth and not get a dinosaur back.
6) Now the side seams get sewn together all the way up the body and down the sleeves keeping the armpit seams lined up together. you can hem the sleeves at this point too.. or wait til the end.. doesn't really matter.
7) The hip panels may not be necessary but I added them for reasons probably. With the side seams all done up I could try it on pray there were no adjustments that needed to be made. seriously. you really don't want to have to do adjustments to any of the princess seams so make sure you're confident about the fit before putting on the detail. -hang on I'm putting this at the beginning-**
Cool.
K double checking that it fits and I was happy I made the pleather hip pattern with masking tape right on the suit and to avoid seeing stitching I sewed the right sides together. I cut the same shape of spandex (leaving seam allowance of course) out of the suit to make it easier to sew together.


8) I finished the leg holes with regular cotton bias tape and ran stretchy webbing through. not sure how sensible that is.. non stretchy cotton with stretchy webbing but here we are, it worked for me so whatever. don't @ me.
The crotch has 3 prong snaps to keep it closed.. hopefully they will.
th-th-thats all folks!
ps. sorry about my english, it's my first language.
pps. Subscribe to Pewdiepie
Last edited:

