glasscutter
Jr Member
Hi 405th!
First I want to thank everyone here for all the information and hard work put into this site. Without it I never would have gotten my daughter's helmet built for Halloween last year. Credit also goes to Lando who created the pep file and Cereal Kill3r for his YouTube channel. I have been lurking and researching since May 2013 while attempting this first build. Hopefully I can help someone in the future as much as everyone has helped me.
Ok, on with the build pictures.
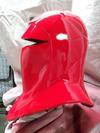
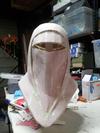
First off it took 3 tries to get the helmet sized properly. Dang kids with their big heads and still growing bodies.") The test helmets were built from plain printer paper.
The test helmets were built from plain printer paper.


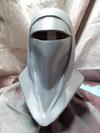
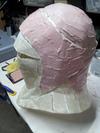
Once the size was good, card stock was used and 3 very light coats of resin applied to the outside.

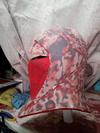
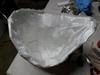
After that Fiberglass cloth was put in using spray adhesive and resin applied.

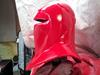
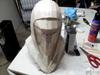
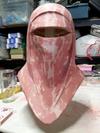
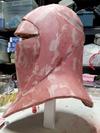
At that point my good progress made me careless. I ignored the advice of applying Bondo in lots of light coats. Instead on went one really thick coat over the whole helmet.

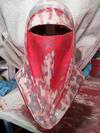
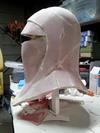
After 8 hours of sanding, 3 packs of 80 grit sandpaper, and very very sore arms, the helmet is presentable again. If you notice, there are a lot of pinholes in the Bondo surface. I have since learned this was from mixing the Bondo wrong. On the Bondo website it has a video which says not to stir mix it. This creates air bubbles in the Bondo, which makes pinholes! Instead it should be mixed by squishing it. http://bondo.com/tips


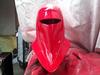
After more sanding and Bondo/glazing coats. I was going to try and fix the front ridge problems with glazing putty. I quickly learned this wouldn't work. Due to time constraint (1 week till Halloween) I had to quit trying and proceed to painting.


First I want to thank everyone here for all the information and hard work put into this site. Without it I never would have gotten my daughter's helmet built for Halloween last year. Credit also goes to Lando who created the pep file and Cereal Kill3r for his YouTube channel. I have been lurking and researching since May 2013 while attempting this first build. Hopefully I can help someone in the future as much as everyone has helped me.
Ok, on with the build pictures.
First off it took 3 tries to get the helmet sized properly. Dang kids with their big heads and still growing bodies.
The test helmets were built from plain printer paper.

Once the size was good, card stock was used and 3 very light coats of resin applied to the outside.

After that Fiberglass cloth was put in using spray adhesive and resin applied.

At that point my good progress made me careless. I ignored the advice of applying Bondo in lots of light coats. Instead on went one really thick coat over the whole helmet.

After 8 hours of sanding, 3 packs of 80 grit sandpaper, and very very sore arms, the helmet is presentable again. If you notice, there are a lot of pinholes in the Bondo surface. I have since learned this was from mixing the Bondo wrong. On the Bondo website it has a video which says not to stir mix it. This creates air bubbles in the Bondo, which makes pinholes! Instead it should be mixed by squishing it. http://bondo.com/tips


After more sanding and Bondo/glazing coats. I was going to try and fix the front ridge problems with glazing putty. I quickly learned this wouldn't work. Due to time constraint (1 week till Halloween) I had to quit trying and proceed to painting.


Attachments
-
 20130826_002017_zpsda4be774.jpg63.5 KB · Views: 458
 -
 20130826_002030_zps86a69c2b.jpg59.7 KB · Views: 417
 -
 20131024_203930_zpsc6373b75.jpg75.4 KB · Views: 369
 -
 20131024_203913_zps6ba95a98.jpg74.5 KB · Views: 340
 -
 20131023_182216_zps0171ec07.jpg71.2 KB · Views: 311
 -
 20131020_170443_zps7a59fbe2.jpg83.4 KB · Views: 359
 -
 20131020_170407_zps7b52b688.jpg68.6 KB · Views: 307
 -
 20131027_170918_zps20131627.jpg80 KB · Views: 343
 -
 20131027_170949_zps5c76bae4.jpg78.7 KB · Views: 319