- Member DIN
- S410
How to Make Cosplay Stickers
Introduction
Hello friends! I have really enjoyed making stickers for myself and some friends to hand out at conventions, so I want to share how I make them! Below are a few examples of stickers that I have made, including the one that I will demonstrate how to make: the NobleofDeath16 sticker:
Stickers are a great handout to have at conventions. They are a good way to remind folks of your social media handles, while giving them a fun memento/keepsake. They are also a lot of fun to trade with friends!
These stickers are entirely home made. The drawings were created by me using photoshop, they were printed out on an inkjet printer, and cut with a Cricut vinyl cutter. If you don’t have some of those tools, don’t worry! I will give you some alternatives to these methods, so you are still able to make some really cool cosplay stickers.
Digital Drawing
The first thing we must do is create the digital art that we want to print on the stickers. If you’re an artist, this is your time to shine! Use whatever digital art program you prefer to create a representation of your character to put on your stickers. If you’re not an artist like me, you still have a few options. You can commission an artist to create artwork of your character, you can commission someone to trace a photo of your character, or what I like to do is trace my character myself. Tracing the character myself is the fastest and cheapest option, and it still gives you complete control over the look of the sticker. It’s not hard! I’ll show you how to do it:Begin by opening the drawing program of your choice. For this tutorial, I will be showing you how I trace my character in photoshop. You will be able to follow a similar process in other drawing programs, however. Open Photoshop. Create a new document. Make it 8.5 inches wide and 11 inches tall. Use a resolution of 300 pixels per inch. Leave the background as white, or blank. I have these settings saved under a profile for easy access.
We’ll be creating this sticker for out very own NobleofDeath16: Division PR and Midwest RCO! As I said earlier, I trace photos to create the illustrations you see on the stickers. Therefore, we will need a reference to trace over. NobleofDeath16 sent over this photo that he wanted on his sticker:
This photo is pretty good, but I wasn’t completely satisfied with the position of the sword off to one side. Therefore, I elected to trace over in-game assets to create this drawing. Unfortunately, the helmet NobleofDeath16 wears is not available in the game with this specific armour coating, (at least, not for me), but I will show you how to deal with that later. This is the screenshot I will be tracing:
Begin by adding this photo to the photoshop document on a new layer and decreasing the opacity to about 50%. Create another new layer called “Outline”. Hit the B key on your keyboard to select the brush tool. Select a hard round brush with a size of 9 pixels. Using your mouse or a drawing tablet, carefully trace the notable geometry of the armour.
Tip: Increase the smoothing setting to create smoother curves. I usually set it to about 35%.
Tip: Create straight lines by drawing a dot at the starting point, then shift clicking on the end point. A perfectly straight line will be drawn between the two points
Continue tracing the armour until you have a complete outline.
I ran into a bit of a problem with NobleofDeath16’s helmet as I mentioned I would earlier. He wears a different helmet in real life than I have in my in-game screenshot. To fix this, I took a screenshot of the correct helmet with a different coating and traced that overtop of the original screenshot.
Now you should have a complete outline of your character and we can begin working on the colour.
Create a new layer called “Colour Reference” and paste a screenshot or photo of your character. Place the image off to one side where it will not interfere with out colouring, but where we can still see it to select colours from. Create another new layer below the outline and call it “Colour”.
Let’s fill our character with white to begin. Hide the background layer. Use W to select the magic wand tool. With the Outline layer selected and the “select all layers” check box unchecked, select the area outside of your character. Go to Select -> Modify -> Expand and expand the selection by 2 pixels. Use ctrl + shift + I to invert the selection. Select white form the colour selector. Go to the “colour” layer and use G to use the paint bucket tool and fill the selection with white. Use ctrl + D to deselect. You have now filled the character with white. Here is what you canvas should look like:
Now let’s start colouring! On the “colour” layer, Use W to use the magic wand tool. Turn on “sample all layers” at the top of the screen. Select the areas of the drawing that will be one particular colour; say for example: the sword. Select the colour from your colour reference using the eyedropper tool (I) or by using the colour picker.
You may think that we can simply use the paint bucket to fill the selection in now, but there’s a problem with doing that. Sometimes, the selection does not go right to the black line and can leave behind space that will be left white. To avoid this, we must first go to Select -> Modify -> Expand to expand the selection by about 2 pixels. Now we can use the paint bucket (G) to fill in the selection.
Tip: Create a hotkey to quickly access the expand selection dialogue box. You’ll be using it a lot. I’ve set mine to F1.
Tip: To make minor adjustments to a selected colour, use ctrl + U or go to Image -> Adjustments -> Hue/Saturation and move the hue slider.
Use ctrl + D to deselect, then continue using the magic wand, eyedropper, colour selector, expand selection tool, and paint bucket tool to colour in the rest of the image.
Tip: To quickly create this geometric camouflage pattern shown below, use the polygonal lasso tool to select complex shapes, and fill them with colour.
Tip: Here is a way I found to do the energy sword: Select the blue area of the sword that is (up until this point) one solid colour.
Invert the selection using ctrl + I and expand the selection by about 25 pixels. Invert the selection again. Create a new layer called “Energy Sword” and fill the selection with a darker blue.
Use ctrl + D to deselect. Blur the layer by going to Filter -> Blur -> Gaussian Blur and set the blur to about 25.
Create another new layer called “lightning”. Using the Hard Round Pressure Size brush, draw lightning-like lines along the sword in white.
Apply blur of a about 3 to this layer, and lower the opacity. If you turned off the darker blue layer, re-activate it now. You should be left with this effect for the energy sword:
Now the entirety of the character has been filled with colour. To give our solid colour a bit more depth, let’s add some shadows. Create a new layer above the colour layer but below the outline layer and set the blending more to multiply. Select the character by using the magic wand (W) tool, sampling all layers, selecting the blank part of the canvas, expanding the selection, and then inverting the selection. You may need to use the lasso tool to clean up the selection a bit. Use B to use the brush tool, then select a soft round brush. Select black from the colour picker, and a brush size of about 40. You can now draw over the major lines of the character to create more depth. You can control the intensity of the shadows by adjusting the opacity of this layer. Draw shadows over the whole character.
It's a good idea to Save the photoshop Document at this stage, as out character drawing is complete.
Now let’s make the background! Noble wanted my to try and do something with the SSG logo, so let’s work with that. You’re background is going to be much different, so I won’t spend a whole lot of time on how I made this one. The important part is that you make it on a new layer below everything, and give it a black stroke like the rest of the art. Seeing as I’m putting a dark character on a dark background, I used a circular gradient to separate them, making the background lighter in the middle.
Next I created a banner for the text to go over. Overtop of everything, I created a new layer and coloured a banner with the brush tool. Overtop of that, I created another new layer and used the Text tool (T) to add NobleofDeath16’s name in the Montserrat font. Ctrl + click on the text layer to select it, then select fx, gradient overlay. Adjust the colours to create a suitable gradient that matches the colour scheme of the sticker. Add a stroke by going to fx, stroke. I made mine 6px, black, and centred. You can also choose to add a drop shadow to give the text some depth.
Lastly let’s create a white stroke around the entire thing, so that it is not so noticeable if the stickers are not cut perfectly. Using the object selection tool or the magic wand tool and sampling all layers, select everything. Create a new layer underneath everything and fill it with a solid cfolour. Go to fx, stroke, and create a thick white stroke. I used a stroke of 100px.
Save the image as a png by going to file -> save as -> .png. And that is how you can create you very own illustration of a character by tracing an in-game screenshot or photo!
To Recap all of the steps:
- Import reference image
- Trace outline
- Fill with colour
- Create shadows
- Draw background
- Add text and banner
- White stroke around everything
Printing and Cutting Stickers
Great! Now that we have the image we want to turn into a sticker, let’s work on actually printing and cutting the stickers. I’ll be using the Cricut Maker 3 as it has print-then-cut functionality. Any vinyl cutter that has print-then-cut functionality (and even some that don’t if you can work around that) will do the job. If you don’t have your own Cricut machine, consider looking if your local public library has one, looking into if there’s a maker space in your community with a vinyl cutter, or if there is a business that will rent you a machine. Cricut machines and other vinyl cutters are often used by hobbyists and have been for some time, so you may be surprised that your small town likely has a place where you can rent a machine! If you’re not keen on cutting the stickers yourself, you can also hire sticker manufacturer to make your stickers. I prefer to make them myself as it allows me to really tune the quality of the print, size and shape of the sticker, and it allows me to make as many or as few stickers as I want without having to worry about minimum order sizes.I’ll be demonstrating how I make stickers on a Cricut vinyl cutter, but the process will be similar for other brands. I’ll assume you already have the Cricut machine set up and you have the Cricut design space installed on your computer.
Begin by launching the Cricut design space. Create a new project. We want to make print as many of these stickers on a single page as possible, so I’ve made a svg template that you can use as a positioning guide. This template is for standard letter sized paper. To add it to your canvas, first download it (It is attached to this post) then, in Cricut design space, go to Upload -> Upload Image -> Browse -> Print Then Cut Template -> Open -> Upload -> Select the Template -> Add To Canvas. You will see that the template has been added to your canvas and you can see how much space you have to work with.
Now let’s add our sticker image. Go to Upload -> Upload Image -> Browse -> Your Sticker Image.Png -> Complex -> Continue -> Apply and Continue -> Print Then Cut Image -> Upload -> Select the Image -> Add To Canvas. Now you can adjust the size using the boxes at the top of the screen, and duplicate and rotate the sticker to fill your page. I figure 8.5cm wide is optimal for these stickers. You will have to determine this number by trial and error, and by deciding how large or small you want your stickers to be. Ensure that you stickers do not go into the red area of the template, otherwise you will not be able to print that size. Seeing as this page could look similar upside down, I’ll add some print-then-cut text in the middle to make the correct orientation.
Now let’s make sure we don’t print the guide. Select the guide, then from the operation dropdown, select guide. This will make sure the guide is not printed.
To make sure we print everything as it is on the guide, we have to attach everything. Use ctrl + A to select all, then select attach.
Now we have the stickers laid out and we can print them! Select Make. Save the project if you have not done so already. Seeing as we’ve already laid the stickers out how we want to print them; we can hit continue. Next, hit send to printer.
Printing is the part of making stickers that requires the most trial and error. For printing I’ll be using this Epson inkjet printer. Before printing I make sure the printer is powered on and has ink. I also load my sticker paper in the drawer and select premium semi-gloss paper settings on the printer. I print on label paper from OnlineLabels. I buy Weatherproof Matte for Inkjet 8.5” x 11” SC. The reason I use matte paper but select semi-gloss settings is because sometimes there is yellowing on the white parts of the sticker with matte settings. This is something you’ll have to experiment with, as all printers are different. Make sure to load the paper into the printer so that we print on the label side, not the backing side. This is different for all printers as well, and you’ll have to experiment with your printer to see which way you need to orient the paper.
Back on the computer, Select your printer from the drop down. Deselect add bleed and enable use system dialogue. Hit print.
To make sure your system dialogue has the most settings available to you, make sure you’ve properly installed your printer’s driver. If you simply set up you printer without installing the manufacturer’s driver, you will only have limited settings available to you in the system dialogue. Open the preferences and adjust the following settings:
- Set paper type to Premium semi-gloss
- Set quality to high
- In the more options tab disable high speed
- Select custom colour correction, then advanced, adjust the colour controls:
- Use trial and error to determine the best settings to print with. Here you can see I set brightness to 15, contrast to 5, and saturation to 5, but I’ve found that optimal settings for this sticker are closer to brightness of 10, contrast of 15, and saturation of 5.
Prepare the medium strength cutting mat. I tape mine to the table to make sure it doesn’t shift. Note that I’m using the metric side of the mat, so the top will be this way.
Lay the paper on the cutting mat and ensure it’s fully flat using a squeegee with a felt side. Note that the top is in line with the top of the cutting mat. To laminate the sheet, I use Avery 9”x12” Self Adhesive Laminating Sheets.
I’ll need to trim them before applying them to the stickers. Note the side of the paper that has this removable tab. Be sure to not trim this side. I trim the laminating sheets to a size of about 8”x10.5”. Line up the laminating sheet to cover all of the stickers, then pull off the tab and stick the sheet in place. Then, pull off the rest of the backing, using a squeegee to make sure it is immediately pressed flat against the page with no air bubbles. Remove the tape that holds the cutting mat to the table, and insert the cutting mat into the Cricut machine, making sure you insert the top first.
Tip: Sometimes the laminating can cause issues with the sensors used to find the print-then-cut markings. If laminating the entire sheet is problematic, consider laminating only the sticker area, cutting around the print-then-cut markings.
Back on Cricut design space, I’ve bookmarked Heavy Cardstock – 100lb (270 gsm). Select this material and choose default pressure. Load the cutting tools into the machine as prescribed by the software. When ready, hit the load button on the Cricut machine. When the start button flashes, hit it. Now wait for the machine to cut out the stickers.
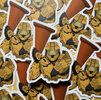
When the machine is finished, hit the unload button. Peel away the excess material and use a pick to remove the stickers. Inspect the quality and size of the stickers, and make adjustments to the next batch if needed. Here, you can see I made the stickers too bright. I’ll reduce the brightness and raise the contrast for the next print. But that’s how I make my stickers!
To Recap using the vinyl cutter:
- Create a project with a template in the cutter software
- Add and arrange your stickers
- Send the stickers to the printer
- Laminate the sheet and stick it to the cutting mat
- Set the cutter settings
- Cut out the stickers and remove excess material
Final Thoughts
These stickers have a very bright and glossy finish, they hold well, are resistant to water and weather, and they’re super customizable. I’ve had a sticker stuck to the back of my phone for the better part of eight months, and it’s still sticking strong! And it’s seen hot and cold days, as well as rain. I love handing these out at conventions for people to remember who I am and what my social media tags are. I can easily hand out over 50 stickers during a full day at a convention, even by only giving to folks who ask for my social media tags. If you have access to the tools to make your own stickers, I highly suggest giving it a try, because they are a lot of fun to make and give away!Even if you aren’t able to make the stickers completely from scratch, having unique stickers to trade with friends is really fun! Look how many I’ve collected on my tool box!
And I hope that with this tutorial I’ll be able to collect even more!
If you have any questions at all, please leave a reply in this thread and I’ll be happy to get back! Also, post pictures of your stickers in this thread as well! It’ll act as an inspiration repository for all of our future sticker makers! I hope you all found this tutorial helpful, I hope you learned something, if not found it entertaining. That’s all from me! N8TEBB, out!
Attachments
Last edited: