1st Build. Halo Reach Air Assault build, 3D printed.

Status
Not open for further replies.

Space Fox 1

New Member
So this is my first armor build but not my first attempt. I tried the old Cura route and sucked at it majorly. It took me a whole day to make a thigh and it was terrible. I tried the foam method and I just wasn’t having luck with it I worked really hard, and ultimately got sub par results and lost the motivation to finish it despite how much I wanted to make a suit. Then my buddy suggested using a 3D printer. It would be easy he said. Just load up a file and print. Well after 400 dollars down the hole, hours and hours spent learning how to 3D print and how to optimize prints, and finally getting my printer to work well and print ABS I’m. Going for it and printing my full suit. I have 10kg of ABS on the way and am super excited to get started!
image.jpg
 
image.jpg

So this is older progress of mine but thought I’d show it. This is at 30% scale and is designed to figure out the best way to 3D print as well as to teach me how to print. Initially I had the infill after 10% and oriented it standing up. Due to the stubborn support and low infill this mini helmet turned out very frail and had some breakage. It did print successfully though so I took what I learned here and tried to print from an upside down orientation. That resulted in this
image.jpg
as you can see I had some breakage at the top that was again due to stubborn supports and not having strong enough infill. Overall the helmet is stronger because of the greater infill amount but still not quite enough.I increased the infill percentage all the way to 40 and then reoriented it to lay on the backhalf of the helmet. Surprisingly enough it used even less material and this resulted in the final tuning of my settings and the final orientation.
image.jpg
This model had no breakage, was the quickest to print, and the easiest to break from its supports. Aside from sanding at the back and Some normal post processing I shouldn’t have to do anything else. I will do one final 30% scale print with ABS before moving on to my final helmet tommorow. I will update this post again then. Thishas all been done over the course of the week.
 
Pro or just the standard? I've been shopping around for a while and just looking for all info and opinions.
 
Pro or just the standard? I've been shopping around for a while and just looking for all info and opinions.
It’s a
Standard CR-10. Personally if I was going to upgrade I would probably upgrade to a CR-10 S5.
while I’m here I would also like to mention that after a day of trial and error I just decided to build an enclosure for my CR-10 to make printing with ABS a lot easier. 2 things I want on my next printer personally are an auto bed leveler and an included enclosure. Unfortunately I will not be able to work on this project until Friday-Saturday as I’m going on a family vacation. Will update then!


Vacation?....what's that? ;) Thanks for the info.
 
So. It’s been a long time since I last posted. First things first printing with ABS is hard. So hard in fact I had to order a shroud and mess with my printer for weeks to begin printing. Then the biggest pitfalls of all occurred. My laptop burned itself after a windows update and so I no longer have a laptop. Needless to say this project has been delayed. I still have my settings and files saved to an SS card so I will continue to tweak my hardware to get it to work but after the final helmet prints It will be a month or 2 before I can proceed at all. Man 2020 sucks. Anyways have a great day and I will post again once I have a finished ABS print
 
Good luck with your prints! May I suggest using PETG for armor? Its quite durable and is easier to sand then PLA but it doesn't give off fumes as bad as ABS. Can be a bit of a pain to get to print however imo it's easier than ABS
 
Sorry for the necro but believe it or not I did not give up on the project. After nearly giving up and swearing off 3D printing I decided to randomly pull an all nighter and completely tore apart my 3D printer and reassembled it. Poured some hairspray on the print bed and the ABs printed wonderfully. I have an enclosure and a list of upgrades to do. I decided to rethink the program and print the armor pieces from smallest to largest and deal with the problems as they come along. I have printed 4 hand plates (2 prototypes and 2 final) and am in the process of printing the shoulders. I will update with pictures
 
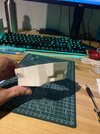
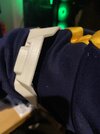
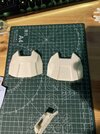
So the shoulder print failed due to to an issue with my filament spool but I already have a solution set out (it’s because it’s a 5kg spool so usually manual feeding is necessary without a close roller) also printed out the final handplates. I decided to take the failure in stride and test out some fit and check the extrusion. Overall I’m pretty happy and will be starting the final print tommorow.
 

Attachments

  • image.jpg
    image.jpg
    2 MB · Views: 173
  • image.jpg
    image.jpg
    2 MB · Views: 163
  • image.jpg
    image.jpg
    2.3 MB · Views: 163
image.jpg

image.jpg

So. After much delay and many days of wrenching I have fixed my problems. I ran into a pretty nasty ABS clog and so I think it will be valuable to share what I have learned along the way and the many struggles. So first thing, for bed adhesion hair spray works wonders (went from barely adhering to being difficult to take off the bed) also check your extruded and make sure the bolts aren’t too tight, you shouldn’t have visible pinching on your filament (this caused many clogs and headaches) I also was preheating and leaving my printer idle to heat the enclosure to make printing easier, do not do this, set your bed, auto home and start immediately, all you will do is leave nasty residue on your nozzle and create points of failure. If you need to clean out your nozzle give acupuncture and cold pulls with nylon a solid go before taking apart your entire horned. Heat guns and small wire brushes are excellent for dealing with clogs as well, I would highly recommend using acetone (for abs) afterwords and doing a deep brush to make sure you get all the gunk out. Finally don’t be cheap! Get and use good filament the first time. This is all stuff that I have been wrenching on and doing trial/error with over the last several days, it has been a very frustrating experience but I have taken it in stride and have learned a lot. Throughout the build process I will also be upgrading my printer and will be documenting the process as I go along. Hopefully the pace will be much faster from here on out. Thank you for your time and have a great day!
 
View attachment 309942
View attachment 309943
So. After much delay and many days of wrenching I have fixed my problems. I ran into a pretty nasty ABS clog and so I think it will be valuable to share what I have learned along the way and the many struggles. So first thing, for bed adhesion hair spray works wonders (went from barely adhering to being difficult to take off the bed) also check your extruded and make sure the bolts aren’t too tight, you shouldn’t have visible pinching on your filament (this caused many clogs and headaches) I also was preheating and leaving my printer idle to heat the enclosure to make printing easier, do not do this, set your bed, auto home and start immediately, all you will do is leave nasty residue on your nozzle and create points of failure. If you need to clean out your nozzle give acupuncture and cold pulls with nylon a solid go before taking apart your entire horned. Heat guns and small wire brushes are excellent for dealing with clogs as well, I would highly recommend using acetone (for abs) afterwords and doing a deep brush to make sure you get all the gunk out. Finally don’t be cheap! Get and use good filament the first time. This is all stuff that I have been wrenching on and doing trial/error with over the last several days, it has been a very frustrating experience but I have taken it in stride and have learned a lot. Throughout the build process I will also be upgrading my printer and will be documenting the process as I go along. Hopefully the pace will be much faster from here on out. Thank you for your time and have a great day!
I am currently in the process of fighting my ender 3 pro over ABS. What kinds of issues did u see when you let the machine heat the enclosure?
 
I am currently in the process of fighting my ender 3 pro over ABS. What kinds of issues did u see when you let the machine heat the enclosure?
A metric tone of nozzle clogs. Basically as abs sits idle in the enclosure it degrades and forms into unextrudeable mess. I have found that a deep clean and starting up the printer first worked wonders. Having an enclosure too fixed a lot of my problems. My CR-10 is relatively similar and I am printing at 270 on the hot end and 100 on the bed with the fan speed set to 0 and using a brim. I got alot of layer skips when using lower hot end temps.
 
I assume you're using brass nozzles, have you considered upgrading? Steel nozzles might be worth looking at and investing in. A little while ago I bought a couple of copper nozzles plated with nickel which supposedly are a good balance between the quick heating of brass and the durability of steel, though so far I haven't had a chance to test them.
 
I am using a steel nozzle. When my printer is sitting idle warming the enclosure bits of abs melt and kind of extrude out. I just need to remove it before the actual print starts. I'm printing at 245 nozzle and 100 bed. My prints start out great and then fail after about an hour. They are detaching from the bed and getting all spagetti-y. I wonder if the pseudo extruded ABS is making the filament available for printing thinner so that the first layer is not full thickness and therefore not adhering to the plate?
 
Status
Not open for further replies.
Back
Top