Charlie13 reporting return to the 405th: Mark VI Build-PIC HEAVY-

Status
Not open for further replies.

Charlie13

Active Member
Member DIN
S133
Hey guys 'n' garls,

Long time no see :D
Since I was really busy with my job and moving to another place, I was -unfortunately- not able to visit this forums constantly.
Anyways, I decited that it's time for another build, which isn't as usual as you might think.

It all started with a friend of mine, who purchased one of those vacformed armor kits by Westerfield Studios which was -of course- unassembled and unpainted.
A while after he recieved the armor, my friend got really bored and unmotivated to go on with the assembling process.
And thats where I came in. He sold it to me for a fairly good price, considering the current prices on the Westerfield Website.

However, this thread is about to share the finishing-process on that armor with you guys, so you're all invited to write some critiques, tips, opinions and what not.

So yeah. Let's get started! :D

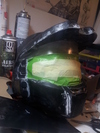
First of all I payed most attention to the helmet, which I recieved partially assembled. However here's a pic of it fully assembled :D

fbimg13866005yi9xl1bfj3.jpg


Note: I used Hotglue to assemble the armor, which works pretty well. Only thing to mention is, that you really have to keep an eye on the glues temperature, cause otherwise it may melt down the armor-pieces.
The part of the brim, which conmnmects directly to the visor was not included and had to be done by hand btw.
To seal the glueing edges, I used epoxy putty.

Once this was done, I dremeled down the epoxy to give the helmet a nice and smooth look. Frogtaped the visor as well.
fbimg138695574nr36djivf.jpg


As you might have noticed, I also added some detailing,made out of pvc sheet.

Thats it for now :) Hope you like the progress so far :D
 

Attachments

  • fbimg13866005yi9xl1bfj3.jpg
    fbimg13866005yi9xl1bfj3.jpg
    2.7 MB · Views: 333
  • fbimg138695574nr36djivf.jpg
    fbimg138695574nr36djivf.jpg
    2.7 MB · Views: 327
This is actually vacuum formed, which is rather a cast.The whole armor was made using this method.
 
Awright, its update time :)

Got the helmet and armorpieces ,sanded, primed and painted so far. Here are some images :)
fbimg13871891f8h6rdtus2.jpg

Well, I know on this pic you can't really make out specific pieces, just a blue pile of something. But pictures where everything is spread out properly, will follow of course. ;)
fbimg13871974gn9o60mrh3.jpg

Now as you can see I also glued an motorcycle visor inside the helmet. In addition to that I painted most important areas of helmet and backpiece black, suing an airbrush.
Applied some white stripes as well. They'll look alot more weathered in the end, but for now I'm pretty statisfied with the outcome :) How about you guys?
 

Attachments

  • fbimg13871891f8h6rdtus2.jpg
    fbimg13871891f8h6rdtus2.jpg
    3.2 MB · Views: 326
  • fbimg13871974gn9o60mrh3.jpg
    fbimg13871974gn9o60mrh3.jpg
    2.5 MB · Views: 332
Back with a vengeance! I think know it looks solid. It will look much better once it has been weathered/blackwater.
 
WOW! Where did you get these!? This probably will be the fastest build on the forum! Has all of this taken just 2 days or have you started before this? Very very cool. Judging by the masking tape you will have a real cool paint job. + 1 sub!
 
Back with a vengeance! I think know it looks solid. It will look much better once it has been weathered/blackwater.
Thank you! Started weathing today btw. Pics will follow:)

WOW! Where did you get these!? This probably will be the fastest build on the forum! Has all of this taken just 2 days or have you started before this? Very very cool. Judging by the masking tape you will have a real cool paint job. + 1 sub!

Frist of all, thanks alot for your kind words and your sub :) This is actually an socalled "armor kit" which can be purchased on a website called "Westerfield Studios" i think. Just look it up in google :) I bought it from a friend, who ordered it from there, but didn't have any motivation to assemble it. As far as I can tell, these kits are very pricey though. The only reason I bought this from my buddy, was that he made a good price.
What I can definately say is that those kits save you alot time, cause you won't have any pepping, resinig and fiberglassing.
But consindering the price ,I would highly recommend to take your time on making your own armor, which is not only alot cheaper but also will have some more accurate detail on it, which this one I brought from my buddy didn't have already.
So yeah I worked a liddle bit further than I actually show progress on here, but it's not that much. The reason for that is, that I don't always have time to shoot some good images. :)

Ok now back to the progress:

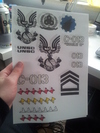
Made some decals today and printed them out. This is just regular paper unfortunately, so I'm just planning to bring them on with some clearcoat-paint.
20131218121037mx73q6yc9b.jpg


After a alot cutting, painting and swearing, here are the results xD

fbimg13873694zgkun7rabj.jpg


Thats it for today. Have fun everybody :)

P.S. I tagged this thread as Pic Heavy consindering there are lots of pics to come.
 

Attachments

  • 20131218121037mx73q6yc9b.jpg
    20131218121037mx73q6yc9b.jpg
    2.4 MB · Views: 336
  • fbimg13873694zgkun7rabj.jpg
    fbimg13873694zgkun7rabj.jpg
    2.4 MB · Views: 346
looks awesome! love the paint job and the decals look amazing! Keep it going man
 
looks awesome! love the paint job and the decals look amazing! Keep it going man

Thanks man! :) I will definately keep this going.

With that being said, here's the next update. :D
These are the results of yesterdays and todays "weathering-session". Enjoy!
20131221135512k0zpj9vxil.jpg

So this is my helmet so far. Only thing missing now is the padding inside :). Note also, that every scratch mark is handpainted! I know this was a hell of a work, but I really think it's worth it. Oh btw here's a closer shot:

2013122113552170f86swilh.jpg


Finished the chestplate as well. Used the same technique as on the helmet. Again handpainted scratchmarks. The shoulderpiece on the right still needs some work though xD

20131223134812ni2z4ok7ld.jpg


That's it for today :) Let me know what you think.

Oh and a merry christmas everybody!
 

Attachments

  • 20131221135512k0zpj9vxil.jpg
    20131221135512k0zpj9vxil.jpg
    2.6 MB · Views: 324
  • 2013122113552170f86swilh.jpg
    2013122113552170f86swilh.jpg
    2.9 MB · Views: 340
  • 20131223134812ni2z4ok7ld.jpg
    20131223134812ni2z4ok7ld.jpg
    2.8 MB · Views: 341
what I think? I think that I love the color scheme you're using and the symbols...well...I like everything in your armor! Gooooood Job
 
Have you tried model putty to make plasma damage and cut marks and other damage. I brings detail to a whole new level. I wil be doing that to mine since I love heavy weapons. Yes I am a rocket whore.
 
what I think? I think that I love the color scheme you're using and the symbols...well...I like everything in your armor! Gooooood Job
Thanks alot for the kind words dude :D

Have you tried model putty to make plasma damage and cut marks and other damage. I brings detail to a whole new level. I wil be doing that to mine since I love heavy weapons. Yes I am a rocket whore.
This is a really interesting idea. Unfortunately i was out of budget this month. But i will definately try this on some of my future projects. Speaking of plasma damage, I really wantend to do some plasmasword scratch marks across my chestpiece but decided to do just some messed up decals instead, because I don't wanted the armor to look too battledamaged.

And now, finally, after a two-day-absence here is some serious progress for you guys :D

Finally padded my helmet, with some foam I had left over from an order. All I can say is, that the helmet now fits like glove. Even when I move my head rapidly, it doesn't even move a bit.

201312271310156cjiqk8oyz.jpg


Chestpiece is done als well. Added proper strapping and some buckles.
20131227131150lrpyxd3qit.jpg


201312271312070zh43cgjke.jpg


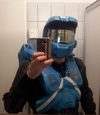
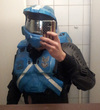
In addition to that, my undersuit arrived today. I really love how things finally come together and altough I'm not that selfie-type-of-guy, here are some shots for you. :)

20131223200746519z0eg38i.jpg


201312232009336k8vhqjwp4.jpg
 

Attachments

  • 201312271310156cjiqk8oyz.jpg
    201312271310156cjiqk8oyz.jpg
    2.8 MB · Views: 338
  • 20131227131150lrpyxd3qit.jpg
    20131227131150lrpyxd3qit.jpg
    2 MB · Views: 358
  • 201312271312070zh43cgjke.jpg
    201312271312070zh43cgjke.jpg
    1.8 MB · Views: 315
  • 20131223200746519z0eg38i.jpg
    20131223200746519z0eg38i.jpg
    530.9 KB · Views: 341
  • 201312232009336k8vhqjwp4.jpg
    201312232009336k8vhqjwp4.jpg
    434.8 KB · Views: 319
Status
Not open for further replies.
Back
Top