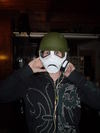
Fallout New Vegas, NCR Veteran Ranger Armor

Status
Not open for further replies.
Looking great dude! And you did exactly what I did for the battle damage on my NMPD vest too, lol! =P

Soldering iron rather than a propane pen torch, but the idea is the same, yes :)

I really like your work. You might have already addressed this so if I missed it please forgive me, are you doing the red LEDs in the eyes pieces like the picture in the start screen of new vegas?

EL Wire around the edges of the lenses. as well as red self adhesive tinting.
 
Yeah man....? Thaaaats what I did? And I didn't use a propane pen torch, it was a full sized propane torch. And that was just for the back plasma shot effect. The front was done with a soldering iron you silly goose! =P
 
Yeah man....? Thaaaats what I did? And I didn't use a propane pen torch, it was a full sized propane torch. And that was just for the back plasma shot effect. The front was done with a soldering iron you silly goose! =P

i misread your earlier posts in the foam armor thread then, my bad, i thought you had just used a pen sized propane torch.
 
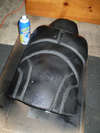
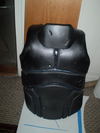
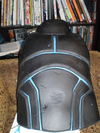
Firstly, as much as i liked the burn marks and blackening of the foam with the soldering iron, i am not content to leave the armor a simple grey with a few scratch marks.
it needs to look dirty and have a somewhat paintchippy look to areas.

i cannot speak more highly for this spraypaint however, in the shot you can see it, Plastidip,
works a charm on foam, and holds paint to it perfectly, a great primer
PA070617.jpg

PA070618.jpg


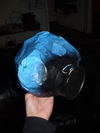
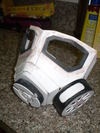
after i've gotten the front amp sorted, i needed to make the filter canister, and was at a total loss for how to do it until i routed through some of my junk box, i found something almost perfect!
it was a cheap dollar store purchase at a japanese market, i bought a couple of them for things like a potential stick grenade prop, or other such ideas.
PA070619.jpg

cut it in half
PA070620.jpg

and the bottom now slides inside the top.
PA070623.jpg


for the more observant of you,
http://www.existentialgamer.com/blog/wp-content/uploads/2010/10/fallout-new-vegas.jpg
this detail shot shows an interesting detail that looks like a series of thin discs held inside the canister.
so i'm going to have to try to replicate that.
PA080624.jpg


hey, the hole only shows about a quarter of the possible inside of the canister.. why not cheat?
work smart, not hard!
so i saved my fingers some pain and divided each disc i cut into four.
PA080625.jpg

i think it works.
PA080626.jpg


now, back to the armor,
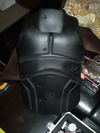
i want to keep the channels between the plates black, so i'm using some blue painters tape.

PA080627.jpg

hard to tell but i've given it a coat of gunmetal as my "raw" armor color, i'll be painting the grey over this in select places to give it an extra weathered look.
PA080628.jpg


i also think the plastidip is a great stuff to try with the canister, so i'm giving it a coat of it before i give it some regular primer, we shall see how it goes.
PA080629.jpg
 

Attachments

  • PA070617.jpg
    PA070617.jpg
    112.4 KB · Views: 262
  • PA080625.jpg
    PA080625.jpg
    21.8 KB · Views: 262
  • PA080624.jpg
    PA080624.jpg
    30.4 KB · Views: 256
  • PA070623.jpg
    PA070623.jpg
    83.8 KB · Views: 242
  • PA070620.jpg
    PA070620.jpg
    74.2 KB · Views: 264
  • PA070619.jpg
    PA070619.jpg
    56 KB · Views: 253
  • PA070618.jpg
    PA070618.jpg
    78.4 KB · Views: 264
  • PA080629.jpg
    PA080629.jpg
    45 KB · Views: 238
  • PA080628.jpg
    PA080628.jpg
    73.9 KB · Views: 249
  • PA080627.jpg
    PA080627.jpg
    126.4 KB · Views: 267
  • PA080626.jpg
    PA080626.jpg
    51.8 KB · Views: 243
guns? i'm thinking a cavalry colt single action.
that and a flag pole with the NCR flag attached.

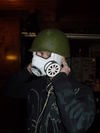
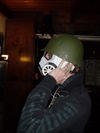
So after my dremel tool exploded in my hands, and burnt it'self out (as well as my hand) i decided to give up on the steel helmet route.
at this time of frustration, a friend suggested i use the fiberglass helmet liners they used.
i've got to say, they work very very well for the design, much closer to the head, and i can much easier add a camera box.
though i'm not sure how to add a dent to them, i'm honestly considering cutting a hole and filling it with bondo to leave it the impression of a dent.


PA090606.jpg

PA090607.jpg


PA090608.jpg


speaking of bondo, i needed to fill a few areas.
PA090610.jpg

now i just need a few tubes and cables, add abit of damage, add the camera on one side, and the ear 'pod' on the other side.
then i'll just fiberglass the inside, lenses, tinting.. holy crap i have alot to do
 

Attachments

  • PA090607.jpg
    PA090607.jpg
    41.4 KB · Views: 264
  • PA090608.jpg
    PA090608.jpg
    40.2 KB · Views: 239
  • PA090610.jpg
    PA090610.jpg
    92.6 KB · Views: 240
  • PA090606.jpg
    PA090606.jpg
    50.3 KB · Views: 235
holy crap i have alot to do

That should be our motto

405th.com

"Holy crap... I have a lot to do!!"

I'm nearing the end of my pepping and looked at how much fiberglassing I have left not to mention molding and casting

I think your a genius in this build by the way, very skillful
 
you know there is a secret to making this stuff that works really good and looks great you know that garage floor paneling the foam well use a dremel tool on that to make your crevices and it looks amazing i would show a pic but do not have one right now
 
Oh and Btw the helmet is not a WWII helmet it is a brimless riot control helmet along with the armour the text on the left pec stands for either L.V.P.D or L.A.P.D riot
 
ive found a bandsaw tends to kick the pants off of a dremel handtool for working with the foam. :)

and yeah, the Rangers are part of the NCR and their HQ is in LA, so the riot armor is LAPD RIOT.
i've yet to find a riot helmet that looks like the NCR helm, so i went with this fiberglass helmet liner.

cfh935, i agree, it really should be our motto!
 
inspiring? well thank you, that's quite a compliment!
i'll be supplying an update soon.
ill be starting the coat very soon.
 
what will be used for the coat in my oppinion the coat is what brings every thing together on this build
 
Status
Not open for further replies.
Back
Top