Mark IV - Lookin' Good is What It's Best For

March 31st, 10 days until C2E2:

Still haven't put any work into the soft parts, though I did bring the padded shirt down from my spare bedroom that I store all my cosplay stuff in so that when I get a chance, I can experiment with sewing some buckles to the shoulders.

Carbine:
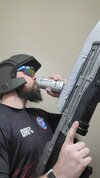
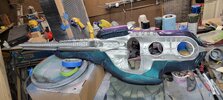
For Con Crunching, the Carbine can be considered to be done. The color shift rattle can that I used ran a bit more than I would like, so if I have some free time I will lightly sand those areas and hit them with another coat, but if I don't get around to it I'm not too worried. I'd love to get some neon green color added to the body somehow, but I think that might have to be a future project. I need to slap a couple of coats of clear coat on it, but that can wait until the week of the Con. Right now the ammo cannister and cover are held in with friction, I might super glue some velcro to them to make it less likely for stuff to wiggle apart while walking around the Con floor.

Pauldron:
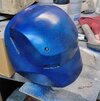
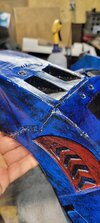
Got the chrome blue applied, clear coat, and some light weathering. For whatever reason, the acrylic wash didn't stick to this one nearly as well as the other pauldron so the weathering is much lighter, but I'm not too worried about it. The only thing needed for this piece now is to add padding and buckles for rigging.

Knives:
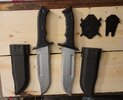
I bought some 1/4" aluminum rod to use as support for the knives, but it appears that the rod is ever so slightly too big, and trying to expand the hole in the PLA handle wasn't going well. I considered chucking the rod on my lathe and turning it down a few thou (I need to justify my lathe somehow), but opted instead to just 3D print some solid connecting rods. They won't hold up if I try hitting things with the knives, but will be plenty sufficient for holding them together. The sheathes are painted and ready to go. I need to paint the blades and apply plastidip to the handles, and then pick Y mounting locations. I'll probably have to suit up and figure out where I actually have enough mobility to reach, as well as where I can put them that won't interfere with my current mobility.

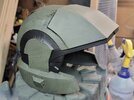
Helmet and torso armor fixes are the main priority for this week. At the very least I need to glue one of the ears back on the helmet, but getting the fan running again is also a highly desired goal. I would like to be able to leave the helmet on for as long as I want.
Torso armor fixes (chest buckle and shoulder strap) will be fairly easy fixes that I can knock out in an evening. Some hot staples for the shoulder straps and a Chicago screw for the chest buckles.

While I have the Chicago screws out, I'll probably also do something about the calf armor straps.

For C2E2, that's probably all that I have time for, since I still have work to do for my Jayce Talis and Judgement Paladin cosplays.

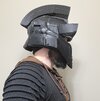
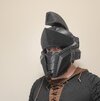
Also finished the Marine helmet for my friend. After C2E2, I might need to make my own, because I feel like it has a lot of potential for silly tiktoks.
 

Attachments

  • 20250329_161008.jpg
    20250329_161008.jpg
    1.1 MB · Views: 13
  • 20250328_011243.jpg
    20250328_011243.jpg
    842.2 KB · Views: 11
  • 20250328_011321.jpg
    20250328_011321.jpg
    1.1 MB · Views: 12
  • 20250328_012602.jpg
    20250328_012602.jpg
    2.6 MB · Views: 15
The finish on that carbine is beautiful! how did you do that?
I Second what zippy said above id love to know how you did that finish
It's actually just a straight rattle can job. The interior section is some kind of Rustoleum silver.

The outside (which I'm assuming you are more interested in) is the blue/purple "Color Shift" spray paint from Rustoleum that I picked up from Walmart.
Getting a black primer undercoat is critical to getting the blue/purple to show up, I had some of the silver showing when I taped the interior off, but it didn't show up at all in those areas. It was also really easy to have run, so definitely be very cautious with starting/ending off of the part.
1743477782323.png
 
It's actually just a straight rattle can job. The interior section is some kind of Rustoleum silver.

The outside (which I'm assuming you are more interested in) is the blue/purple "Color Shift" spray paint from Rustoleum that I picked up from Walmart.
Getting a black primer undercoat is critical to getting the blue/purple to show up, I had some of the silver showing when I taped the interior off, but it didn't show up at all in those areas. It was also really easy to have run, so definitely be very cautious with starting/ending off of the part.View attachment 359835
Thank you for the info
 
April 2nd: One Week of evenings remain until C2E2.

Back Armor:
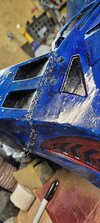
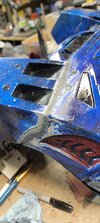
Dragged my back armor out to the shop and made some repairs. The crack was in a different spot than I remember but that actually made it easier to fix. I added a bunch of hot staples along the crack, welded the seam with my wood burner, and then did a basic sanding with a rasp and some 180 grit.
I didn't get photos of the paint touch-up, but I didn't put too much effort into it. It's on the back, and I'm notorious about not caring about anything I can't see. It got primer, then the silver basecoat, and then a generous amount of the blue chrome that matches the rest of the armor. I probably won't bother weathering the spots or even repainting the detail areas that should be black/red, since I would like to redo the back armor eventually anyway (to put in fans/electronics).

Carbine:
I don't have photos of it, but I made an attempt to fix the spots where the color shift ran. This was likely a mistake. I did a light sanding of each area and then sprayed black primer over it, but it looks like the primer doesn't like to sit on top of the color shift. I haven't checked to see how it looks after drying, but I might end up having to sand all the way down to the original primer layer.

Combat Knives:
I glued the handle to the guard and the connecting rod and then sprayed them with flexseal (which I have been mistakenly calling plastidip for months). I definitely should have separated the glue/paint tasks, as the gorilla glue I used foamed out and onto the flexseal, but it's not too terrible, and I could in theory just put another coat over the messed up spots.
I painted the blades with primer and a silver top coat, then glued everything together once that was dry. I need to hit them with a clear coat for protection (the sheathes are a tight fit, so scratches are guaranteed), but otherwise they're done.

Helmet:
I have the helmet sitting on my work bench to begin the task of correctly setting up the wiring of the fan and maybe adding LEDs. I used some crude push connectors for DragonCon which I will need to completely replace (ideally with soldered connections).

Side Project, C2E2 Edition:
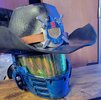
The theme for C2E2 this year is Western, and the specific group theme appears to be "flannels and helmets" for the Cosplay Afterparty (replacing the Prom of last year). In honor of my desire to always have too much work on my plate, I have decided to add a Cowboy Spartan cosplay.
Cowboy Spartan:
  • Cowboy boots: I already own a pair from a bull riding course I took a few years ago (I will definitely never be a rodeo star), and have no plans to modify them. I thought about making some fake spurs, but fear they will just get stepped on at the party and won't really be noticeable anyway.
  • Flannel: I am going to take one of my blue flannels (which matches my helmet) and embroider a large iron-on Spartan logo for the back. I need to justify my embroidery machine purchase, so this will help with that. I might also add a patch to the front, or maybe the shoulders, depending on time/how I feel.
  • Belt: I want to make a large belt buckle with some kind of Halo symbol on it. I'm currently thinking of using the Legendary difficulty symbol, though I was also thinking that the AI chip could be a good option as well since it already kind of looks like a real buckle.
  • Helmet: No changes to the helmet for this, but I am going to add...
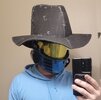
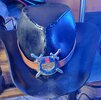
  • Cowboy Hat: I own several cowboy hats, but they would look tiny on my helmet. It also just feels like I'm stacking props, instead of wearing them. Instead, I have bought the cowboy hat foam pattern from Kamui Cosplay and scaled it up to 155% so that it will sit on my Mark IV helmet in such a way as to look like it is actually being worn. This is a pretty easy pattern but is also my most involved foamsmithing project to date. I bought the pattern on Etsy at like 1 am and had it all glued together by 3 am, so it was absolutely rushed and the quality reflects that. I only plan on wearing this for a couple of silly Tiktoks and this one event though, so I'm not too worried about it. I didn't take a photo of it last night, but I filled in some of the uglier seam gaps with wood filler and put down one coat of plastidip (actually plastidip this time) after doing some basic heat shaping. It looks more cowboy hat-shaped than the photo, though I still might add a wire to the brim to help hold the shape, depending on how it feels after being painted.
    • The hat will be painted black.
    • I will add a hat band made with a leather strap and then probably another Halo symbol of some kind for a front decoration. Currently probably going to go with whichever symbol I don't use for the belt buckle.
  • I've tossed around the idea of making a Sheriff badge that says Spartan. Doesn't quite feel fitting for a flannel though, so it's low priority.
The Cowboy Spartan will be low priority in general beyond the hat (which mostly just needs more plastidip and then paint). Main priorities for moving forward now are to get the Carbine to a satisfactory level, make the helmet wiring fixes, attach the knife sheathes to the armor, rig the new shoulder piece, fix the chest armor, and hopefully rig the shoulders to the undersuit.
 

Attachments

  • 20250402_021114.jpg
    20250402_021114.jpg
    790.1 KB · Views: 9
  • 20250401_031007.jpg
    20250401_031007.jpg
    740.5 KB · Views: 8
  • 20250331_234812.jpg
    20250331_234812.jpg
    1.4 MB · Views: 8
  • 20250401_000621.jpg
    20250401_000621.jpg
    1.2 MB · Views: 9
  • 20250331_233737.jpg
    20250331_233737.jpg
    1.2 MB · Views: 9
April 7th Update, 3 Evenings Remain.

At this point the crafting has moved into "make what I already have work", so I'm not going to print any more parts. This actually applies more to my Jayce Talis and Judgement Paladin builds than the Mark IV.

Cowboy Spartan:
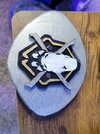
Since this was arguably the least important part of the Con Crunch, I obviously put the most effort into this and finished it up first. The hat is pretty rough (at one point I literally poured super glue along a seam to fix a popped contact cement connection, and the run off is pretty noticeable), but it's a meme item, so it doesn't need high quality. I decided to do the Helmet and Cross-Swords emblem for the hat, and the Legendary symbol for the belt buckle.
The buckle backing and the piece that the helmet emblem sticks to were both just basic ovals cut out of EVA foam, and then the hat piece had a leather strap wove through two slots that I cut out, while the belt buckle has a belt clip attached via Chicago screws, and the Legendary symbol is Chicago screwed to the foam back.
The embroidery turned out acceptably. I had a few issues during the stitching (mostly due to not hooping it tight enough) that caused a tear-out in one spot. The iron-on adhesive also didn't seem to like sticking at the very edges, so I might end up throwing on a whip stitch or maybe some strategic safety pins where needed to make sure it doesn't peel off while busting a move on the dance floor.
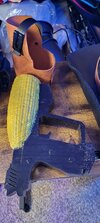
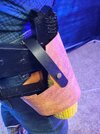
Since I am a member of the Midwest, I wanted to work in at least one corn reference. I found a corn on the cob model and a very basic Halo Magnum model and kit bashed them together in Meshmixer to create this whimsical love child of a prop. Did literally zero sanding/layer filling, just straight to filler primer and then a yellow top coat for the cob and black for the metal parts. Slapped together a very basic leather holster so that I don't have to hold on to it all the time.
Cowboy Spartan is 100% complete and ready to deploy to the rave dance floor.

Carbine:
I applied the color shift paint and let it dry, and it's not terrible. I still think the original paint job was probably better, but it's good enough for carrying around at C2E2. Still need to attach some velcro for the ammo cover, though in a pinch a glob of hot glue will be acceptable for this con.

Mark IV:
No progress on helmet, have not adjusted rigging.

Combat Knives:
Applied clear coat. I held the chest plate up against my chest and tested the feasibility of putting a sheath on my pauldron, I definitely don't have the mobility to actually grab it. I think I might do one on the left thigh and the other either on the chest (left pec) or mounted under the chest plate where the ab plate currently sits.

Side Quests:
At the very beginning of this thread I mentioned wanting to do an Achilles variant, and I finally decided to start slipping in the prints for at least the helmet when I had some down time, so I cut up the Infinite versions (purchased from STLSmith on Etsy) into 4 plates and started weaving them into my queue of other prints. Yesterday I met with some friends to do some crafting and used that time to weld the pieces together. I will be forcing myself to not do any more post processing until after C2E2 though.

To-Do List before C2E2 (next 3 evenings):
  • Rig new pauldron. Realistically I'm not making any undersuit changes in time, so I'll just tap in to the currently existing 1" buckle connection leftover from when I accidentally installed one on that side (happy little accidents).
  • Attach knife sheathes. Left thigh (for left hand grab) for sure. Will decide on chest/ab placement as a final task (ab piece would likely be wobbly, chest piece will potentially get in the way of things). I'd be fine with only having one knife.
  • I seem to be missing one of my gloves. Find or replace (they're just basic Mechanix gloves).
  • Find or replace neck wrap. No clue where this ran off to either. Probably in one of my other totes with other cosplays.
  • Helmet wiring. I found the LEDs that I would like to use. I will lay out a breadboard for the lights and fans tonight and see about installing them tomorrow. If this doesn't get done, I'm not worried about it.
  • Adjust rigging of calf armor. Should be an easy fix, I just need to scrounge up the extra clips (I seem to be running low). I also might see about cutting some EVA foam inserts to slip in front of my shins to create a more form-fitted fit.
  • Still need to fix the chest plate, but that will only take a few minutes as well. Mostly just deciding where to put the Chicago screws so that it doesn't look like I've given the MJOLNIR nipples with comically high placement.
Feeling pretty decent about the Mark IV. The armor is technically fine to go right now (with the exception of the one broken clip for the chest plate and the missing glove/neck wrap, though those are definitely *somewhere* in the house). I have a lot more that needs to be done for my Jayce Talis, as well as my Judgement Paladin.
 

Attachments

  • 20250406_233511.jpg
    20250406_233511.jpg
    778.6 KB · Views: 3
  • 20250406_233505.jpg
    20250406_233505.jpg
    709 KB · Views: 3
  • 20250405_004549.jpg
    20250405_004549.jpg
    1.5 MB · Views: 2
  • 20250405_004554.jpg
    20250405_004554.jpg
    1,003.3 KB · Views: 3
  • 20250405_004558.jpg
    20250405_004558.jpg
    1.3 MB · Views: 2
  • 20250405_004625.jpg
    20250405_004625.jpg
    1.3 MB · Views: 2
  • 20250405_004645.jpg
    20250405_004645.jpg
    1 MB · Views: 3
  • f38b7fc5be27ec08a495bab40bcdf8f2.mp4
    11.3 MB

Your message may be considered spam for the following reasons:

If you wish to reply despite these issues, check the box below before replying.
Be aware that malicious compliance may result in more severe penalties.
Back
Top