1st Build MJOLNIR Mark V [B] Custom

Ya boi got shoulder.

Continuing from my last post, I drilled an exactly a couple of holes through the bicep into the mount I designed. Then I shoved some M5 heat set inserts into the mount and fastened using M5 socket cap screws and washers.
IMG_5180.jpegIMG_5181.jpegIMG_5182.jpeg

This works as a temporary solution so it can be removed for paint, but also as a way to clamp the two parts together for cement when it’s time to make it permanent.
IMG_5183.jpeg

Also cut up a temporary visor out of a spare PETG sheet and gold window film. It sort of works, and god forbid timing doesn’t work out it’ll serve its purpose, but I’m still married to vacuum forming my visor.
IMG_5196.jpeg
 
Been a while - progressing much slower than I'd like to, but I've been finding little pockets of time here and there. I've been spending most of my time just sanding and sanding and sanding to get everything ready for paint.

After my last full test fit I decided to reprint the boots in TPU. I modeled a sole into the boots themselves so they print as one piece. These are much more comfortable and easy to walk in. They slip right over my shoes and stay on quite well. The lace and heal guards are printed in PLA.
dehancer 2024-08-09 165224 UTC.JPG

I decided to start reprinting some pieces for increased strength. First up was the thighs, which I felt were too thin and had too much give for my taste. It also just happens to be the part of the suit that gets the most stress, oddly enough. I doubled up on the wall count so there are no voids in the shell at all.
dehancer 2024-08-09 183154 UTC.JPG
I printed the thigh gaskets out of Sainsmart Matte TPU. Unfortunately I don't have a large enough printer with a direct drive extruder, so I had to print them in two pieces. I'm the process of sanding them smooth to remove my weld lines.
dehancer 2024-08-09 183209 UTC.JPG

I also got the knees done, which are attached using elastic webbing (glued on with E6000) and snaps on the back. This goes over a gel knee pad for comfort.
dehancer 2024-08-09 165253 UTC.JPG


dehancer 2024-08-09 165307 UTC.JPG

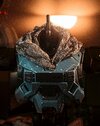
I had an unfortunate accident involving my chest piece. I dropped it while standing and it split along a seam and suffered a few more cracks around that area. It was one of the first pieces I'd printed before I'd really figured my desired settings out, so it was already weak to begin with. Also, you can see that the print quality isn't stellar, which is par for the course for my Kobra Max despite way too many hours of calibrating/repair.
dehancer 2024-08-09 190227 UTC.jpg
Instead of trying to fix a turd, I decided to simply reprint the entire thing on my new Ender 3v3 - doubled up the wall count, used gyroid infill. Even though I had to print it in more pieces due to the smaller build volume, the print quality was stellar and I really only had to fill in the weld seams.
dehancer 2024-08-09 185535 UTC.JPG

I just finished the ab wrap, which I also printed out of Sainsmart Matte TPU. My intention here is inspired by what pipninja and KitKatGoose did with their ab wraps (I'll link their write-ups below). I'm going cut it into its preexisting segments (I'll probably have to pad the inside surface for comfort), then reattach the pieces using elastic. The TPU on its own is somewhat flexible enough, but this will allow the wrap to really stretch and contort with me.
dehancer 2024-08-09 165236 UTC.JPG

I must admit, I'm losing confidence in my ability this done within the next couple of months, so some part of me does want to bite the bullet and not go for "perfect" and just go for "good enough to be happy with" - I want to be able to dress up with my kids for Halloween, which was my goal in the first place. I can always improve on it later.

Writeups:
Pipninja's Reach Spartan Undersuit
KitKatGoose's detailed-reach-armor-undersuit
 
Last edited:
That's exactly what I was thinking. I was going to do it in Fusion until I remembered I could just do it in the slicer. I used both the bicep and pauldron as negative volumes against a cube.

I'm going to bolt this on for now - put some heat set inserts in the spacer and use screws and washers through the bicep so I can take it off when it's ready for paint. Then when I'm ready to make it permanent I'll slap some two-part JB Weld in there.
What slicer are you using? Ive been trying to think of a way to do this for a while and I love this idea. Do you have any resources to point me in the right direction on how to do this method or could you potentially explain in further detail on how you did this? Im still new to 3d modeling software and will take all the help I can get. Also big thank you for explaining your webbing set up!

Edit for clarification: I see how you did the physical piece with the screws and the inserts more so asking about how to do the modeling of it.
 
We're always our hardest critics and perfection is the enemy of progress. I wasn't exactly thrilled with the details of my suit (I'm currently reprinting the helmet as i type this) but tons of people stopped me for pictures at the last convention I went to, and eventually I'll remake the entire thing. You've already made a lot of progress and your suit is looking awesome, I hope to see more soon!
 
Last edited:
What slicer are you using? Ive been trying to think of a way to do this for a while and I love this idea. Do you have any resources to point me in the right direction on how to do this method or could you potentially explain in further detail on how you did this? Im still new to 3d modeling software and will take all the help I can get. Also big thank you for explaining your webbing set up!

Edit for clarification: I see how you did the physical piece with the screws and the inserts more so asking about how to do the modeling of it.
I use Orcaslicer.

I Orcaslicer (and I believe PrusaSlicer as well - or really any fork of Slic3r) allows you to import an existing STL to use as a "Negative Volume" on another object. Negative Volumes subtract, or cut, the geometry of that STL from an existing body. It's a lot like creating a mold or cast, but it's all done in the slicer.
Screenshot 2024-08-19 at 5.57.01 AM.png


I positioned the bicep and shoulder armor the way I want and exported them together as a new STL file. Then I generated a cube in Orcaslicer and scaled it to the dimensions I want. I then imported the bicep/shoulder STL as a negative volume and positioned them over the cube.
Screenshot 2024-08-19 at 5.58.25 AM.png
This can be done in a dedicated 3D modeling software. I simply did it this way because it's relatively quick. However, this method has drawbacks, mainly that while you can see the negative volume you don't see the actual finished product until after slicing. The feature itself is also slightly buggy (from my experience) - when importing an existing STL I've found that it often starts out skewed in size and way off the print plate so I have to move it and scale it to its actual dimensions. Trying to make a negative volume from two different objects and get them positioned properly can be tricky this way.

We're always our hardest critics and perfection is the enemy of progress. I wasn't exactly thrilled with the details of my suit (I'm currently reprinting the helmet as i type this) but tons of people stopped me for pictures at the last convention I went to, and eventually I'll remake the entire thing. You've already make a lot of progress and your suit is looking awesome, I hope to see more soon!
Thank you. That's kind of where I'm at - I'm going to try to get as much of it done as possible, but even if it's not perfect I know we can still turn heads trick-or-treating. ;)
 
I use Orcaslicer.

I Orcaslicer (and I believe PrusaSlicer as well - or really any fork of Slic3r) allows you to import an existing STL to use as a "Negative Volume" on another object. Negative Volumes subtract, or cut, the geometry of that STL from an existing body. It's a lot like creating a mold or cast, but it's all done in the slicer.
View attachment 351364

I positioned the bicep and shoulder armor the way I want and exported them together as a new STL file. Then I generated a cube in Orcaslicer and scaled it to the dimensions I want. I then imported the bicep/shoulder STL as a negative volume and positioned them over the cube.
View attachment 351365
This can be done in a dedicated 3D modeling software. I simply did it this way because it's relatively quick. However, this method has drawbacks, mainly that while you can see the negative volume you don't see the actual finished product until after slicing. The feature itself is also slightly buggy (from my experience) - when importing an existing STL I've found that it often starts out skewed in size and way off the print plate so I have to move it and scale it to its actual dimensions. Trying to make a negative volume from two different objects and get them positioned properly can be tricky this way.


Thank you. That's kind of where I'm at - I'm going to try to get as much of it done as possible, but even if it's not perfect I know we can still turn heads trick-or-treating. ;)
That is a great write up! Thank you for taking the time to give me a starting point.
 
So I'm pivoting a little bit. I decided to abandon recreating Carter-A259 (for now - maybe someday), and decided to recreate my custom multiplayer SPARTAN instead. It's not out of a loss of interest in the character - it's more that he's one of my favorites and I'd like to tackle that level of accuracy when I have more experience. Going this route gives me a little freedom to play and have fun with it. There are really only a couple of changes to make, as I'm still using most of the same pieces. The biggest differences are the chest piece and the helmet.

image1.jpeg

I've already got a quick mockup of the Morrigan helmet from Titlewave Designs. I'm trying to find the sweet spot between a good fit and the right proportions. I started at 90%, which unfortunately ended up being just a hair too small. I was really pulling for this one because it's more faithful to the in-game proportions. I'm going to bump it up to 95% which will give me roughly 7mm on each side, which should do the trick.

image0.jpeg

Thankfully this doesn't really set me back timewise. Most of the armor shells have gotten their metallic coat and are ready to start taking some color.
 
Last edited:
Allready looking really good! Also you make really good pictures with your lightning and camera setting! Also your printing skilles are mad good. Im ecited to see the final result!
 
That's exactly what I was thinking. I was going to do it in Fusion until I remembered I could just do it in the slicer. I used both the bicep and pauldron as negative volumes against a cube.

I'm going to bolt this on for now - put some heat set inserts in the spacer and use screws and washers through the bicep so I can take it off when it's ready for paint. Then when I'm ready to make it permanent I'll slap some two-part JB Weld in there.
Hold on this is brilliant. Let me make sure I understand. So there is an imprint on each side of the cube matching the exterior of the shoulder and the interior of the pauldron. This creates a slot for each of the actual pieces to nestle into and create more area to glue/bolt. Super awesome I was wondering how I was going to do this!
 
Hold on this is brilliant. Let me make sure I understand. So there is an imprint on each side of the cube matching the exterior of the shoulder and the interior of the pauldron. This creates a slot for each of the actual pieces to nestle into and create more area to glue/bolt. Super awesome I was wondering how I was going to do this!
Exactly that. The increase in surface contact makes for a very secure hold and gets rid of any play between the two parts. I'm certain that dedicated modeling programs like Blender can accomplish the exact same thing (probably more intuitively), but I have no experience in that area. Fortunately Orcaslicer has a similar feature.

Allready looking really good! Also you make really good pictures with your lightning and camera setting! Also your printing skilles are mad good. Im ecited to see the final result!
Thank you! I'm a photographer/videographer in my spare time.
 
Small update - the Morrigan helmet is finished. Props to TitlewaveDesigns for such an easy print! I love the functional vents on the face mask - makes it easier to breathe and keep the inside of the helmet cool. On to sanding. At this point all pieces have gotten a metal coat and are ready to get masked off for weathering.

IMG_6456.jpeg

 
A couple more small updates.

In my absent-mindedness I completely forgot about printing a weapon. I opted for Galactic Armory's MA40. I've got everything but the magazine and flashlight printed up. Everything's held together with tape right now, but thanks to the model allowing for a 12" dowel for support it was easy to mock all the pieces up.
IMG_6565.jpg

The Morrigan helmet is all sanded/bondo'd and ready for a final coat of primer so I can catch it up to the rest of my pieces. I'm about ready to start masking for paint chips. In the meantime I decided to dress it up with a camo net like Jun-A266. I need to figure out a way to attach this - very likely magnets will be involved, though I want to fluff it up a little bit too so it helps the neckline flow a little better.

dehancer-1728300639186.jpg
 
Last edited:
Finally laying down some color with 17 days to go before my hard deadline.

I opted for Rustoleum Nantucket Blue for my primary. Secondary will be Charcoal Grey with some Matte Gold accents. I’m hoping this is close enough to the Wet Crow coating after I grunge it down with a dark wash. I’m not stressing about it, though - I rather like the shade I picked out.

I used Liquitex masking fluid to mask off some “paint chips” on the metallic layer - hard to see here, of course.

The TPU parts got their last coat of Herculiner. I wish I’d gotten better photos but it was a terribly windy day out and I had to move everything to the garage.

dehancer-1728860851428.jpeg
 
Looking good! I'm still printing mine, and I have A LOT of sanding left to do, but I am excited about painting. I think I'm going to go with Rust-Oleum Deep Teal but I'm worried it might be too dark after a black wash. I might need to do a deeper dark wash but sparse. When I saw ElvenArcane's white boots I got super inspired because I'm looking to do teal with a white secondary color so I hope my boots will look just like theirs.
 
Both halves of the torso have gotten their primary and secondary colors, plus paint chips using Liquitex masking fluid. There's still drybrushing and a dark wash to be done. I also need to touch up some minor bleeds here and there.

dehancer-1729005787057.jpg
04FABA07-7919-4BA2-8674-FF7CEFEDC792.jpg

The thighs and shin guards also got their primary and secondary, but the charcoal grey got a little runny so I have a some sanding to do.

I also started putting the ab wrap together using E6000 and stretch fabric. If I'd had more time I would have been more religious about sanding the TPU parts, but I'm making do for now. It's not pretty, but it will be functional.

IMG_6670.jpg

Looking good! I'm still printing mine, and I have A LOT of sanding left to do, but I am excited about painting. I think I'm going to go with Rust-Oleum Deep Teal but I'm worried it might be too dark after a black wash. I might need to do a deeper dark wash but sparse. When I saw ElvenArcane's white boots I got super inspired because I'm looking to do teal with a white secondary color so I hope my boots will look just like theirs.
If you've got a spare piece to test your wash, you could throw it on that to ease your worries. I have a feeling you might be able to thin it out enough so that the impact isn't as significant.

The sanding part does get tedious - which normally I'd find to be a calming activity but with October 30th being my hard deadline I'm a bit rushed. And it shows - the combination of learning as I go and not having a ton of free time to work on my suit my surface prep isn't up to my own standards, which I'm letting go of in favor of getting it good enough for Halloween. After that I'll have more time to redo and improve when I don't have so much pressure on me.
 

Attachments

  • dehancer-1729005776263.jpg
    dehancer-1729005776263.jpg
    4.3 MB · Views: 9
Got the thighs and shin guards painted with their primary and secondary colors. I did try to have a little fun with color separation on the thighs - the Wet Crow coating has them in a single color, which I felt looked a little bland so I threw a little Charcoal Grey in there.

dehancer-1729085765291.jpg
dehancer-1729085778283.jpg

You can see on the bottom of the shin guards where I was lax on my surface prep, so the layer lines are very visible. I'm hoping I can make them a little less obvious after weathering.

I really love how the TPU thigh gaskets turned out - the Herculiner coating makes them look like an entirely different material and the texturing is a nice contrast from the smoother surfaces on the armor.
 

Your message may be considered spam for the following reasons:

If you wish to reply despite these issues, check the box below before replying.
Be aware that malicious compliance may result in more severe penalties.
Back
Top