MrJamin's 3D Printed MK VI Master Chief

Status
Not open for further replies.
Time for some weathering! (it looks very plain without it)

Starting to get some weathering on the back. it is amazing how much a quick pass can make a difference.

IMG_20201113_141433.JPG
 
Worked a bit more on the weathering today and I feel pretty good with how it is looking.

IMG_20201117_130039.JPG

(note: this is before silver was applied to the back)

I also got some questions about the process:
  • Matte black base coat
  • Krylon Italian olive
  • Airbrush black wash into recesses / edges
  • Black wash whole back
  • More airbrushing with black, rust, and oiled earth (all Vallejo weathering paints - TurboCharizard's suggestion)
  • Edges and chipping with rub n buff
  • Hit the silver with a tiny bit of black / rust

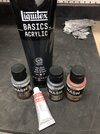
(Here are the paints)
IMG_20201117_212442.JPG


And after the silver was applied to the back:
IMG_20201117_224008.JPG

IMG_20201117_224029.JPG
IMG_20201117_224049.JPG
IMG_20201117_224104.JPG


And finally some pictures of the chest + back
IMG_20201117_224620.JPG
IMG_20201117_224701.JPG


Now time to finish up the inside of the back and then work on some clips to be able to attach the two pieces
 
Worked a bit more on the weathering today and I feel pretty good with how it is looking.

View attachment 299481
(note: this is before silver was applied to the back)

I also got some questions about the process:
  • Matte black base coat
  • Krylon Italian olive
  • Airbrush black wash into recesses / edges
  • Black wash whole back
  • More airbrushing with black, rust, and oiled earth (all Vallejo weathering paints - TurboCharizard's suggestion)
  • Edges and chipping with rub n buff
  • Hit the silver with a tiny bit of black / rust

(Here are the paints)
View attachment 299482


And after the silver was applied to the back:
View attachment 299483
View attachment 299484View attachment 299485View attachment 299486

And finally some pictures of the chest + back
View attachment 299487View attachment 299488

Now time to finish up the inside of the back and then work on some clips to be able to attach the two pieces
master chief would be proud to wear this armor, great job
 
I just realized how long it has been since I posted any updates here.

We are currently in the process of building a new house and getting our current one ready to sell. My time to work on this project (plus it getting cold and my workspace is in the garage) has meant that I have not been making any progress. This project will get across the finish line, just might not see much progress for a few months.
 
We are finally moved into our new house and starting to get settled in. My next project is to organize the garage and convert this area into my workshop.

Garage.jpg
Garage_2.png


Hoping to get this done soonish and get back to working on my suit!
 
Well.. since my last update my son decided to be born (~3 weeks early on 3/18) that delayed some of my other plans around the house and has meant that I have not been able to put any work into my suit.


However, I was able to make some progress last night!

I made a perilous trip (never went above 20 mph and had flashers on the whole way) home from Home Depot with some new goodies for my garage! (I really want to get it setup so that I can get back to work on some stuff)

Loaded Up.jpg

Yes - that is a giant box (~500 lbs.) in a tiny little trailer. I did know the dimensions before I went to pick it up and I knew it would fit. If you look closely you can see that the hatch on my car is tied shut since I have two large boxes in there too.

PapaBraus 100% approves of the strapping on that box :-D

Also thanks TurboCharizard for reminding me to obscure my license plate :-D

It took me a bit after I got home to take everything out of the box and get it into our garage. Now I just need to spend some time getting everything setup into my workspace!
Garage.jpg

(yes - my garage is an absolute disaster right now. We are still waiting on the builder to put in our yard so we can actually put things like the grill and patio furniture outside)
 
Just discovered this thread and your armor looks amazing!

I also used the Italian olive for my helmet.
 
Handplates are symmetrical however the biggest mistake I always see people make with this armor is they make them way to small.. in halo 3, the handplate pretty much covers the entire hand except for all the digits. They're pretty big, but if you mount them correctly to the glove, there are absolutely no movement restrictions at all. I dont even realize mine are on when wearing them.

View attachment 280366View attachment 280367View attachment 280368View attachment 280372
Hey! What and where did you get those gloves?
 
Hate to admit it, but it is taking me way way longer to get stuff setup around the new house that I ever anticipated. This means that I am still a bit away from actually getting to work back on my suit.

However, I did get some time over the long weekend to make some progress on getting my work space setup!

image0.jpg


I need to finish getting all of the cabinets bolted together, install the new lights on the ceiling, install the peg boards behind the work bench, and then finally organize the many boxes (right behind the camera in this picture)

I am not going to count my future additions to the work area in my list of things to do since they are more upgrades over what I had before. These include:
- Speakers
- Micro Computer
- Wall mounted monitor
- Shelves / Storage above the cabinets

Hopefully I can make some more good progress on this project this week. I am currently not able to get my car in the garage until I clean some of my stuff up.
 
Looks fantastic!

I can't wait to finish my workshop. It's supposed to have a full vented paint booth for working with paint, bondo, etc.

After seeing yours it make me want to finish mine even more.
 
Coming along nicely! Bet it'll feel fantastic when you've got your workshop all set up and get back to working on your suit.
 
Ok - so long (emphasis on long) overdue update
1640638291552.png


Life happens and sometimes hobbies + projects have to take a back seat. Two kids are way more work than one and to add to it - I decided to train for and run my first marathon this fall. (Official time of 3:56:37!)
IMG_20211003_162219.JPG


I've also been working on other projects!

Some you may have seen:
1640638616484.png
IMG_20211227_145232.JPG

(yes... the workshop area is a total mess)

And others that will be seen when the time is right... (and no you can't see them in the workshop image)
Secret Project(s) :p

To really top it off a new game finally was released and I personally have been really enjoying it.
1640638754823.png


However, I wanted to circle back and give a general update on this project.

Here is the current state:
IMG_20211227_144705.JPG


Now onto the fun part. Where do we go from here?

Well one of the many awesome things about the 405th is how everyone shares knowledge and helps us along the way. When I worked on the colorshift helmet I tried something new (with plenty of guidance) and coated the inside of the helmet with fiberglass + resin. Holy heck is this amazing and it has made me want to do the same for this armor. My plan is to get this done ideally in the next few weeks (and yes even the pieces that have been painted + weathered (though these will take more time to be cautious as I do it)

On top of the glassing I need to fix some damage to the front of the chest.
IMG_20211227_144622.JPG

Something caused this piece to warp (and not the rest of the chest) enough for it to break free from the glue. Thanks to MoeSizzlac I have an updated file for this piece and I am going to start by printing a new one.

After this is done I am going to channel my inner TurboCharizard and summon the sanding goblin to really get some work done on these pieces. (Since I've taken a break on these I've experimented and learned even more cool ways to prepare 3D prints for paint)

My ideal goal is to have all of the pieces fiber glassed + lots of sanding done by spring time. Given that my workshop is in the garage and not heated it can make things hard to do in the winter.

I also desperately need to make a duct tape dummy of myself so that work on the under suit + harness can begin. (Sorry Ashuraa)

Once spring hits It will allow me to go into full paint mode. I no longer plan to try to knock pieces out one at a time (like I did before) but ideally keep all of the remaining pieces at the same state.

Once everything is painted that will allow me to work on strapping + attaching with an end goal of wearing the suit for...
1640639447686.png
 
Status
Not open for further replies.
Back
Top