New member, start of a build

Personally... i don't know that I'd bother condensing. I'm a fan of printing in "one at a time" mode anyway. "Object Order" to this slicer.
Complete one part fully then the next. Much cleaner parts most of the time. Having 10 parts to a plate and all that travel doesn't reduce overall job time.
 
Personally... i don't know that I'd bother condensing. I'm a fan of printing in "one at a time" mode anyway. "Object Order" to this slicer.
Complete one part fully then the next. Much cleaner parts most of the time. Having 10 parts to a plate and all that travel doesn't reduce overall job time.
That's fair. I was kinda looking at it and was thinking it's gonna get pretty unorganized real quick if I try to do that.
 
it's gonna get pretty unorganized real quick
Totally. I opened a feature request ticket with Orcaslicer hoping to get the ability to re-order plates.
There's a pull request from a develop who added a "move to front" ability that at least would let you move the current working plate to the first slot - it has not yet been merged however. But it would be a start on tracking what plate to do next, at least.

Should I print the whole knee assembly in TPU or just the kneecap itself?
Mine are all solid just because I like armor to be armor and I find it easier to sand and paint. There was enough room to wear a foam construction kneecap inside which both helps hold the part from rotating and provides a cushion when you take a knee. That's me. Next person might have a different plan that is more right for them.
1723765882496.png
 
Totally. I opened a feature request ticket with Orcaslicer hoping to get the ability to re-order plates.
There's a pull request from a develop who added a "move to front" ability that at least would let you move the current working plate to the first slot - it has not yet been merged however. But it would be a start on tracking what plate to do next, at least.


Mine are all solid just because I like armor to be armor and I find it easier to sand and paint. There was enough room to wear a foam construction kneecap inside which both helps hold the part from rotating and provides a cushion when you take a knee. That's me. Next person might have a different plan that is more right for them.View attachment 351208
Yeah, I wasn't sure how easy TPU would be to sand and paint... I would prefer to not use TPU, but I'll see when I get there.
 
Update time! Taking inventory of armor parts and setting up what I still need to print. (Edit: Not all the parts are pictured here...and I forgot about the boot armor, so that still needs printed, but still...)

As of this time, the armor is completely printed! Onto the backpack!
20240905_171838.jpg20240905_171858.jpg
While that is ongoing, I have begun the sanding process. And even though I told myself not to, I started with one of the most expensive parts, the buck. As you can see, I got a little to aggressive with it, and will probably need to add a little filler to it. I did figure out a good system for the other parts. I did 2 passes of 100, 240, and 600 grains and it came out pretty smooth using my random orbital. Will go back in with a mouse sander to try and hit the details. Anything too small for the mouse will get hand sanded, but that's gonna wait until the end.

20240907_171639.jpg20240907_173115.jpg20240907_190842.jpg20240907_193123.jpg
 
Haven't posted an update in...over a month?? Oops...

TORG is nearly upon us, and I still have a LOT to do. My main goal is to finish my armor. Might not have time for my SMG, and certainly not enough for the backpack, but we'll see...

That said, who's ready for a photo montage??

First up, gluing the larger parts together. (Not all are pictured, but they're included.)
20240919_182552.jpg


Glued up and eventually plastic welded (that process also isn't pictured...)
20240922_010528.jpg


But here's an example of it on the chest and thigh pieces.
20240928_134108.jpg
20240928_134121.jpg


Sanding down the glue and some smaller parts.
20241002_194755.jpg


Had a buddy print out some clear resin pieces. I see the red dot for the SMG...but wait..what's that other piece? Guess we'll see sometime down the road?
20241007_090746.jpg


Test fit didn't fit. Will need to wet sand a bit and try and make it fit.
20241008_205245.jpg


My sanded bin is getting larger than my to-be-sanded bin! Some still need the small details sanded, which I have since acquired the tools for.
20241008_203734.jpg


And would you look at that? It's prime time to prime! (Sorrynotsorry) Hit it with Rustoleum's 2-in-1 filler primer. Need to wet sand and they'll be ready for paint!
20241010_183616.jpg


Think I'm gonna go with a green. Seems I haven't taken a picture of it yet, so that'll be a part of my next update. Stay tuned!
 

Attachments

  • 20241010_183616.jpg
    20241010_183616.jpg
    2.1 MB · Views: 43
  • 20240919_182552.jpg
    20240919_182552.jpg
    1.7 MB · Views: 36
  • 20240922_010528.jpg
    20240922_010528.jpg
    1.2 MB · Views: 33
  • 20240928_134108.jpg
    20240928_134108.jpg
    2.5 MB · Views: 36
  • 20240928_134121.jpg
    20240928_134121.jpg
    1.1 MB · Views: 33
  • 20241002_194755.jpg
    20241002_194755.jpg
    1.9 MB · Views: 32
  • 20241007_090746.jpg
    20241007_090746.jpg
    5.5 MB · Views: 39
  • 20241008_203734.jpg
    20241008_203734.jpg
    911.4 KB · Views: 35
  • 20241008_205245.jpg
    20241008_205245.jpg
    1,014.2 KB · Views: 36
Looking great! Here's to seeing it at TORG.
 
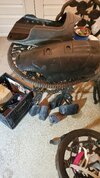
It's been a minute since my suit has made its appearance at TORG, and I should've updated since then... Ope, well, here we are. Anyways, finished the paint. And strapped everything up. The shins aren't great, but I'm hoping to fix that this week...before C2E2.

Also, I'm gonna upgrade my ¾" straps to 1" straps to hopefully give it better support, and use higher quality hardware. And I think I'm gonna remake the visor, but that's of a lower priority, as my current visor works.

Without further ado, the pictures:

Here's an example of what I used for my base coat:

20241012_233018.jpg20241013_163328.jpg

The other spray paints I used:
20241117_112724.jpg
20241026_104934.jpg


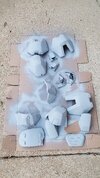
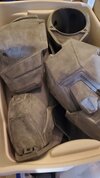
Now it's all weathered. I used just a simple black acrylic to weather it.
20241030_170913.jpg


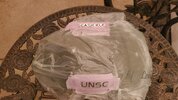
Sadly, the weathering made it incredibly difficult to see my name and the UNSC tag.
20241030_170922.jpg


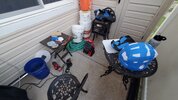
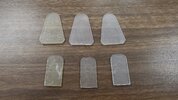
Now onto the visor! My delve into this hobby was to encourage me to gain new skills and try new things. With that in mind, I decided to make my own vacuum former, and I think it turned out alright. I used a toaster oven to heat the PETG, and found out that I wasn't paying enough attention to what I purchased, as it wasn't pure PETG, so it's melting point was much lower. That lead to some issues when dyeing the visor.

While vacuuforming, I used some tape on the bottom of the buck to to hold it in place.
20241029_153123.jpg
20241030_222703.jpg

(Yes, those are 2x4s used to keep the PETG sheet up. And no, it hasn't caught fire.)

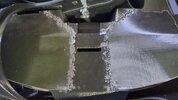
Can't see it too well, but got a few good pulls out of it.
20241030_232054.jpg


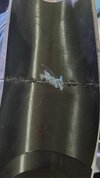
And this is what happens when it's not pure PETG and you try to dye it...
20241031_005049.jpg


I was able to salvage one of them well enough to make it work. I haven't sprayed it with the alclad, or whatever it is called. I forget, by now. But it's not super see through if the light isn't on the visor, and that's good enough.
20241104_223235.jpg
20241104_223245.jpg


So that's everything I had together by the first day of TORG. I may have stayed up until like 7am the day of to finish the strapping, but hey, that's cosplay for ya. Thanks to those who helped before they had to bed. I don't remember who all was there... I recall it was in Skidmorpheus's room, and I remember HoundsOfMeath being there. So thanks to those two, and everyone else who helped!
 

Attachments

  • 20241029_220231.jpg
    20241029_220231.jpg
    1.4 MB · Views: 5
Now that you're caught up to what I had ready for TORG, time to show you the backpack!
20241112_183225.jpg

Masking off the important bits.
20241117_130344.jpg

Painted up and ready for weathering. Not exactly the same paint layout as in-game, but that's OK.

20241117_135116.jpg


20241130_013020.jpg


Now that it's weathered, we need to finish my waist down.

20241126_204217.jpg


Which I apparently didn't take pictures of...
So here's a fun gif of the backpack... Just kidding. Turns out, I can't post gifs. Also, no videos, which is why I couldn't post me forming the visor. Also, the backpack isn't completely finished, but it is close enough at this point.

So here's the first picture of the full suit (ope, minus boot armor) together.
20241130_134721.jpg


I actually won a competition with this!
462562808_451596584647782_1098011241636734720_n.jpg


And here's one from a photoshoot Fallen and I did last winter.
DSC03709.jpg


And here I am, loading up to drop at the Celebrity Car Museum in Branson, MO.
20250315_194908.jpg
 
Hey everyone! I joined after talking to the members who were representing the 405th at the Kansas City Comic Con. I have not made anything prop or cosplay related before, but I've begun my own Great Journey towards making a suit of my own. Specifically, a set of Halo 3: ODST armor and armaments.

To start off my journey, I printed the Halo 3 ODST SMG from Galactic Armory. I haven't done much beyond print and test fitment. No sanding or anything yet. I just had to share because I was excited.

View attachment 348952

I still have to get the lens for the red dot. I'm not sure if I want to get the rest of the equipment I need to print it in resin (I only have a resin print, and no ventilation or wash/cure station.), or if I want to just order the part from someone/somewhere.

But that's where I am! Pretty excited to continue this journey as time is available. Will post updates when there are new things to update on.

It is a pleasure to be here and meet everyone!
that's so smooth what did you print it on?
 

Your message may be considered spam for the following reasons:

If you wish to reply despite these issues, check the box below before replying.
Be aware that malicious compliance may result in more severe penalties.
Back
Top