You are using an out of date browser. It may not display this or other websites correctly.
You should upgrade or use an alternative browser.
You should upgrade or use an alternative browser.
Foam My Halo Infinite Chief build!
- Thread starter Scarlet Impaler
- Start date
- Status
- Not open for further replies.
Scarlet Impaler
Member
Decided to save the Kwik Seal and foam clay work for the very last. Today I dremel'd the edges, and took care of rigging.


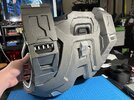
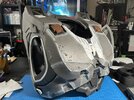
The very last circle detail on the hexagon piece will probably be the last thing on the back. I probably have to cut it up for the magnets.
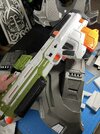
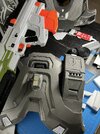
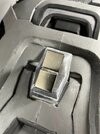
If I remove that plastic piece between the magnets, those two will definitely fit. This is my first time doing this, so is this a good spot? I can't seem to find another place where these big guys will fit. If it helps, I bought these (suggested in another thread): Amazon.com


The very last circle detail on the hexagon piece will probably be the last thing on the back. I probably have to cut it up for the magnets.


If I remove that plastic piece between the magnets, those two will definitely fit. This is my first time doing this, so is this a good spot? I can't seem to find another place where these big guys will fit. If it helps, I bought these (suggested in another thread): Amazon.com
Last edited:
JTF4
DJO and RCO
Division Staff
Southern Regiment
405th Regiment Officer
Community Staff
Stream Team
- Member DIN
- S054
Are you talking about the little charging handle? If so, then it’s up to you. I just flipped the gun around and have the piece facing out the back.If I remove that plastic piece, those two will definitely fit. This is my first time doing this, so is this a good spot? I can't seem to find another place where these big guys will fit.
I will say you might struggle to reach the AR if it’s in between the two packs. It’ll look more game accurate, but you might need someone to grab the gun off your back when you need it.
Nevertheless, I think that spot should work well.
Scarlet Impaler
Member
I meant the piece that's in between/separates the magnets. They came packaged with that piece, as they'd be impossible to pull apart.Are you talking about the little charging handle? If so, then it’s up to you. I just flipped the gun around and have the piece facing out the back.
I will say you might struggle to reach the AR if it’s in between the two packs. It’ll look more game accurate, but you might need someone to grab the gun off your back when you need it.
Nevertheless, I think that spot should work well.
But still, roger that.
JTF4
DJO and RCO
Division Staff
Southern Regiment
405th Regiment Officer
Community Staff
Stream Team
- Member DIN
- S054
Ahhhhhhhh.I meant the piece that's in between/separates the magnets. They came packaged with that piece, as they'd be impossible to pull apart.
But still, roger that.
I has the dumb.
That’s completely up to you. Removing it or keeping it, the magnets will have the same strength.
Scarlet Impaler
Member
Actually, what sort of glue should I be using to stick magnets to foam? Just stick with Loctite super glue or contact cement?Ahhhhhhhh.
I has the dumb.
That’s completely up to you. Removing it or keeping it, the magnets will have the same strength.
JTF4
DJO and RCO
Division Staff
Southern Regiment
405th Regiment Officer
Community Staff
Stream Team
- Member DIN
- S054
I think either option would work just fine.Actually, what sort of glue should I be using to stick magnets to foam? Just stick with Loctite super glue or contact cement?
But, I would like to summon foam man N8TEBB to make sure I’m right.
This actually looks unreal. Your foamwork before the filling was really good but after it’s just amazing. Can’t wait to see where this build goes!Decided to save the Kwik Seal and foam clay work for the very last. Today I dremel'd the edges, and took care of rigging. View attachment 338839
View attachment 338838
View attachment 338840View attachment 338841
The very last circle detail on the hexagon piece will probably be the last thing on the back. I probably have to cut it up for the magnets.
View attachment 338837View attachment 338836View attachment 338835
If I remove that plastic piece between the magnets, those two will definitely fit. This is my first time doing this, so is this a good spot? I can't seem to find another place where these big guys will fit. If it helps, I bought these (suggested in another thread): Amazon.com
- Member DIN
- S410
I has been summonedBut, I would like to summon foam man N8TEBB to make sure I’m right.
I actually have those exact same magnets as I originally planned to be able to mount an AR on my back as well. Unfortunately, I realize that the AR clips through the thrusters in the game so until I reprint the AR smaller, I wont have this feature. That is about where I was planning on putting mine though.
I would recommend covering the magnets with something, like a thin layer of foam. They will want to pull themselves out even if they're glued in there really good. If they're buried (even very shallow) I think that will be good. I don't have any recommendation for glue as I have not actually done my magnets yet... but I was planning on using E6000.
They say you will not be able to get those magnets apart if you remove the plastic piece... but I accidently let mine touch. Somehow they didn't shatter, and even crazier, I was able to separate them using only my hands and a piece of plywood. If you let them touch, make sure they touch softly.
Scarlet Impaler
Member
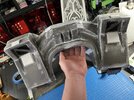
And progress from the past few days. Calling the back completely done!
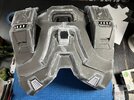
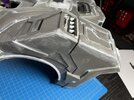
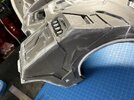
Not too happy with the top section here, but it really shouldn't be seen all that much.
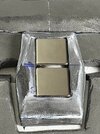
As for the magnets, I went with E6000 to adhere the magnets on the sides, then a contact cement the 'decorative cover' and will add another layer of eva foam on the bottom also with contact cement, just to be sure.
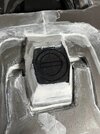
The design should be raised, but if I made it out of foam, it would be squished when a weapon is mounted, and if I 3d printed the detail, a weapon wouldn't sit flush. Probably over thinking it, though. (and no matter how I shaped that hexagonal piece, it kept leaning right...). These magnets are pretty strong, too. I actually had some trouble with the section, I tried dremeling, but magnets pulled the dremel's head and damaged it. Its why there is so much kwik seal there.
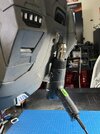
Between kwik seal applications, I began fixing up the helmet. I tried to fix the side vents as is, but eventually just cut them out and started over with foam. Also, used some kydex to cover up those weird ear holes. Along with sanding down the molding at the seam lines and filling it. Another thing I did was try to widen/deepen up groove lines that are supposed to be there, to define them more.
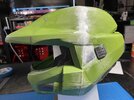
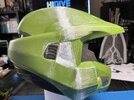
I know there's better stuff than kwik seal to fill these gaps, and probably take a few more applications, but its what I have on hand. But its looking a lot better than how it came.


Not too happy with the top section here, but it really shouldn't be seen all that much.

As for the magnets, I went with E6000 to adhere the magnets on the sides, then a contact cement the 'decorative cover' and will add another layer of eva foam on the bottom also with contact cement, just to be sure.


The design should be raised, but if I made it out of foam, it would be squished when a weapon is mounted, and if I 3d printed the detail, a weapon wouldn't sit flush. Probably over thinking it, though. (and no matter how I shaped that hexagonal piece, it kept leaning right...). These magnets are pretty strong, too. I actually had some trouble with the section, I tried dremeling, but magnets pulled the dremel's head and damaged it. Its why there is so much kwik seal there.

Between kwik seal applications, I began fixing up the helmet. I tried to fix the side vents as is, but eventually just cut them out and started over with foam. Also, used some kydex to cover up those weird ear holes. Along with sanding down the molding at the seam lines and filling it. Another thing I did was try to widen/deepen up groove lines that are supposed to be there, to define them more.


I know there's better stuff than kwik seal to fill these gaps, and probably take a few more applications, but its what I have on hand. But its looking a lot better than how it came.
Last edited:
- Member DIN
- S118
this build is going to make me try again on making a MC foam suit, great job so far cant wait to see it done and weathered going to be epicDecided to save the Kwik Seal and foam clay work for the very last. Today I dremel'd the edges, and took care of rigging. View attachment 338839
View attachment 338838
View attachment 338840View attachment 338841
The very last circle detail on the hexagon piece will probably be the last thing on the back. I probably have to cut it up for the magnets.
View attachment 338837View attachment 338836View attachment 338835
If I remove that plastic piece between the magnets, those two will definitely fit. This is my first time doing this, so is this a good spot? I can't seem to find another place where these big guys will fit. If it helps, I bought these (suggested in another thread): Amazon.com
Scarlet Impaler
Member
Back at it, started the shoulders today and got the pauldron parts done.


Levels, Jerry, levels! This scene popped in my head when I was making the center parts.
Anyway, happy how these turned out.
Levels, Jerry, levels! This scene popped in my head when I was making the center parts.
Anyway, happy how these turned out.
- Member DIN
- S118
your lines are clean on the build you are doing a great job looks to be a great build i will keep watching to see how this turns out
Scarlet Impaler
Member
Tonight's shoulder progress! About halfway with the bicep portion. Foam clay is about to come in clutch once again.


I also figured out the paint job and began painting!

The process is looking like:
PlastiDip
Black primer
Mask off black pieces
Silver primer
Liquid Mask off paint chips and dented areas
Rustoleum Eden
Tamiya Dark Green 2
Airbrush weathering (black, dirt colors)
Satin coat
Whew lad, that's a lot.
I also figured out the paint job and began painting!
The process is looking like:
PlastiDip
Black primer
Mask off black pieces
Silver primer
Liquid Mask off paint chips and dented areas
Rustoleum Eden
Tamiya Dark Green 2
Airbrush weathering (black, dirt colors)
Satin coat
Whew lad, that's a lot.
Looking amazing as usual! You airbrushing the Tamiya Paint or using the spray cans?Tonight's shoulder progress! About halfway with the bicep portion. Foam clay is about to come in clutch once again. View attachment 339064
View attachment 339063
I also figured out the paint job and began painting!
View attachment 339062
The process is looking like:
PlastiDip
Black primer
Mask off black pieces
Silver primer
Liquid Mask off paint chips and dented areas
Rustoleum Eden
Tamiya Dark Green 2
Airbrush weathering (black, dirt colors)
Satin coat
Whew lad, that's a lot.
Scarlet Impaler
Member
I'll be airbrushing it. To darken up the Eden spray can.Looking amazing as usual! You airbrushing the Tamiya Paint or using the spray cans?
Nice, I don’t know if you’ve airbrushed with Tamiya Paints before but Mr. Leveling thinner is just the best. Makes the paint go on so smoothly it’s amazing, but I can’t say I’ve used it on foam armor before, just model kits. Anyway, whatever you choose to thin it with I hope It turns out well!I'll be airbrushing it. To darken up the Eden spray can.
Scarlet Impaler
Member
I've been Tamiya nearly exclusively for airbrushing, haha. Their thinner has been working well for me, I'll look into that, is that the Mr. Color Leveling? And is it still 2:1?Nice, I don’t know if you’ve airbrushed with Tamiya Paints before but Mr. Leveling thinner is just the best. Makes the paint go on so smoothly it’s amazing, but I can’t say I’ve used it on foam armor before, just model kits. Anyway, whatever you choose to thin it with I hope It turns out well!
Oh yea Tamiya’s thinnner absolutely works XD! It’s called Mr. Color Leveling Thinner, I just find it works better for lighter colors like white and red, and I use a ratio of about 1:1. Just be warned it lengthens the drying time a little bit.I've been Tamiya nearly exclusively for airbrushing, haha. Their thinner has been working well for me, I'll look into that, is that the Mr. Color Leveling? And is it still 2:1?
- Status
- Not open for further replies.
Similar threads
- Replies
- 23
- Views
- 2,471
- Replies
- 3
- Views
- 1,196
- Replies
- 2
- Views
- 1,442
