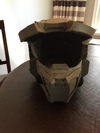
Jme's H3 MKVI Foam build

Status
Not open for further replies.
The funny thing is that I sharpen it all the time. The ragged pieces on the shins are where I had to take pieces off and re-attach them (the back of one of the shins for example, I had to remove a whole piece because the shin was just too wide).

If you find that you need to remove 2 pieces of foam from each other after you've glued them together use your cutting utensil and slice either right down the seam or just to the side of it then add or take away what you need. I've had the same issue before and that's how I take care of that. Great build so far. Looking forward to the completion. Keep it up.

Thanks!

Good ideas.


"I don't know what's weirder, that you're fighting a stuffed animal, or that you seem to be losing" - Suzie
 
88bd05a0262e3f2f1771c8a6c6a5293b.jpg


Right boot.


"I don't know what's weirder, that you're fighting a stuffed animal, or that you seem to be losing" - Suzie
 

Attachments

  • 88bd05a0262e3f2f1771c8a6c6a5293b.jpg
    88bd05a0262e3f2f1771c8a6c6a5293b.jpg
    534.5 KB · Views: 197
Great work! Everything looks pretty clean, and you seem to have it a lot of the details! Cant wait to see it dipped and painted. Defeinatly subbing

When I saw that visor hex pattern, I almost jumped off my bed and ran to print some off, but then realized that I only have an ink jet printer xD
However I had an epiffany (An idea for all non fancy-English versed peeps out there)

What if you could print on some of that clear 'paper' stuff used for slides, then sprayed over it a time or two with clear spraypaint?
I have had experience with the slide paper with some of my 4-H presentations, and know it works well, though it tends to scratch and be a tad bit tacky. a quick coat of clear spraypaint should fix that though.
This is for sure something I must try.

Fingers crossed, I might not need a laser printer! :3


Anyway, I look forward to the next update with anticipation. Good luck!
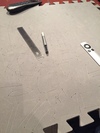
Thanks! Boots are in progress

The overhead slide transparencies were actually my first thought and then I found the document sheets (which are a bit thicker).

I think that your idea may work. I would do the hex pattern and tint in different layers. When I get my window tint I plan to make it the bottom layer, then the hex pattern, then the cut-out. I am thinking that the tint later should show through the other two layers given how thin the sheets are. Of course if I tint the hex layer and can still see the pattern through the tint, I will go with only two layers.


"I don't know what's weirder, that you're fighting a stuffed animal, or that you seem to be losing" - Suzie
 
Just wanted to stop by and say great foam work! I am also working on a project and love to see others working on ones as well, it helps motivate me. All of your pieces are looking really great so far! Are you planning on heat sealing or sealing with pva glue/water mix before the plasti-dip? Subscribing to this thread! :D
 
Just wanted to stop by and say great foam work! I am also working on a project and love to see others working on ones as well, it helps motivate me. All of your pieces are looking really great so far! Are you planning on heat sealing or sealing with pva glue/water mix before the plasti-dip? Subscribing to this thread! :D

Thanks!

My plan is to heat seal the foam with my heat gun (most of which has been done) then glue wash with PVA and then do a final coat with smooth cast.

Edit:

I may use Evakura's polyurethane method due to the cost of smooth cast ...

"I don't know what's weirder, that you're fighting a stuffed animal, or that you seem to be losing" - Suzie
 
Build looks great anxious to see it in paint!

Thanks, I am anxious to get to the paint!


"I don't know what's weirder, that you're fighting a stuffed animal, or that you seem to be losing" - Suzie
 
Visor material update!

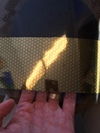
My window tint finally arrived from Shanghai (it sat at Canada post for over a month). I decided to do a quick test piece with the hex pattern to see how it looked.

I used the end piece that was taped up from the window tint and printed off the hex pattern to the binder cover as before.

After removing the backing from the tint I discovered that it was to be applied to the inside of the plastic (good news for the hex pattern). Some soapy water and a credit card to squeegee out the excess and the tint was applied.

I am happy to say I may have hit a homerun on the cost-effective hex pattern visor. See for yourselves.

This is sitting on an overturned hat that has a black interior. The mirroring will work best without light behind the visor so I will paint the inside of my helmet black.

If I can't see my fingers through it...,

1edfa81bda4e5f4ffe995715728d8d1a.jpg


"I don't know what's weirder, that you're fighting a stuffed animal, or that you seem to be losing" - Suzie
 

Attachments

  • 1edfa81bda4e5f4ffe995715728d8d1a.jpg
    1edfa81bda4e5f4ffe995715728d8d1a.jpg
    457.2 KB · Views: 187
That looks killer!!!!! what size hex are they? You are correct, you can't see your fingers but you do see the phone reflection and something on the ceiling......
 
Your build is really solid, you have done a really good job with this! I'm in the process of helping my dad finish out the last of my suit before our convention.

We started from the feet up, so I find it interesting that you started with the forearms, any particular reason for this?
 
If you don't mind my asking, does your window tint paint make the visor foggy? Our mirror paint does and was wondering if that was just a brand of spray paint problem or normal. :p
 
Absolutely love the hidden thigh pocket for your phone, that is super clever! Can't wait to see it all done
 
That looks killer!!!!! what size hex are they? You are correct, you can't see your fingers but you do see the phone reflection and something on the ceiling......

Thanks!

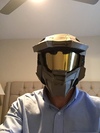
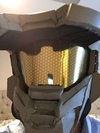
The individual hexes are 5mm across. I am thinking that when I do my good visor I will take lots of pictures and post a tut with the hex file included.

In the meantime, here it is in the helmet ( I really need to clean up that helmet)

84a2f14f6bb05bed307a62c33356c774.jpg


fe57273778d3cde124faa3ee18a0c712.jpg


"I don't know what's weirder, that you're fighting a stuffed animal, or that you seem to be losing" - Suzie
 

Attachments

  • 84a2f14f6bb05bed307a62c33356c774.jpg
    84a2f14f6bb05bed307a62c33356c774.jpg
    272 KB · Views: 188
  • fe57273778d3cde124faa3ee18a0c712.jpg
    fe57273778d3cde124faa3ee18a0c712.jpg
    302.3 KB · Views: 201
Your build is really solid, you have done a really good job with this! I'm in the process of helping my dad finish out the last of my suit before our convention.

We started from the feet up, so I find it interesting that you started with the forearms, any particular reason for this?

Thank you.

When i was doing my research someone had mentioned that the thighs were very difficult to do. So I decided to start with the firearms and then move up the arms and then down the torso.


"I don't know what's weirder, that you're fighting a stuffed animal, or that you seem to be losing" - Suzie
 
If you don't mind my asking, does your window tint paint make the visor foggy? Our mirror paint does and was wondering if that was just a brand of spray paint problem or normal. :p

I won't really know until I finish the helmet completely but I am planning on installing fans just in case.

Edit

It isn't a paint though. It is a tinted film.


"I don't know what's weirder, that you're fighting a stuffed animal, or that you seem to be losing" - Suzie
 
Absolutely love the hidden thigh pocket for your phone, that is super clever! Can't wait to see it all done

Thank you!


"I don't know what's weirder, that you're fighting a stuffed animal, or that you seem to be losing" - Suzie
 
Small update.

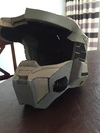
I wasn't happy with the bottom half of my helmet, so I remade it.

dd9709a2fd5a72fdc9db3395f5b3b541.jpg

3d54697348b8a5c10bd613e67941ade3.jpg


Also, there may be a problem with the inexpensive visor. It doesn't provide enough support to the front of the helmet to help keep the shape. Now, I am planning to seal and harden with PVA and Smooth Cast, so it may obtain enough structural support for the visor to work

We'll have to wait and see.


"I don't know what's weirder, that you're fighting a stuffed animal, or that you seem to be losing" - Suzie
 

Attachments

  • dd9709a2fd5a72fdc9db3395f5b3b541.jpg
    dd9709a2fd5a72fdc9db3395f5b3b541.jpg
    471 KB · Views: 210
  • 3d54697348b8a5c10bd613e67941ade3.jpg
    3d54697348b8a5c10bd613e67941ade3.jpg
    432.2 KB · Views: 210
Boots are done (final foam construction)!

bd5cc41ed3ba5f514759e2e9e0fd87e6.jpg

b0d48cae01f08f9b2d29ba3b2481cc1a.jpg

1714420dbd67c58005dc1f53026536dc.jpg

29d5b9778e633dcc8b8d4d24e61bacd0.jpg


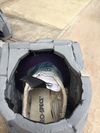
I used expanding foam to fill in the toes and an old pair of Tae Kwon Do shoes inside glued to the interior.

3f578c76be706020ced0ba2d09176e0c.jpg


I did some sanding of earlier pieces to remove ridges and am planning on doing some gap filling tonight.

Then PVA and Smooth Cast!

Although I am thinking of cutting out the windows for my lights now....


"I don't know what's weirder, that you're fighting a stuffed animal, or that you seem to be losing" - Suzie
 

Attachments

  • bd5cc41ed3ba5f514759e2e9e0fd87e6.jpg
    bd5cc41ed3ba5f514759e2e9e0fd87e6.jpg
    656.2 KB · Views: 197
  • b0d48cae01f08f9b2d29ba3b2481cc1a.jpg
    b0d48cae01f08f9b2d29ba3b2481cc1a.jpg
    634.8 KB · Views: 201
  • 29d5b9778e633dcc8b8d4d24e61bacd0.jpg
    29d5b9778e633dcc8b8d4d24e61bacd0.jpg
    673.6 KB · Views: 183
  • 1714420dbd67c58005dc1f53026536dc.jpg
    1714420dbd67c58005dc1f53026536dc.jpg
    592.9 KB · Views: 177
  • 3f578c76be706020ced0ba2d09176e0c.jpg
    3f578c76be706020ced0ba2d09176e0c.jpg
    517.3 KB · Views: 190
Status
Not open for further replies.
Back
Top